Why does not it work
A key is a part of an electrical circuit that makes and opens it. Switching on is forced, and switching off is under the influence of steam.
A bimetallic plate (thermostat) is built into the device; it turns off the device when the temperature reaches certain values. When exposed to high temperatures, it expands, and when it cools, it contracts. When using an electrical appliance repeatedly, the plate becomes deformed, which leads to breakdown.
In most cases, electric kettles are made of plastic. This material does not always withstand high temperatures. Melting near electrical contacts, it also leads to breakdown.
Important! The kettle can turn off spontaneously due to the absence or small amount of water in it.
Step-by-step: do-it-yourself electric kettle repair (video)
A kettle is an indispensable household appliance in every home, because how nice it is to wake up in the morning with a fragrant cup of coffee. And how it spoils the mood if suddenly our house helper, the electric kettle, suddenly stops heating the water, but thanks to the elementary design of the electric kettle, you can carry out the repair yourself and enjoy the taste of an invigorating drink without any problems. Do it yourself or contact the service – it’s up to you to decide.
Classically shaped teapots have a wide bottom. Electric boilers have a smaller bottom circumference. They require less space to place on the table, but they are taller. This was done so that the devices could hold more water. Despite the practicality of modern devices, kettle repair remains a popular service.
Most models of electric kettles today turn off on their own after the water boils. There are modifications with manual shutdown. Before first use, it is recommended to fill the product with water and bring it to a boil. It is also necessary to wash the kettle at least 2 times before use. If the products have not been used for a long time, you should do the same steps. Modern devices are made of heat-resistant plastic or stainless steel.
Before cleaning electrically powered devices, you must unplug them. If they are cold, wash the outer surface with a damp cloth. The use of abrasive substances is prohibited. Water is heated thanks to the presence of a special element inside the kettle. It is attached to the body. Fixation is achieved using:
- threaded bushing;
- metal nuts;
- screws holding the housing to a watertight seal.
Often such seals cause leaks. In the latest models on the market, the disc element is closed and located at the bottom of the water compartment. This is done to make cleaning surfaces simpler and easier. This measure also ensures better descaling. In various models, seals are made in the form of:
- gaskets;
- washers;
- bushings
As soon as the water boils, steam enters a tube or small hole, passing onto a disk or bimetallic plate. These components are designed in such a way that they bend when heated, thus turning off the kettle.
A safety device is provided in almost all models. It is responsible for turning off the device after the water boils. This element is triggered if someone turns it on without first pouring water. In addition, modern products are designed in such a way that the user can visually control the amount of liquid poured.
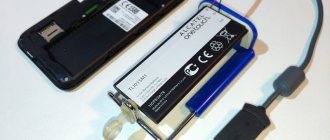
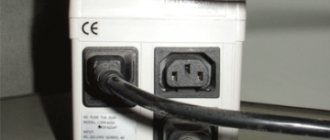
To connect to the power supply network, there is a cord or wire, the feature of which is flexibility. At one end there is a plug, and at the other there is a power connector block. It has sockets that provide contact. A coiled power cord is provided to save desk space. It is also good for families with small children, as it is less accessible to them.
This device has a base-stand on which the block and power connector are connected. Connection to the electrical network is carried out thanks to a cord that is connected to this very stand. Due to this design, it is possible to pick up the kettle without removing the plug from the socket.
There are modifications that are installed in a fixed position on the base. However, modern products can be placed facing any direction. The base also has a special compartment for storing excess cord. Cordless kettles contain:
It would seem that there is nothing simpler than filling a kettle with water. But if this process is not performed correctly, serious problems and even accidents can occur. Before pouring water, you must remove the plug from the power supply and disconnect the cord from the kettle.
Cordless models
removed from the base. Be sure to check whether the water covers the heating element. You need to pour at least one cup into the kettle. Underfilling can cause failure of individual components of the device. If there is a lot of liquid, it will turn off without bringing it to a boil. At the same time, boiling water will splash out.
A tight seal on the lid is very important. Without it, the automatic shutdown device will not work. If the kettle is equipped with a cord, wait until the water stops boiling, and only then remove the plug from the socket.
Before you start repairing electric kettles, it makes sense to check basic things. For example, you should make sure that the kettle is turned on and that the plug is firmly plugged into the socket. The power connector must also be well inserted. In a cordless kettle, you need to check whether it is positioned correctly on the base.
Disassembly of the device must be carried out according to the rules. The classic option is to remove the base cover, after which the mounting screws located at the bottom of the handle and in its upper area are removed. After this, remove the handle itself, the plastic rocker, and any parts that interfere with further manipulations. Lift the switch and inspect the metal plate for defects.
First of all, you need to inspect the filter. Modern devices contain mesh products for cleaning liquids from scale particles. These items can be replaced in a workshop. The filter should not be removed until the water in the kettle has cooled down. Normally, these products are removed from the surface easily and without much effort. When they become clogged with scale particles, you have to wash them with a nylon brush under running water.
If there are more serious deposits, you will have to soak the filter in descaling agent or plain vinegar overnight. Before use, you will have to wash it thoroughly with water. You will also need a new filter to replace the damaged one.
Some users notice that the water begins to boil more slowly than usual. This may be due to a thick layer of scale on the heating element. Gradually, it begins to overheat, which causes the protection switch to trip prematurely. To get rid of lime deposits, use an anti-scale agent that does not damage plastic.
For this procedure, fill the kettle halfway with water and bring to a boil. Turn it off and remove the plug from the socket. Add the amount of product indicated in the instructions to the water and leave until the bubbles on the surface disappear. This is usually enough to fix the problem. If deposits still remain, turn on the kettle and heat until the water hisses. It cannot be brought to a boil. Drain the liquid, add a new portion of water and boil. Drain again and rinse. If a lot of deposits have accumulated, you will have to re-treat.
The circuit breaker sometimes fails to operate when steam is not discharged properly. Normally it is directed to a bimetallic plate. It is responsible for the functions of the switch. This happens if the lid is not tightly closed. To fix the problem, simply turn off the device and let the water cool. After this, close the lid so that it fits tightly to the surface.
The situation when the steam outlet is blocked often occurs in older models of kettles. In this case, the steam is not directed through the corresponding hole or tube. In modern products, this area is larger in size, and therefore, to clog it, a larger amount of scale is required, detached from the heating element. To eliminate such a malfunction, clean the kettle from scale and carefully inspect the steam outlet.
When there is no automatic shutdown of the device
The switch is probably to blame. The bimetallic strip cannot activate it. This happens when the switch pusher gets stuck or the plate itself is damaged. Classic types of switches act as a component for fastening the heating element. Therefore, checking such products and replacing them becomes a real problem. Accordingly, in such cases you cannot do without the help of a specialist.
The switch on a jug teapot often plays the role of a separate part that is installed in the handle. Accordingly, you can inspect and check it by removing the casing. This can be tricky as they sometimes use screws with non-standard latches and heads. If inspecting an element is accompanied by difficulties, it is better to shift this task to a professional.
After removing the switch cover and handles, remove the rocker arm located on top of the switch. The upper and lower parts must be marked so that in the future it will be possible to correctly assemble the structure. It is likely that the mounting screws, as well as several parts, will also have to be dismantled. This is required to lift the switch.
Subsequently, the object is turned over and the disk along with the metal plate is examined. Check how smoothly the stroke of the pusher, which is responsible for controlling the switch, operates. If there is no mechanical damage, touch the contacts with the probes. This is how the ability to pass current is tested. This procedure can be performed if the wire is disconnected from at least one of the contacts. If the wires are soldered, you will have to head to the workshop.
This problem is also not uncommon. This is not surprising, since electric kettles operate for a long time and sometimes cannot withstand such voltage. Some part becomes loose, causing the device to malfunction.
To understand, you need to study the structure of the device. If you find a broken part, you must go to a specialized customer service center. Sometimes the water indicator breaks down. To determine the presence of such a malfunction, remove the cover that covers the switch. There is a plastic indicator here. It shows the presence of certain defects.
The appliance may leak due to a weakened heating element. Quite often it can be repaired by tightening the nuts and screws that act as fastenings for the classic heating element. If the leak is not eliminated in this way, you will have to go to a specialized center. It employs experts who are well versed in solving problems.
When the gasket is damaged, tightening the fastening elements alone is not enough. The gasket rarely causes water to leak in the kettle, but if this happens, you need to replace the damaged element with a new one. This is the only way to resolve this problem.
There could be several reasons for this. Probably, the plug with which the kettle cord is equipped is non-separable. You can try changing the fuse and see what results it gives. If all other devices powered by electricity stop working, you need to check the shield. It's worth checking to see if the fuse has blown. Sometimes this indicates that the RCD has tripped.
When the appliances have a faulty cord and a break, repairing electric kettles no longer makes sense. The easiest way is to go to a parts store and buy a new one. When the switch wears out badly, it practically cannot be fixed in the on position. In this case, you can change it in a workshop or buy a new device for heating water.
When the kettle works even after the water has boiled, the protection switch may be triggered. It is recommended to leave the kettle without adding water for at least 10 minutes. During this time, the protection switch should turn on on its own. Damage to the heating element results in the kettle not working, despite the measures taken. Sometimes it depends on the model. On some older modifications, after the protection is triggered, you have to turn it on yourself.
It cannot be said that an electric kettle is a “long-liver” among a variety of household electrical appliances. The average lifespan of an electric kettle is 2-3 years, after which various problems begin, primarily related to its button or thermostat.
These problems occur due to specific operating conditions, during which various parts of the electric kettle become very hot. This article will look at repairing the electric kettle button, as well as options for how to connect the kettle directly, bypassing it.
The material for making the body of the electric kettle button is plastic. By itself, this material can withstand high temperatures, but this turns out to be not enough. Therefore, repair of an electric kettle button is most often caused by melting of places near the metal contacts or serious damage due to deformation.
And if just such a disaster happens, and the electric kettle button melts around the edges or inside due to high temperature, then it can no longer be repaired. In this case, it is easier to buy a button for an electric kettle of a similar design, and then replace it yourself.
Replacing the electric kettle button looks like this:
1. First you need to remove the old button, which will require disassembling the part of the kettle where it is installed. As a rule, to do this, it is enough to unscrew the screw from the bottom of the handle, which consists of several connected parts.
2. Then you will need to disconnect the two contacts from the burnt button and unscrew the self-tapping screw that secures the button to the body of the electric kettle.
3. The new button for the kettle is installed and connected in the reverse order.
This is the easiest way to do it. Of course, it is only suitable if the new button is similar to the old one.
Otherwise, as in the pictures, you may need to replace the screw with a longer one or slightly enlarge the hole in the handle for a non-standard button.
If there is no spare button at all, then you can connect the kettle directly. In this case, you need to understand that it will no longer turn off automatically and you will have to monitor this process yourself.
So, before connecting the electric kettle directly, you should remove the old button by disconnecting the wires from it. To make the kettle work again, but without the button, you just need to connect these two wires together.
The easiest way to do this is through regular twisting, which is then insulated or protected with heat shrink tubing. In any case, the splice must be reliably protected.
With this, the issue is resolved, you can boil water without forgetting that the button is no longer there and you shouldn’t go far from the electrical appliance without first disconnecting its power cord from the network.
The electric kettle is very popular today. It can be found not only in the home kitchen, but also in offices and various production bases. The device allows you to boil water for coffee or tea in a short time. But any, even the most reliable and high-quality electric kettle can sooner or later fail. In this case, it is very important to correctly determine the cause of the breakdown, which led to the fact that the electric kettle does not turn on.
Electric kettle in the office
How to fix the button of an electric kettle with your own hands at home
Before you repair the button on an electric kettle, you need to find the cause of the breakdown. To do this, you need to unscrew the screw in the part where it is attached. Most often it is under the handle.
Disassembly is carried out carefully - all parts are fragile and cannot be restored:
- If the cause of the breakdown is deformation of the bimetallic plate, you need to return it to its previous shape with pliers.
- If the contacts are burnt out or covered with soot, they need to be cleaned. The wires are cleaned with sandpaper and checked for functionality with a tester.
- If the key itself has melted, it must be replaced. To do this, the contacts are disconnected from the old button and the screw is unscrewed, and then the new button is screwed in the same way.
The burnt-out part is replaced with a similar one in shape. If there are slight deviations in its size, a longer screw or enlarging the hole for it will help.
After all the manipulations, the electrical appliance is assembled, and the screw under the handle is screwed back in.
How to fix an electric kettle with your own hands: step-by-step instructions
Let's consider solutions to the following problems that are most often encountered in practice.
If it leaks
There are two possible reasons. One - mechanical damage to the housing occurred. The second is that the rubber gasket located between the body and the heating element has failed. In the first case, the kettle flask is repaired, if possible. In the second, the gasket is changed.
Sometimes, to eliminate a leak, it is enough to tighten the screws securing the spiral heater so that the rubber gasket seals. But if not, then the spiral is disconnected, the old gasket is removed and a new one is installed.
To replace, you need to disconnect the heating element
You should pay attention to the condition of the old gasket. If the reason for its failure is a thick layer of scale, then from now on it is necessary to clean the interior of the container more often from the formation of water stone. Otherwise, the new rubber band will face the same fate.
The most famous way to descale a kettle is citric acid. Add a packet of citric acid to half a liter of water and boil with the lid open. If necessary, the procedure can be repeated several times, alternating with pauses for the kettle to cool (about half an hour).
But there are other ways. Instead of citric acid, you can use vinegar (200 grams per 100 grams of water), as well as Coca-Cola and even potato peelings.
You should not get carried away with synthetic detergents. If even milligrams of these substances remain on the walls of the kettle, then once inside the body, they will cause harm to well-being and health in general.
In kettles with disk heaters, leaks are eliminated in a similar way.
If the kettle model is collapsible (which is not always the case), as a means of preventing leaks, you can clean the silicone gasket from water stone. Having disconnected the housing from the heater, you can remove the gasket and rinse it with ordinary clean water, and use a soft brush to remove fine sand, which, in fact, breaks the seal. It is also recommended to thoroughly clean the heater itself, as well as the inner surface of the kettle body. After this, the gasket is installed in its place and the device is assembled to its original state.
A clean and flexible gasket can last for a long time if you regularly monitor its condition and prevent fossils on the surface.
How to make an electric kettle directly without a power button
The cost of a new key or bimetallic plate may be too high in relation to the price of the electric kettle itself. In this case, you can do it by connecting directly without an enabling mechanism.
Important! The electric kettle will turn on when connected to an electrical outlet, and turn off when removing the plug from the outlet.
To connect directly you need:
- disassemble an electrical appliance;
- disconnect the contacts;
- connect and twist the ends of the wires together;
- secure the contacts to each other with insulating tape;
- Assemble the electric kettle, securing the handle with a screw.
Repairing a device to turn on an electrical appliance is a simple process. By following the instructions, you can extend the life of your favorite kettle and save money.
Recently, a kettle broke in our office. On the same day we bought a new one, because... There is nothing to do at work without a kettle
Nowadays, a kettle is not expensive, but, nevertheless, I want to tell you how you can bring an electric kettle to life without special knowledge and tools.
Unfortunately, I didn't take any photos because I didn't intend to write an article on this topic. In general, let's take a little break from design.
Our kettle was from BOSH. The company is good, but to disassemble such a kettle you need to sweat a lot. After 5 minutes of analysis, I realized that I needed to ask Yandex for help. Fortunately, I found a video on YouTube of the analysis of exactly such a kettle.
Somehow, but I almost took it apart, although it was only possible to unscrew the lower part where the heating element is installed.
To repair a kettle, like any other electrical appliance, you need to know its design.
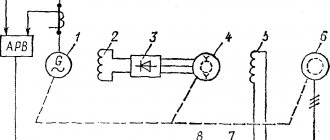
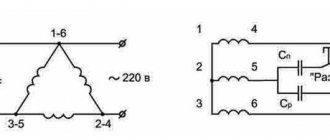
Electrical circuit of the kettle
The main elements of the kettle are: heating element, thermostat, button, signal lamp.
Always try to improvise. If you don’t know something, don’t be afraid. First of all, check all contact connections. Then you need to check the heating element.
If the heating element in your kettle burns out, then you can throw the kettle in the trash.
In my case, it was necessary to remove the bottom part of the kettle to get to the heating element. To find out the condition of the heating element we need a multimeter.
Electric kettle button repair
The material for making the body of the electric kettle button is plastic. By itself, this material can withstand high temperatures, but this turns out to be not enough. Therefore, repair of an electric kettle button is most often caused by melting of places near the metal contacts or serious damage due to deformation.
And if just such a disaster happens, and the electric kettle button melts around the edges or inside due to high temperature, then it can no longer be repaired. In this case, it is easier to buy a button for an electric kettle of a similar design, and then replace it yourself.
Replacing the electric kettle button looks like this:
1. First you need to remove the old button, which will require disassembling the part of the kettle where it is installed. As a rule, to do this, it is enough to unscrew the screw from the bottom of the handle, which consists of several connected parts.
2. Then you will need to disconnect the two contacts from the burnt button and unscrew the self-tapping screw that secures the button to the body of the electric kettle.
3. The new button for the kettle is installed and connected in the reverse order.
This is the easiest way to repair an electric kettle switch button. Of course, it is only suitable if the new button is similar to the old one.
Otherwise, as in the pictures, you may need to replace the screw with a longer one or slightly enlarge the hole in the handle for a non-standard button.
How to connect the kettle directly
If there is no spare button at all, then you can connect the kettle directly. In this case, you need to understand that it will no longer turn off automatically and you will have to monitor this process yourself.
So, before connecting the electric kettle directly, you should remove the old button by disconnecting the wires from it. To make the kettle work again, but without the button, you just need to connect these two wires together.
The easiest way to do this is through regular twisting, which is then insulated or protected with heat shrink tubing. In any case, the splice must be reliably protected.
With this, the question of how to repair an electric kettle has been resolved, you can boil water without forgetting that the button is no longer there and you should not go far from the electrical appliance without first disconnecting its power cord from the network.
The electric kettle was invented in 1900 by the American engineer Whitcomb, when electricity was not yet available everywhere. Contemporaries did not take the invention seriously, considering it an eccentricity. However, over more than 100 years, the electric kettle has turned from an eccentricity into an indispensable attribute of any kitchen. Even if there is gas in the house, they still use an electric kettle. It boils water much faster; there is no need to stand around it, waiting for the moment when it needs to be turned off. From the point of view of energy saving, it also looks much more progressive than its “copper” ancestor. Not a single kilocalorie created by a heating device is wasted, which cannot be said about a gas burner, which, while boiling water, heats the surrounding air by 40%. But sometimes there is a need to repair this miracle of technology.
Why does not it work
A key is a part of an electrical circuit that makes and opens it. Switching on is forced, and switching off is under the influence of steam.
A bimetallic plate (thermostat) is built into the device; it turns off the device when the temperature reaches certain values. When exposed to high temperatures, it expands, and when it cools, it contracts. When using an electrical appliance repeatedly, the plate becomes deformed, which leads to breakdown.
In most cases, electric kettles are made of plastic. This material does not always withstand high temperatures. Melting near electrical contacts, it also leads to breakdown.
Important! The kettle can turn off spontaneously due to the absence or small amount of water in it.
How to fix the button of an electric kettle with your own hands at home
Before you repair the button on an electric kettle, you need to find the cause of the breakdown. To do this, you need to unscrew the screw in the part where it is attached. Most often it is under the handle.
Disassembly is carried out carefully - all parts are fragile and cannot be restored:
- If the cause of the breakdown is deformation of the bimetallic plate, you need to return it to its previous shape with pliers.
- If the contacts are burnt out or covered with soot, they need to be cleaned. The wires are cleaned with sandpaper and checked for functionality with a tester.
- If the key itself has melted, it must be replaced. To do this, the contacts are disconnected from the old button and the screw is unscrewed, and then the new button is screwed in the same way.
The burnt-out part is replaced with a similar one in shape. If there are slight deviations in its size, a longer screw or enlarging the hole for it will help.
After all the manipulations, the electrical appliance is assembled, and the screw under the handle is screwed back in.
DIY electric kettle repair
One article has already been written on how to repair an electric kettle with your own hands, but it turns out to be not enough. In an electric kettle, not only the button can break, but also the contacts can burn out and the plate that is responsible for opening them and, accordingly, turning off the power supply to the electric kettle can stick.
Repairing an electric kettle should begin with diagnostics. Of course, first you should turn off the electric kettle from the mains, and then start checking the stand. If there are no visible signs of damage on it, and these may be direct melted areas, in places where the contacts of the stand and the electric kettle touch, etc., then disassembly follows.
Disassembling the electric kettle stand is quite simple; to do this, you need to unscrew three or four self-tapping screws that connect the body. Having disassembled the stand, first of all it is necessary to inspect the metal contacts for signs of burning, moving to the sides or falling out of the mounting sockets.
If there is no visible damage, then before assembling the stand, all that remains is to check the power cord of the electric kettle. This can be done with a regular indicator screwdriver to determine the phase.
Electric kettle switch button does not work
The most common breakdowns of an electric kettle are, as mentioned above, the stand and the switch button. And if everything is in order with the stand, and the electric kettle cord is not burned out and is in working condition, then there is nothing left to do but check the switch button and the heating elements of the electric kettle.
If the electric kettle switch button does not work, then the inspection must also begin with disassembly. To do this, depending on the design of the product, you will need to disassemble either the handle or the top of the electric kettle, first removing its lid.
Having reached the switch button, you should carefully inspect it for burning, melting or other mechanical damage. Fortunately, this is easy to do, even for a person who knows nothing about repairing electric kettles.
The design of the electric kettle switch button is quite simple. Most often, it includes several metal plates of different shapes and a pin on which the button itself is held.
It is the metal plates and the plastic elements that hold them that are most damaged when heated. By carefully inspecting the electric kettle button, you can understand why it is not working.
Here the contacts of the switch button may fall out of the socket due to melting of the latter or partial burnout of the contacts.
Repairing an electric kettle if the switch button does not work is often complicated by the fact that in many cases the installed product may simply not be dismountable.
If somewhere in the countryside
the grinder breaks down during work , and the retail outlets are located far enough away, do not panic. The causes of the breakdown should and it may turn out that repairs can be made independently . For example, if the power button of an angle grinder breaks down, there are options for restoring its functionality without replacing failed parts.
How to make an electric kettle directly without a power button
The cost of a new key or bimetallic plate may be too high in relation to the price of the electric kettle itself. In this case, you can do it by connecting directly without an enabling mechanism.
Important! The electric kettle will turn on when connected to an electrical outlet, and turn off when removing the plug from the outlet.
To connect directly you need:
- disassemble an electrical appliance;
- disconnect the contacts;
- connect and twist the ends of the wires together;
- secure the contacts to each other with insulating tape;
- Assemble the electric kettle, securing the handle with a screw.
Repairing a device to turn on an electrical appliance is a simple process. By following the instructions, you can extend the life of your favorite kettle and save money.
Useful articles, news and reviews on our Yandex Zen channel
How to quickly and easily fix an electric kettle
An electric kettle breaks down - an unpleasant situation. But there are two options: spend some extra money on purchasing a new electrical appliance, or try to repair the old one. At the same time, check yourself - where do your hands come from?
Most kettles are assembled based on a very simple electrical circuit. Consequently, their diagnosis and repair do not require any specific knowledge in the field of electrical engineering.
Below are 3 common malfunctions of kettles, in the order in which it would be more rational to diagnose them:
1. Burnt contacts of the stand
2. Broken power cable
3. Problems with the power button;
Before starting any repair work on the kettle, it is strictly necessary to disconnect it from the household power supply, that is, unplug its plug from the socket.
Burnt contacts on the stand
There are spring-loaded contacts in the center of the stand. When water is heated, a current of about 10 A flows through them. The force with which the contacts of the stand contact the contacts of the kettle itself is not enough to form a good electrical connection. Therefore, both of them heat up, become covered with a layer of oxide, and sometimes burn out, completely disrupting the electrical circuit.
This problem can be determined by simple inspection. Good contacts should have a coppery metallic sheen like in the photo below and be at the same height. Also, they should not give off a strong smell of melting plastic.