What are the stages of installing NTV Plus?
You can install NTV Plus yourself using the following steps:
- Check connectivity. Make sure that the populated area is within the coverage area and can receive the satellite signal.
- Select the necessary equipment. The user may have a compatible antenna, then he will only need to purchase an access card or receiver. And if you need to connect NTV Plus to several TVs at once so that different channels are broadcast on them simultaneously, then several receivers are purchased.
- Select a package of channels and additional services. For some, a basic set is enough, while others will need advanced features provided by the operator.
- Install the NTV Plus antenna yourself or hire a professional. The process includes the following steps: Determine the installation location of the NTV+ dish.
- Install it on the support.
- Approximately set the desired direction.
- Lay the cable from the converter to the receiver.
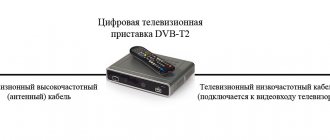
- Connect the cable to the receiver, and the receiver itself to the TV. When using a TV module, the antenna is connected directly to the TV.
- Turn on the set-top box and TV, perform detailed adjustments to the position of the plate.
- Tighten the fasteners.
- Install the access card into the set-top box or CAM module.
Step-by-step instructions for installing and configuring the antenna
Once all the necessary equipment from the list has been prepared and the subscriber has registered on the company’s official website, you can begin setting up. There are two types of setup scheme - a relatively simple automatic one and a more complex manual one.
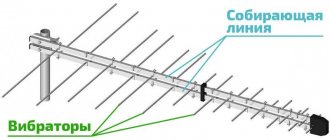
Assembly of an NTV Plus antenna with a diameter of 60 cm
The first step is to choose a place where the antenna will be mounted - it should be a strong external wall, on the back side of which there will be a TV. After this, you need to install the bracket that comes with the antenna on the wall; the dish will be hung on it. You need to attach a cable to the dish itself, and then connect it to a special socket on the back of the TV. In a situation where the receiver intended for receiving the signal and converting it is not built into the TV, but stands separately, you need to connect the antenna and TV to the receiver.
Required equipment set
To connect NTV Plus in a minimal configuration you will need:
- antenna;
- converter;
- attachment or CAM module;
- TV.
If the length of the supplied cable is not enough, buy another similar one. Don't forget about the set of tools necessary for installing fasteners, laying wires, installing adapters, etc.
Some types of antennas may be compatible, so do not rush to purchase the entire set at once - consult with specialists.
The official NTV+ store offers the following decoder options.
CAM module
NTV Plus CAM - module
Its advantages:
- Compact.
- Installs directly into the TV and does not take up extra space.
- Does not require a separate remote control.
- The antenna is connected directly to the TV without any attachments.
Flaws:
- Compatible only with TVs equipped with a CAM port.
- Additional functions directly depend on the technical capabilities of the TV.
Standard receiver
Has the following advantages:
- Connects to any TV.
- Provides advanced functionality, even if some features are not available on the TV: recording broadcasts, viewing media files, etc.
Flaws:
- Controlled by a separate remote control.
- Takes up extra space and outlet.
- May cause connection difficulties due to the large number of interfaces.
- Doesn't work with online TV.
Interactive console
NTV Plus interactive set-top box
NTV offers the VA-1020 model, but there are alternative solutions. Advantages of interactive consoles:
- They can work not only with a satellite signal, but also connect directly to the Internet. And this is a whole layer of additional technologies and services, such as online cinemas, broadcast rewinding, etc.
- Expand the capabilities of your TV to the maximum.
- They can connect to both old-generation and modern TVs.
There are also disadvantages. Such a prefix:
- Takes up space and an additional outlet.
- Controlled by a separate remote control.
- It costs more when compared to previous options. You will have to pay for Internet. Some types of online content are also paid.
The user selects the appropriate option depending on his preferences and TV model. If you need interactivity, an option with Internet connectivity is suitable. If only satellite TV is enough, a CAM module will suffice. A universal solution is a classic console. It is compatible with all TVs and is inexpensive.
NTV plus - installing the antenna yourself
Let's consider the standard installation procedure, when all the necessary tools and consumables are at hand, there is no need to do hidden wiring or increase the cable length.
Choosing an installation location
Installation recommendations:
- The plate should not disturb anyone. For example, it should not be placed within the reach of passers-by or household members, or directly behind the sash of an opening window.
- The support must be reliable and withstand wind loads, taking into account the sailing effect of the antenna itself.
- There should be no interference along the path of signal propagation from the satellite - reinforced concrete buildings, radiating towers, etc.
- There should be no equipment near the antenna and the cable laid from it that could cause interference.
You can determine the direction of the NTV Plus satellite and Tricolor TV using a compass and a map of the area. Special applications (SatFinder, Dish Installation & Alignment, etc.) created for terrain orientation using a smartphone also help with this.
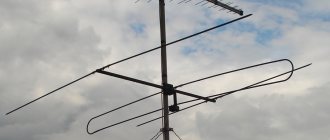
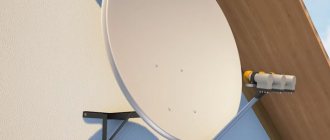
Pole mounting
Antenna on bracket
The main rule is to follow safety precautions to avoid injuries if work is performed at height.
It is best to secure the converter to the support in advance, while the plate is below.
The support is attached to the selected base using suitable fasteners. For metal profiles or metal tiles you will need self-tapping screws with press washers, and for wall mounting - anchors.
The antenna is aligned to the satellite approximately. Fine tuning will be done later. Therefore, there is no need to tighten the movable bracket tightly.
Cabling
The specific solution depends on the user's requirements. If you don’t want to spoil the appearance of the wall inside the room, then the cable needs to be pulled from the outside of the building. And hide the route inside in a groove.
The main task is to optimize the route so that the length of the existing cable is sufficient. Otherwise, you will need to boost the antenna signal in the gap.
Connecting cables
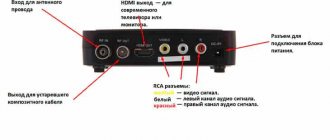
The antenna cable requires special connectors, but there should be no difficulties with them. The main problem is how to connect the NTV Plus set-top box to the TV. There are several options here:
- RCA, also known as “tulips” or “bells”, TV-AV. The receivers are equipped with a composite output for a special adapter with a 3.5 mm minijack connector (like on headphones). And on the TV, the input connectors are classic - there is a separate socket for each signal. You need to connect everything with the corresponding colors. If there are separate sockets on the set-top box and on the TV, you need to connect sockets of the same color to each other. AV-IN / AV-OUT should be selected only when the digital data transmission format is not available. RCA can only work with analog signals and does not provide the best quality picture.
- HDMI. Preferred option. If the TV works digitally, then this method will ensure maximum image quality when using the connection.
- SCART. The connector can handle digital and analog signals, but is obsolete. The main difficulty will be finding a suitable adapter for HDMI or RCA.
Fine tuning
The procedure involves searching for a dish position that ensures maximum quality of signal reception from the satellite. For this:
- The set-top box and/or TV turns on.
- From the list of channels, select any open one, for example, TNT or another.
- By changing the position of the antenna mirror, you need to achieve image reception. This will be the initial rough setup.
- The channel menu displays information about signal quality.
- Next, the antenna position is adjusted so that the signal level shows the maximum value.
Now you can tighten the bracket.
Installing an access card
The card is a key that allows the equipment to decode the signal of closed channels.
NTV Plus access card
It must be installed in the appropriate hardware slot. If this is a CAM module, then the card must be inserted into it. When using the set-top box, read the instructions for its operation; it will describe in detail where exactly to insert the card.
Setting up the NTV Plus antenna
The NTV Plus satellite television set is an excellent choice for sports and movie fans. But the operation of television without failures and interference can be ensured with proper assembly, installation and configuration of the dish. First, make sure that the requirements necessary for the correct operation of the system are met:
- Visibility to the south from a window, balcony or roof.
- Open horizon without interference at window level (trees, high-rise buildings).
NTV Plus channels are broadcast from the Eutelsat W4/Express AMU 1 satellite, located at 36 degrees east longitude. The satellite covers the main part of the territory of the Russian Federation.
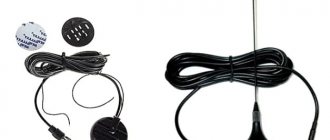
To receive channels you will need the following equipment:
- Antenna diameter 55-90cm.
- Circular polarization converter.
- Receiver for receiving NTV plus or CAM module.
- Coaxial cable.
- Connectors.
The minimum size of the plate for reception is 55-60cm. By increasing the size to 80-90 cm, we will get a stable and stable signal that will not be affected by weather conditions in the form of rain, snowfall, or cloudiness. The NTV+ system uses circular polarization converters. There should be a circular or “Circular” mark on the irradiator body. The number of outputs in the irradiator corresponds to the number of connected receivers.
Let's proceed to the procedure for installing and configuring NTV Plus channels, which consists of the following steps:
Stage 1: Checking the signal
You can set up an NTV Plus satellite dish only if there is a signal. You can navigate by the sun: around 13:00 its direction corresponds to the position of the satellite, by the dishes on neighboring houses. There are also maps on the Internet, like DISHPOINTER, which will help you check the possibility of satellite reception. Working with it is quite simple: enter the exact address of the house, select the name of the Eutelsat W4/Express AMU1 satellite. A colored beam will show the direction. If the beam is red, that is, reception from the window is not possible, then the system is installed on the roof. The connection will cost more, since cable costs will increase, but the result obtained is worth the effort.
Is it worth ordering NTV installation from private specialists?
Assembling, setting up and connecting equipment takes a lot of time and requires tools, materials and knowledge. If you have the time and skills, you can do the work yourself. Otherwise, contact professionals, they will do everything as quickly as possible, correctly and with a guarantee for the work.
How much does it cost to install NTV? Important pricing factors:
- Region of residence (minimum prices in different regions of the Russian Federation may differ significantly).
- Distance from the office of the company that carries out the installation. The further from the boundaries of the serviced area, the higher the price.
- Installation difficulties. This includes the method of laying the antenna cable, the need to equip a separate mast for the antenna, connecting several antennas at once, etc.
Average prices for a standard installation are 2000-3000 rubles. In Moscow and the region you can often find a fixed price - 2500 rubles.
Conditions may vary in other regions.
The services of private craftsmen cost approximately the same. But based on the results, the client will not receive a formal contract, which automatically complicates the procedure for challenging the quality of services provided. Yes, there are also scammers in this area.
How much does it cost to connect to NTV Plus?
How to connect NTV Plus and how much the connection costs - there is information about this on the company’s website. The official NTV+ store offers the following prices:
- CAM module + access card + year of the “Basic” package – 3490 rub.
- TV set-top box + access card + year of the “Basic” package - 4990 rub.
- Interactive TV set-top box + access card + year of the “Basic” package – 5990 rub.
- The antenna is paid separately - 1500 rubles.
- Delivery service with on-site setup – minimum RUB 2,500.
You can purchase a set of equipment from official NTV partners or other dealers. Prices will depend on the selected equipment and additional services.
In the basic configuration, they are all comparable to the position of the official store. There may be individual promotions or special offers that will allow you to save money. Installing NTV Plus with your own hands will also help you save 2-3 thousand rubles.
Procedure for tuning NTV Plus to satellite
- In Moscow and the Moscow region, the antenna is positioned vertically.
- Heads to the satellite reception sector (the sun and neighbors' antennas help)
- Slowly turn the mirror by 1-2 mm, wait a few seconds, check the signal scales in the satellite set-top box, continue the adjustment procedure until the scales are filled to 70%.
- Fix firmly and tighten the bolts.
- The receiver reacts to all actions with a slight delay, so we carry out all work slowly.
Installation of NTV Plus
Repair NTV plus
How to set up equipment
It is better to find the position of the plate not alone, but with the assistance of an assistant.
Divide responsibilities:
- One is responsible for rotating the antenna.
- The second is for signal quality analysis.
If there is a significant distance or if there are a large number of barriers to voice communication, you can use walkie-talkies or cell phones.
- After changing the position, the first informs the second that he is ready.
- The second compares whether reception levels have improved.
- If necessary, the procedure is repeated.
This is how the optimal receiver position is searched. This is considered a signal with a level of at least 70% .
How to set up an antenna
The next stage is setting up the NTV satellite dish.
- Connect the converter cable to the receiver, and connect the receiver itself to the TV. To avoid malfunctions or equipment breakdown, you must follow all recommendations specified in the manufacturer's instructions.
- Slowly and carefully rotate the satellite dish mirror in the horizontal/vertical plane towards the location of the satellite. Goal: to get the image to appear on the TV.
- After the picture appears, you need to activate the “RECEIVED SIGNAL LEVEL” command on the receiver. For a good television picture, the scale should be as high as possible.
Search channels
May be:
- Automatic.
- Manual.
In the first case, you need to select “Setup Wizard” in the receiver menu and run it. All available channels will be found by the equipment and added to the list.
A manual search should be launched if the automatic search did not work correctly and did not find all channels. Another situation is when the search is performed on universal equipment designed to work with a large number of providers. In this case, you can choose a provider or a specific satellite. For NTV+ this is:
- EUTELSAT 36E
- EUTELSAT 36B
- EUTELSAT 36C.
For manual search, you may need other data:
- The LNB power must be turned on.
- Transponder settings 11008 MHz, H/L or 11900(V/R) 27500.
- LNB level. Oscillator - upper 9750 MHz, lower 10750 MHz.
- DiSeqC mode enabled.
- The tone is set according to the LNB type, but most often it is 22 kHz or “Auto”.
The standard password for accessing manual settings is “0000”. But it may differ from one manufacturer to another.
Connection difficulties
Difficulties may arise at any of the above stages.
- It is not possible to align the antenna for a sufficient signal level.
- The supplied antenna cable is not enough for connection.
- The receiver does not find all channels.
- It is not possible to connect the set-top box or TV module to the TV.
- And others.
The solution to the problem can be found in the instructions for the devices. Or involve specialists or service centers if the equipment does not work properly despite following the operating rules.
Preventive measures:
- Check the connections, make sure the connectors are installed correctly.
- Turn on the power.
- Check the expected satellite angles. They are given in the official documentation of the provider.
- Repeat the setup procedures, check that they are correct.
- Contact your provider and find out if there are any problems with broadcasting or planned preventive measures.
- Check information on services in the client’s personal account.
- technical support service. Perhaps she has a ready-made solution.
Problems and solution
During the connection, even a professional may have connection problems that he should solve. The table below will help you understand common problems and find their solutions.
| Problem | Solution |
| The antenna is not set to a sufficient level. | It is worth checking the angles shown on the map, as well as using additional utilities for more precise settings. |
| The receiver does not find all channels. | You need to perform a factory reset and manually reconfigure all channels. |
| The set-top box cannot be connected. | It is worth checking all connections, as well as cables, turning on the power and then setting up the set-top box. If it does not connect, then you need to contact your provider. This is worth doing if there is no visible interference with the set-top box. |
4.6 / 5 ( 31 voice )
0