Music in a car is an integral part of comfort, especially if the trip lasts more than one hour. Some download their favorite tracks to removable media and play them in a circle, which gets boring over time. Radio (a function that is present in the vast majority of car radio models) allows you not only to create background music, but also to find out the latest news in Ukraine or in the world.
But the design of any radio is that it will not pick up a signal unless a radio antenna is connected to it. If the car is located in a big city, for example, Kyiv, then there will be no problems with the signal even when the radio is equipped with the most primitive antenna. But when the car leaves the metropolis, another antenna is required to help the radio receive a weak signal.
In car accessories stores you can find many options for car antennas. Let's try to figure out what their difference is and how to connect them correctly. We will also consider the features of installing an indoor or outdoor antenna. The scheme for each of them will be different.
Main types of car antennas
Contrary to the popular belief that a car antenna is only needed to play a radio station, this car element of a multimedia system is also needed if the vehicle has a TV or a head unit with a navigator function.
The list of main types of car antennas includes:
- Passive type;
- Active type;
- Adapted for receiving GPS signals;
- External option;
- Internal view.
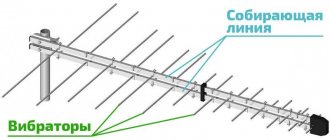
Each of the listed types has its own characteristics. Let's consider each of them separately. The easiest way to connect is a passive antenna. To do this, just lay the wire inside the car so that it does not interfere with the control of the car, and connect the plug to the radio.
Active antenna
This type of car radio antenna has its own amplifier. It provides better reception of a weak signal and clears it of interference. The circuit of such a device will include not only the antenna wire, but also the power cable. You can connect such an antenna to the radio as follows:
- You need to find the power wire in the antenna harness (it supplies power to the amplifier). Which wire is responsible for what is specified in the operating instructions for the active antenna.
- It needs to be connected to the blue wire with a white stripe (goes to the radio). This is the cable responsible for remote control of the car radio.
- These wires can be connected to each other using a chip, twisting or soldering. If a chip is not used, then the connection point must be properly insulated. To do this, you can use electrical tape, but it is much more practical to do this using heat-shrinkable cambric.
- Now you can connect the antenna plug to the radio and tune the radio.
If connected correctly, such a circuit will be able to pick up radio signals from a radio station located at a distance of approximately 60 km from the receiver. If the active antenna is equipped with an indicator light (small red light), it should light up when power is supplied to the car radio.
If there is no signal from the antenna (no radio station is played), it is necessary to check the connection of the receiver's power wire. It happens that the car radio does not have a blue wire with a white stripe. In this case, it is necessary to install a separate button to turn on the antenna itself.
It is more practical for the switch to have an individual backlight that will light up when power is applied to the button. This will remind the driver to turn off the antenna every time he is not using the device. Thanks to this, a constantly working antenna amplifier will not consume battery energy and will not heat up.
The scheme is as follows. A wire connected to the power cable of the car radio (goes to the positive terminal of the battery) is connected to one contact of the button. The power wire of the antenna amplifier is connected to the second contact of the switch. The negative wire of the antenna is connected to ground in close proximity to the amplifier.
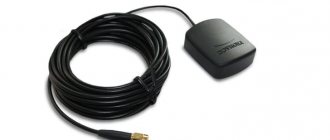
GPS antenna
Connecting the GPS antenna is carried out in the same way as installing any other receiver. To connect such an antenna to the radio, you need to remove the player from the mounting shaft. Read about how to do this in another review . This is necessary in order to have access to the sockets, including the antenna one.
Depending on the car model and the preferences of the motorist, the dashboard or part of the panel is dismantled. This is necessary for laying the antenna cable. Of course, this can be done without dismantling work, if it is difficult to do this in a particular car or there is no confidence that the work will be done correctly, so that you do not have to repair the car panel later. You can lay the cable in the openings between the panel elements and secure it with clips.
If terminals with screws are used on the back of the radio, then before connecting the wires, you need to clean them well so that there is good contact. Some car radio models use crimp terminals. In this case, the wires also need to be well cleaned, twisted together and tightly inserted into the mounting hole. Then the latch is clamped.
If the GPS antenna is connected correctly when the navigator is turned on, the device will immediately show the real location of the car. If this does not happen, you need to double-check that the receiving element is connected correctly to the head unit. When using a navigator with a separate antenna, it is important to remember that there are no large metal objects (panels or boxes) near it. Otherwise, they will create interference and the device will not work correctly.
Outdoor antenna
Before connecting such an antenna to the radio, you must properly secure it to the car. If this is a modification intended for installation at the highest point of the car, then you need to ensure the tightness of the installation location of the device. The roof of the car should not leak. Otherwise, during rain, water may flow behind the dashboard or onto the wiring unnoticed by the driver. Because of this, at the most inopportune moment, the machine will stop functioning correctly, since some system will stop working due to a short circuit or loss of contact. In some car models, repairing the electrical circuit is similar in cost to the capital of a motor.
Next, the antenna cable is laid behind the panel to the radio. To prevent the cable from creating noise from vibration and contact with plastic surfaces while driving, it is better to fix it in several places.
The antenna cable is very sensitive to excessive bending (the metal shield of the signal core may be damaged and will not protect it from external interference). For this reason, installation work must be carried out carefully, without tugging on the cable or applying excessive force if it is not pulled between the panel elements. The wire is connected using a standard plug or an appropriate adapter if the socket and plug do not match.
Internal antenna
In-cabin antennas are connected in a similar way, but the installation work in this case has some subtleties. For example, some similar antennas that are installed inside a car are equipped with an additional ground wire. It should be fixed on the body of the car as close as possible to the receiver itself.
If the antenna is installed near a canopy that protects from sunlight, the grounding can be secured using a self-tapping screw that holds this canopy. Thanks to this, there will be no need to make additional holes in the car body. Using a grounding wire reduces interference from atmospheric phenomena or electrical appliances operating nearby (the amplifier will not turn on without it).
Any type of external or interior antennas has a general connection principle, but in each individual case the installation will have its own subtleties. And for the most part, these differences are related to the design features of the devices.
How to install and connect an antenna to a car radio
After installing an audio system in a car, a completely logical question arises about installing and connecting the antenna. You need to start from the installation site, or rather, from its choice.
Where to put the antenna
When choosing a place to install the receiving device, you must adhere to the following rules:
- you should try to install the antenna at the highest point of the car;
- to improve the signal, most of it should be located above the roof;
- the cable should be laid as far as possible from sources of interference such as ignition system wires or electromagnetic devices;
- when purchasing a ready-made antenna, you do not need to change its length;
- The cable must be attached to the body securely, but try not to damage it.
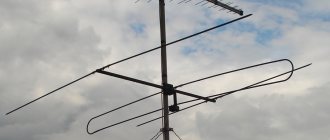
Experts recommend installing the antenna on the roof, which is due to the best signal reception.
A list of such simple rules will not only facilitate installation, but also ensure high-quality reception. Regardless of the location of the antenna, it must have reliable contact with the body. Every car owner has the right to install an antenna in any place he likes, but in order for it to be not just an element of beauty, but also beneficial, experts recommend installation at the following points:
- on the roof;
- on the front fender;
- on the trunk lid;
- on the rear bumper;
- on the bracket.
This is interesting: Problems with the insurance company
The best installation location is the roof, since the signal will be picked up from all sides. Regardless of the chosen mounting point, it is important to ensure a reliable connection to ground, which will significantly reduce the level of interference and improve signal quality and reception range.
Tools and materials
Depending on the location and method of fastening, the following materials and tools may be needed:
- drill and set of drills;
- knife or side cutters;
- sealant;
- insulation (heat-shrink tubing or electrical tape).
Installation and connection of an active antenna
Antenna installation is carried out in accordance with the instructions:
- We choose an installation location, for example, in the corner of the windshield.
One of the most common places to install active antennas is the windshield - Degrease the installation site using an alcohol wipe.
- There is a triangle on the package that makes it easier to position the antenna when mounting it on glass, so you should cut it out. Then we fix the mounting disk in its grooves by removing the protective film and gluing it to the glass in the place where the antenna will be installed. Remove the triangle.
The antenna comes with a special triangle, in the grooves of which the mounting disk is fixed - We glue the limiting strips, which serve as a guide for the receiving part of the antenna.
In order to properly glue the antenna antennae, special limiting strips are used. - Upon completion of installation of the receiving elements, the strips are removed. An antenna element (antennae) is placed on the disk pin, for which part of the protective film is peeled off. Gradually pulling out the film, glue the mustache to the windshield. The same procedure is done with the second element along the boundary strips, while care must be taken that the antenna does not stick to them.
Antenna mustaches are glued along the boundary strips; care must be taken that the receiving element does not overlap the strip itself. - Since the receiving device itself is located in the corner, the mass is fixed with a self-tapping screw from the sun visor. To do this, the visor itself is unscrewed and the ground wire is inserted through the hole in the ceiling trim.
The ground cable is fixed to the self-tapping screw of the sun visor - To lay the cable, remove the side trim. Depending on the car, fastening can be done with plastic ties to the standard wiring or to the washer hose clamps.
To lay the cable, you will need to dismantle the side pillar trim; the wire is attached to the standard wiring or to the washer hose clamps - To lay the cable, it is not necessary to remove additional elements, but for convenience, you can remove the glove compartment.
To make cable laying easier, you will have to remove the glove compartment, for which we unscrew the corresponding screws - We connect the power cable of the antenna amplifier, which in radio tape recorders is called the control cable and is blue.
You need to connect the power wire to the antenna amplifier, which is blue for non-standard radios - Reinstall the glove compartment and side windshield trim.
- We connect the antenna to the corresponding connector on the radio.
Installing and connecting an external antenna
In addition to purchasing the antenna itself, you also need a plug and cable for connection. For these purposes, a cable with a characteristic impedance of 75 Ohms can be used, which is better to take with a reserve. The installation process is as follows:
- To install the antenna, two holes must be made in the roof: one for mounting with a diameter of 10 mm, the second is auxiliary with a diameter of 5 mm.
To install a passive antenna, two holes are divided into the roof: for mounting and auxiliary - From the interior, we strip the paint down to metal using sandpaper.
From the interior, the antenna mounting location is stripped down to metal to ensure reliable contact. - We make an insulator from fluoroplastic and two copper washers, to which we solder the cable. On the other side we solder a plug for connecting to the car radio.
To connect the antenna, a spacer (insulator) is made from fluoroplastic and copper washers, to which the cable is soldered - The junction of the cable and washers is sealed using Moment glue.
Moment glue is used to seal the junction of the cable with the washers. - To prevent oxidation and corrosion between the antenna cable washer and the roof metal, the area is treated with mastic.
To avoid oxidation at the point of contact between the washer and metal, the surface is treated with mastic - It is recommended to treat the holes with sealant on the outside.
The holes in the roof are also processed from the outside, which will ensure a better fit of the antenna to the surface - Install the antenna and tighten the fastening nut.
We install the antenna on the roof and secure it tightly with the nut from the interior - All that remains is to lay the cable and connect to the radio.
After attaching the antenna, all that remains is to lay the cable in the side rack and connect it to the radio
It is worth paying attention that for high-quality operation of the antenna, it is necessary to use a cable with a shielded braid. When laying the wire, you should try to keep its length to a minimum, and you should also avoid various twists and tension on the cable.
Installation and connection of GPS antenna
To install the GPS antenna, you will need a list of tools, consisting of special keys for dismantling the multimedia system, as well as screwdrivers for removing the side cover on the dashboard.
The GPS antenna kit consists of the device itself, a cable and a plug for connecting to the car radio.
The sequence of installation and connection steps is as follows:
- We dismantle the multimedia system.
We begin the procedure for installing a GPS antenna by dismantling the multimedia system, for which we will use special keys - Remove the cover on the right side of the dashboard.
We dismantle the side panel of the dashboard, which will provide free access for installing the antenna on the body - We go to the back of the radio and connect the connector from the antenna.
To connect the antenna cable you need to get to the back of the radio - We attach the antenna itself to the magnet. For proper installation, the device must be positioned horizontally.
The antenna is mounted on the car body using a magnet in the housing - Turn on the radio and check the functionality of the antenna. We install all dismantled elements in the reverse order.
To summarize the above, the following should be noted: in order for the receiving device to work without complaints, it is important to make the right choice based on the operating characteristics, take into account the installation location, and also make the connection correctly in accordance with the installation instructions.
Choosing a location
As we have already noted, there are passive and active antennas. Their functional difference is only in the presence of an amplifier, which ensures the reception of weaker signals and clears them of interference.
In order for a passive antenna to be able to pick up radio stations over a long distance, it must have a much larger contour than the amplifier version. Thanks to the presence of an additional receiver and shielding element, the active antenna is smaller in size and can be installed in any accessible place in the car. The receiver itself is fixed to the surface using double-sided tape.
Most often, the active antenna circuit is installed on the top of the windshield. Some people mount it on the rear window, but in this case you will have to run the cable through the entire cabin. If your car has a heated rear window, its circuit may interfere with signal reception.
An advantage for reception is installing an antenna on the roof. But in this design, you need to properly ensure the laying of wires. They should not be subject to constant bending unless a hole is drilled in the roof. And if a ready-made hole from an old antenna is used, then it is imperative to protect the interior from water entering the interior through it.
When choosing a place to install the antenna, you must adhere to the following basic recommendations:
- The cable should be hidden under the casing and behind the panels. This is important not only for aesthetic reasons. Wires hanging throughout the interior pose a potential danger when driving a vehicle.
- Metal parts should not be exposed to moisture, so the connection point of the wires should be as far away from sources of moisture as possible. The attachment points to the body must be well cleaned.
- Wires, especially those transmitting radio signals to the radio, should not pass near electrical appliances or other sources of interference or shielding elements.
How long should the connected antenna be for reliable reception?
By reliable reception we mean the ability of the receiver to catch even weak signals without interference (as far as possible in some cases). An important parameter for a receiver is its sensitivity. This concept describes the minimum signal that the device can transmit to the player without interference with the original quality (that which is transmitted to the radio station).
As the length of the antenna's receiving circuit increases, the electromotive force increases, and the device should have proportionally less sensitivity. But in this case, the opposite rule can also apply: excessive antenna length can, on the contrary, reduce the ability of the receiver to transmit a clean signal to the radio.
The reason is that the size of the antenna's receiving circuit must be a multiple of the amplitude of the radio wave that needs to be caught. The greater the amplitude of the wave, the larger the receiving circuit the antenna should have.
So, the first important condition: if the antenna catches the signal well, then you can’t do better by increasing the contour of the device. The second important factor that will help determine how long the antenna should be is the ability of the receiver to filter the useful signal from the useless one.
That is, the antenna must determine which signal is coming from the radio station, and which is simple interference and needs to be filtered out. If you increase the length of the antenna, the EMF will increase, and the interference will increase along with the useful signal.
These two factors depend on the receiver module model. Each manufacturer makes devices capable of picking up certain signals in specific conditions (city or rural areas). To use the receiver in the city, it is enough that the antenna has a sensitivity within 5 µV and its length is about 50 centimeters. Such a device will ensure reception of a signal from a radio station located 40-50 km from the receiver.
But these parameters are relative, since every big city has its own sources of interference, and it is almost impossible to create a device capable of transmitting the cleanest possible signal in any conditions. Of course, modern companies involved in the development and production of such equipment are gradually eliminating this drawback, but it still occurs in modern antennas.
In addition to extraneous sources of interference, the reception of a signal from a radio station is also affected by the landscape features of the area in which the car is located. Everyone knows that the radio signal is of the highest quality on a hill, but in a pit there is practically no way to catch it. It can also be reflected from reinforced concrete buildings. Therefore, no matter how long the antenna is, there may simply be no signal behind the metal structure, and there is no way to catch it.
Device and installation
The Triad-55 car antenna has an ergonomic design and is supplied in a sealed package. The kit includes a central unit and a cable 2.5 m long. The cable consists of two separate wires: one is connected to the radio, the second is the power supply and is connected to the car’s on-board network with a voltage of 12 volts in any accessible place (usually also to the radio). There is an LED indicator. The antenna is attached to any convenient place in the car using double-sided tape. The cable is usually hidden under interior decorative elements.
The body parts fit well, there are no backlashes or creaks. The antenna is light in weight, so mounting it with double-sided tape is almost always sufficient. The antenna is an active type, that is, it is equipped with a radio signal amplifier. It has two modes: highway and city.
We conducted a small test of this device: we checked the operation of the antenna in urban and suburban conditions at a distance of 30 km from the city (in theory, from the nearest radio tower). Based on the results of our test, it turned out that the antenna works great both in the city and outside it. We didn't notice any difference between the modes. All available radio stations are stable, without interruptions or interference.
Step-by-step instructions for installation inside the cabin
Naturally, the subtleties of connecting the antenna depend on the design features of the device. They are usually indicated by the manufacturer in the operating instructions. But here are the main steps that are important to take when installing an antenna in the cabin:
- The places where wires are connected or grounded must be cleaned and also treated with alcohol (degreased);
- A mounting frame is placed at the installation site, if it is included with the device. It will ensure the correct position of the antenna;
- The antenna housing is fixed, the frame is dismantled;
- Strips are glued to the surface to secure the antenna antennae. It is more practical to do this by gradually peeling off the protective film and at the same time pressing the antennae;
- The cable is being laid. To do this, it is necessary to remove part of the trim from the rack on which the windshield is fixed (if the antenna is installed on the windshield);
- To make it easier to install the casing in its place, it is better to fix the wire on the stand;
- Depending on the car model, it may then be necessary to partially dismantle the dashboard or glove compartment;
- The radio is removed from the mounting shaft so that there is access to the rear panel for connecting the antenna plug and wire contacts;
- In the ISO connector we look for a blue wire with a white stripe. The power wire of the antenna amplifier is connected to it;
- The signal wire is connected. For this, different fasteners can be used: screw or clamp clamps;
- The head unit turns on. In this case, a signal light (small, red or blue) should light up on the receiver of the active antenna;
- Find a radio station on the radio and make sure the signal is clear;
- At the end of the work, a radio tape recorder is installed in place;
- The glove compartment and the removed part of the lining are attached back. When fixing it with self-tapping screws, you need to be careful not to damage the wire.
The video provides detailed instructions for installing an interior radio antenna in a car. This may be needed: -When replacing the antenna due to its breakdown; -When installing an antenna, if the antenna was not initially installed in the car; -If the antenna receives poorly and needs to be replaced for better radio reception.
We present the best indoor antenna Triad-190. When buying a new beautiful Chinese radio with navigation and DVD, few people know that these radios receive Radio very poorly. It is in this case that we recommend using the Triad-190 antenna. If it doesn’t help, then no other one will help either.
Replacing an antenna on a foreign carTHRIAD FOR ANY CAR
Replacing an antenna on a foreign carTHRIAD FOR ANY CAR
Replacing an antenna on a foreign carTHRIAD FOR ANY CAR
The best car interior radio antenna Triad-190
BUY LONG RANGE ANTENNA AMPLIFIER “TRIADA-304” City/highway 60-150 km
BEST MORTAR ACTIVE ANTENNA for the roof or wing TRIAD 269 for 939 rubles
To increase the radio reception range from a passive outdoor antenna, we recommend using the Triad 304 Long Range amplifier.
BESTSELLER!
Approximate retail price 350 rubles
Car antenna amplifier "Triad -304" 16 dB AM VHF and FM with gain switch off. Receives AM (long and medium waves). Excellent characteristics!
It is recommended for use if the distance from the radio station to the driving route of the car is usually 50-100 km and reception to an external passive antenna is accompanied by noise and signal loss. typical application is use by car owners living in rural areas and periodically traveling to the city. In this case, the gain is turned off using a button on the amplifier body.
Recommended for use with the Triad VA-63E antenna. Not recommended for use with an active antenna due to the possibility of overexcitation of the radio input stage.
Read the article about Car antenna amplifiers
Reviews about CAR ANTENNA AMPLIFIER “TRIADA -304” LONG RANGE: Touareg Club Forum
ACTIVE MORTAR ANTENNA “Triad-269”.
Designed to replace the standard antenna in Volkswagen, Opel, Chevrolet, Skoda, etc. cars. Excellent reception quality. Removable rod with anti-noise winding. Recommended for installation by car owners who prefer high-quality Radio reception. A huge advantage of the antenna is its versatility in installation location. According to the overall design, it can be installed on the rear of the car roof, on the front of the car roof or on the fender. It is recommended for installation as a replacement for the standard antenna in difficult cases of fender bending of Mercedes, SMART, convertibles, coupes, etc. Designed to replace the standard antenna in Volkswagen, Opel, Chevrolet, Skoda, etc. cars. Excellent reception quality. The radio signal is received by a removable rod with anti-noise winding. At the bottom of the bar, inside a plastic non-removable casing, there is a steel spring that returns the bar to its original state if it is deflected from its natural position by a branch, garage roof, etc. The upper part of the rod is made of durable flexible fiberglass rod. A copper wire is wound on top of the rod, which performs two functions at once - receiving a radio signal and eliminating whistling from the rod at high speed (more than 160 km/h) due to a certain pitch of wire winding. The wire and rod are covered with heat shrink tubing. Rod thread M5 or M6, internal or external (may vary depending on the materials received for production).
Step-by-step installation instructions on the roof
When installing the antenna receiving circuit on the roof, you must use a cable with a screen whose resistance is 75 Ohms. Here is the sequence in which you need to install this antenna model:
- If there was no old antenna on the roof, then you need to make two holes in it. The diameter of one should correspond to the cross-section of the wire (with a small margin to make it easier to thread the cable). The second should be the same diameter as the antenna housing mounting bolt. On some models, the cable runs inside the mounting bolt. In this case, one hole is enough.
- To properly ground the device, the metal part of the roof from the interior must be cleaned.
- To prevent water from seeping into the interior through this hole and preventing the metal from rusting, the outside of the hole is treated with a waterproof sealant, and the inside with mastic.
- Before installation, an insulator is made. This is a spacer made of copper washers, between which fluoroplastic analogues are installed. The antenna cable is soldered to them (this design depends on the antenna model).
- If soldering the cable to the insulator is used, this place must be protected from moisture (placed on a sealant).
- The antenna is installed (in addition, you can use not only a rubber gasket, but also a sealant between its base and the roof). It is secured with a nut on the interior side.
- The cable is laid according to the same principle as the version installed in the cabin.
- The cable is connected to the radio and its functionality is checked.
How to properly connect (connect) and install an active antenna to the radio in the car
So, we have already figured out that the first thing you need to pay attention to before installing the antenna is to determine where in the cabin it would be most practical to install it. The body of the active antenna or antennae of the passive analogue is attached using double-sided tape.
Most models of receiving devices have two wires (in some they are in one bundle and protected by a metal shield). One is a signal signal, and is connected to the radio socket (wide plug at the end). The other is the power cable, and is connected to the corresponding wire that goes from the battery to the head unit.
Many models also have a third wire. It is usually black and has no insulation at the end. It must be secured to the vehicle's ground (vehicle body). An important condition in this case will be to fix the mass as close as possible to the antenna amplifier.
Many modern car radios may use another connector instead of the usual antenna connector. If the antenna plug does not fit, then you will need to buy a corresponding plug. Its price is usually not high, so it is much easier to use an adapter than to be tricky and mess around with soldering yourself. Although there are some craftsmen who never look for easy ways.
Here is a short video on how to connect the antenna to the radio:
How to install and connect the antenna?
How to make your own antenna for a radio
Some car owners prefer to make radio antennas on their own. If you have sufficient knowledge and skills in the field of radio electronics, then why not design such a device. You can make both an internal and external antenna by studying the features of such devices.
DIY external antenna
Making a simple external antenna will be especially important for those whose device has broken down, but the base remains. For this design you will need:
- copper wire;
- anchor bolt (diameter no less than 5 mm);
- cold welding.
This is interesting: Traveling in a taxi with children
Actually, the whole process consists of the following steps:
- The upper part of the bolt is ground down a little, after which small diameter holes are drilled, which are necessary for threading and fixing the wire.
- We wrap two layers of wire around the bolt and solder it at the top of the bolt.
We wind the wire around the bolt and solder it in the upper part - We glue a transparent film onto the base of the antenna.
A bolt with wire is inserted into the hole in the base, and a film is glued to the base itself. - We apply cold welding to the bolt and wire and wait until it dries.
Cold welding is applied to the bolt, which will ensure the strength of the structure - We remove the film and give the product an attractive look by grinding it in any convenient way: manually or with fine sandpaper.
- We cover the antenna with primer and apply a layer of black paint.
After cleaning, a layer of primer and paint is applied, which will ensure an attractive appearance of the antenna. - The device can be installed both on the roof of the car and in the cabin.
- All that remains is to connect the receiving part using a cable: it should not be short or long.
The described device will only have to be prepared for long service: for this, the contacts are coated with Litol or silicone sealant, which will protect them from oxidation and rust.
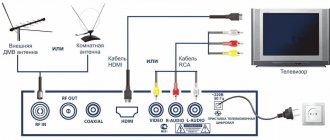
How to make a TV antenna
When buying a car radio with a large screen, you inevitably have to think about installing an antenna that allows you to receive television channels. If desired, the device can be assembled independently, especially considering the cost of factory antennas. For manufacturing you will need the following parts:
- telescopic antenna 2 pcs. (suitable for old radios);
- antenna television amplifier.
The process for creating a receiving device is as follows:
- We take the amplifier, open the case, remove the antenna installed on it for home reception and mount the telescopic ones. The product will simultaneously amplify and transmit the signal to the radio. The amplifier board may not have fastenings for the antenna itself, so you will need to make holes for fastening elements.
To make a car television antenna, you can use an amplifier from a home antenna and telescopic antennas from old radios. - The next step is to supply power to the amplifier board. To do this, we solder the wires in the same way as when using a stationary antenna: cable to the connector, power wires to the contacts on the board. Then we connect the cable to the antenna socket of the radio, and take power from the +12V output to turn on the amplifier.
The wires are connected to the board in the same way as when used in stationary conditions: the cable is soldered to the connector, and the power wires are soldered to the corresponding contacts on the board - The antenna will be installed on the roof. Otherwise, the device will not receive a signal due to the metal body.
- The wires are laid on top of the driver's door opening. To secure the cable, you can use glue or suitable fasteners.
- The antenna is fixed by a magnet. If you don’t have one, you can make a retainer yourself. To do this you will need epoxy, a magnet and a piece of plywood. We glue plywood to the amplifier body, and then a magnet. After drying (3–6 hours), the device is ready for use.
To mount the antenna on the roof, a powerful magnet is used, which you can make yourself using epoxy, a piece of plywood and the magnet itself
Homemade GPS antenna
The antenna can be made by hand and installed directly into the device body, if dimensions allow. Typically the design is for low signal devices. Such equipment has built-in weak GPS modules and no antenna as such. Before you begin implementing the receiving device, you should find out whether you can get to the GPS module to which the antenna will be connected. This modification is especially justified in navigators without a connector for connecting it.
To make the antenna you will need:
- copper wire with a cross section of 2.5 mm²;
- pliers;
- stranded wire of small cross-section;
- soldering iron
The antenna must be manufactured strictly according to the dimensions shown in the diagram.
Only in this case can you count on high-quality signal reception. The manufacturing process is simple and consists of the following steps:
- Using pliers, we make a square measuring 46*46 mm from a piece of copper wire, and the main thing is to make the bends correctly. The dimensions must be strictly maintained; the performance of the structure directly depends on this.
Using pliers we form an antenna measuring 46*46 mm from copper wire - When the antenna is made, it is soldered to the GSM module with a piece of stranded wire (soldered onto the device board), which is led out of the housing through the hole made.
After making the antenna, solder it to the GSM module using a piece of stranded wire - The device is being assembled. The antenna can be attached to the body using double-sided tape in a convenient place.
How to choose an antenna for a radio
First of all, the choice of antenna is influenced by the purpose of the device. As we noted a little earlier, an antenna is installed in a car not only for listening to radio stations. For a regular car radio, a simple car antenna is sufficient.
If the driver bought a mini TV for his car, then he is entitled to a more modern and functional antenna. The only thing that can be contrasted with the functionality of this accessory is its high cost. But there are also universal models that are capable of receiving a regular radio signal, catching television channels (if there is such a broadcast in a particular area), as well as GPS signals (connected to a navigator or head unit that has the appropriate function).
So, before choosing a new antenna, you need to decide on its purpose. The second thing you need to pay attention to is the conditions in which the machine is operated (rural or urban). This will affect the power of the device.
Connecting an active antenna to the radio via an adapter
Here, it seems, we could finish our conversation about connecting the antenna to the radio, if all its variations only ended with the same standard, the so-called DIN type. However, modern radios sometimes cannot afford such great luxury. There is so much in them that using a more compact plug can change the situation radically. This means that manufacturers are looking for opportunities to use their own plugs, but at the same time provide the ability to connect them with generally accepted ones. Here are some examples. The first example is when an ISO type antenna is connected to the radio via an adapter to a DIN socket. The second is when we have a Toyota radio and use an adapter to switch to a standard socket.
In fact, it is clear that when connecting an antenna, cases may arise that will require you to purchase additional adapters. And if you can’t find any, you may have to use a soldering iron.
Now we can certainly summarize that connecting an antenna is not only electrical switching, ensuring correct connection and reliable contacts of the antenna and radio, but also the selection of adapters that match each other. After all, simply by buying an antenna and trying to connect it to the radio, you do not at all guarantee that you will not need an adapter. Although the one who is aware is armed. And now we are confident that you will cope with the task!
Review of popular active car antennas
Here is a list of active car interior antennas that are popular in 2021:
| Model: | Equipment: | Advantages: | Flaws: |
| Bosch Autofun PRO | Radio signal receiving element; Antenna body made of plastic; Gel for grounding the device; Receiver module; Double-sided tape stickers; Fastening. | Small sizes; Highly cleans the radio signal; High-quality assembly; 3 meter cable. | Expensive; If installed incorrectly, it gets very hot. |
| Blaupunkt Autofun PRO | Fastening; Double-sided tape; Receiving module housing; Self-tapping screws; Grounding lubricant (prevents corrosion). | Receives signals in the range of LW, MW, FM; Shielded cable 2.9 meters long; Qualitatively separates signals from the corresponding ranges. | The backlight shines brightly. |
| Triad 100 Gold | Receiving module; Tapes with a contour of the receiving element, equipped with double-sided tape. | Reception of signals at a distance of up to 150 kilometers; Not susceptible to voltage drop; Ability to work in electrical circuits with voltage from 9 to 15 V; Equipped with a double filter that prevents the formation of interference from the internal electrical circuit of the car; High-quality assembly; Great working resource. | The cable is slightly shorter than the previous options - 2.5 meters. |
| Triad 150 Gold | Receiving module; Tapes with a contour of the receiving element, equipped with double-sided tape, adapted for 90- or 180-degree installation. | In terms of signal quality outside the city, it even surpasses Bosch or Blaupunkt models; Good signal amplification and purification; Ability to catch a signal at a distance of up to 150 km to the repeater; High-quality assembly; Durability. | Short cable – 2.5 meters. |
Here is a list of active external car antennas popular in 2021:
| Model: | Set: | Advantages: | Flaws: |
| AVEL AVS001DVBA 020A12 Black | Receiving module; Built-in amplifier; 5 meter signal cable; Fastening with magnets. | Picks up electromagnetic pulses from radio signals and converts them into electrical signals; High-quality assembly; Original design; High-quality signal; Stays well on the car body. | The manufacturer provides a small selection of device body colors. |
| Triad MA 275FM | Receiving module with a cylindrical body shape; Magnetic retainer (72mm diameter); 2.5 meter connecting cable; Built-in signal amplifier. | Stable radio signal reception at a distance of up to 50 kilometers from the repeater; Qualitatively assembled; Compact housing of the receiving module; Equipped with a VHF frequency inverter. | Short cable, as for an outdoor antenna; Small coverage radius (considering signal transmission on flat terrain). |
| Triad MA 86-02FM | Powerful magnet (diameter 8.6 centimeters); Receiving module; 3.0 meter coaxial cable; 70 cm rubberized antenna rod; Built-in signal amplifier. | Ability to receive NV signals in the presence of broadcast; Reception radius – up to 150 kilometers; Large outline; High quality build. | A short cable, like for an outdoor antenna. |
| Prology RA-204 | Double tape; Receiving module with metal antenna rod. | A budget option; LED indication when turned on; Compatible with any car radio model; Quick installation; Radio signal reception at a distance of up to 80 kilometers from the repeater. | Short cable – 2.5 meters; The fastening is not always adequately sealed, so additional sealant must be used. |
To conclude our review, we offer a short video about the basics of operation of antenna devices:
Antennas and fools. Antenna Device Basics
If the car already has a receiving screen installed, then you can additionally purchase the amplifier itself. Here's a video on how to connect it:
High-quality antenna amplifier for car radio
Types of car antennas
Car antennas are different. They are mainly designed for receiving FM radio stations or television programs on radios with a tuner. However, such a device can be installed in a car not only for entertainment purposes, but also for navigation. In addition to the above classification, antennas are divided by type of mounting:
- using magnets;
- on suction cups;
- insertion method;
- clamps;
- by embedding.
In addition, receiving devices are divided into external and internal (passive and active). Depending on the range of received frequencies, the device can be either small or, conversely, large in size. For example, for communications in the 27 MHz band, the antenna has large dimensions. If we consider powerful specimens, their length can reach two meters. Passive external antennas come in telescopic and whip types.
One of the options for mounting a car antenna is magnets, which are used for external mounting of the receiving device.
How to choose an antenna for a car radio
Before deciding which antenna to choose for the radio, you should decide for what purpose it will be used. Based on this, attention should be paid to the parameters and characteristics of the antenna:
- the antenna for the radio is designated as FM or AM (frequencies 70–108 MHz);
- for television - DVB - T (frequency up to 900 MHz);
- for navigation - GPS (400 MHz);
- for radio communications - CB (27 MHz).
One of the main criteria when choosing is to ensure reliable signal reception at a distance from the city. In the process of selecting an antenna, you need to evaluate the advantages of its types.
- Active ones, also called internal ones, work only with an additional built-in signal amplifier. Distinctive features are low weight and size, as well as ease of installation. Plus, this type of antenna is installed inside the car, thereby protecting the device from external influences. But such antennas also have a negative side, which boils down to low sensitivity, in other words, not very good reception quality.
- Passive, also called external. The devices do not require additional power. The positive features of such antennas are ease of installation and high sensitivity, but they do not have protection from the external environment. Basically, such receiving devices are mounted on the roofs of cars.
Passive car antenna does not require additional power, is easy to install and has high sensitivity
To understand which antenna to give preference to - external or internal, it is worth considering the distances (distance from the city) for which they are planned to be used. An important criterion also includes dimensions, which directly depend on the functionality of the receiving device. If you need to choose an antenna only for receiving radio stations, and you do not plan to install a TV or navigator, then you should pay attention to a regular radio antenna. For high-quality reception of radio and television stations or for operating a navigator, preference should be given to GPS/GSM devices. The most universal car antennas include satellite ones, but it is worth considering their rather high cost. However, the difference in price is compensated by convenience and versatility.
As for the dimensions, antennas for receiving radio stations are slightly larger in size than television antennas. It is important to pay attention to the antenna connector: it must match that on the radio. It is generally accepted that an external antenna receives better. Yes, this is true, but only in urban environments. Today, all kinds of universal antennas are offered that can be used for reception in a wide range of frequencies. In addition, some models have the ability to switch reception from urban to suburban, which allows you to change the sensitivity and level of interference suppression.