Why do you need an amplifier?
Multimedia head units have a built-in amplifier, which is not suitable for all car owners. Installing additional equipment allows you to clear the signal of interference and install additional speakers that improve the reproduction of low or high frequencies. When using an additional amplifier, the power of the generator and the capacity of the battery should be taken into account; to reduce the likelihood of voltage failure, electrolytic capacitors (storage) are used.
How to calculate power and choose
To select the equipment yourself, you need to calculate the power of the loudspeakers installed in the circuit of each channel. Based on the obtained values, an external signal amplification device is selected. It is recommended to purchase a more powerful device (10-15%) to reduce the load on the equipment and allow you to subsequently replace the acoustics. You should also take into account the resistance of the coils in the speakers and the frequency range for which the products are designed.
The choice of type of amplification machine installation depends on the configuration of the future speaker system. If you plan to connect a subwoofer to an amplifier, a device with 2 channels that are connected via a bridge circuit is sufficient. If the reason for the modification is the desire to get rid of noise in the speakers and increase the sound volume, you need to purchase a 4-channel unit. To use 4 speakers and a subwoofer at the same time, you will need to install a 5-channel amplifier or use 2 separate devices.
To connect the car amplifier to the radio, “tulip” or RCA connectors are used, located on the rear wall of the head unit housing. Before purchasing an external device, it is recommended to check the type of outputs used on the player. If there are no connectors, it is possible to switch the amplifier unit to standard acoustic outputs through a signal amplitude reduction module (attenuator).
Connecting a passive subwoofer
As already mentioned, a passive sub is simply a speaker/column for low-frequency sounds. It is connected either in parallel with the main stereo speakers, or on a separate channel. Connecting speakers in parallel is not the best solution. With this scheme, the overall sound quality and volume deteriorate. This is usually done if the radio or amplifier has few channels (two) and they are already “busy”.
In addition, parallel connection reduces the total load resistance to less than 2 ohms. This can lead to failure of the car radio amplifier if it is not designed for such resistance.
The connection method and installation location are in no way interconnected
With a dedicated channel on the radio, a passive subwoofer slightly improves the sound quality (if we talk about the reproduction of low frequencies). But the sound will be far from ideal, since there is no possibility of fine tuning.
That’s why they often put an amplifier after the radio, and connect both a stereo pair and a subwoofer through it. With this connection, there are more adjustment possibilities through the amplifier, and the sound quality will be better, since the amplifier divides the frequency spectrum and supplies the speakers with what they can normally output.
How to connect a passive subwoofer to a car
A passive woofer can be integrated into the system via a crossover without an amplifier. In this case, you need to take into account the rated power of the head unit: if the linear output of the radio is 25 W, then the maximum peak power of the subwoofer will be 250 W.
A crossover is a device with an inductive coil that divides frequencies into low and high ranges. There are single-band and multi-band (they have several separate linear streaming outputs). The principle of operation of the device is the distribution of frequencies for each specific speaker: low, mid and high go, respectively, to the subwoofer, midbass and tweeters.
The crossover is connected to the audio system in the same way as for an active bass: the outputs of the “Out Put” sound source are connected for each individual channel using an RCA cable. The passive crossover is connected to a standard 12 Volt power supply. The efficiency of such a bridge is low - at peak loads the speakers will produce background, and the sensitivity will not exceed standard values.
How to connect two amplifiers with a bridge
Master/Slave
Amplifiers designed for this connection have MASTER/SLAVE switches. Therefore, with a bridge connection, one of the amplifiers will be the Master and the second will be the Slave, set the switches in this accordance. It is to the Master that the interconnect cables (tulips) from the radio are connected, and from it, through a mono connector, the signal is transmitted to the Slave (with a single interconnect). This is done so that all settings and control are carried out from one monoblock - from the Master, that is, gain, filters, subsonic, etc. will be exhibited only there. There is no need to take Y splitters to try to plug interconnects into the Slave as well.
If the manufacturer claims that the amplifier can operate as a bridge, but there are no Master/Slave switches, then it will have two sockets with similar names - Bridge Input and Bridge Output. In this case, use the Bridge Output jack on the master amplifier and connect it to the Bridge Input jack of the slave amplifier.
Connecting speaker wires
Here, be careful and do not confuse anything: we connect the negative connectors of the two amplifiers to each other; then we connect the plus (+) of the Master to the plus of the subwoofer, and the plus of the Slave to the minus of the subwoofer!
Yes, there are two positive wires going to the subwoofer, no need to strain - everything is correct. The fact is that a direct signal is supplied to the input of one amplifier, and for the second the signal is turned 180 degrees. Therefore, at the output of one the positive potential increases, and at the output of the second it is the same but negative. The increase in power occurs because the amplifiers or channels (in the case of using one wuxia) operate at reduced resistance. For example, if the sub is connected to 4 ohms, then each amplifier or channel operates at 2 ohms, etc.
Adviсe
Let's give some advice.
In addition to calculating the load on the equipment in a specific connection, it is important to correctly select the wires that match the resistance in the circuit. Preference can be given to acoustic wires, which give the purest sound at the output, or to ordinary wires with R not lower than 4 ohms. To avoid damage and short circuit, the polarity of the contacts + to - should be strictly observed. When you turn on the radio for the first time to check, the volume should be minimal
If the sound is distorted, the equipment should be turned off immediately. This effect occurs when the polarity of the connections is not observed, which will have to be corrected.
CORRECTLY CONNECTING A SUBWOOFER TO AN AMPLIFIER
The subwoofer is connected to the amplifier using a car audio converter (adapter, adapter). This is a small device with a pair of RCA outputs and two pairs of wires, two of which are used to connect a dynamic emitter. The rest of the wires can simply be hidden - they are not needed for now. The line output wires (RCA OUT) must be connected to the amplifier.
The principle of connecting a subwoofer to a single-channel amplifier
To connect a car subwoofer to a mono amplifier, you will need to connect the positive and negative voltage wires from the amplifier to the same terminals of the subwoofer - that's all. Connecting several passive subwoofers is a little more complicated. Their connection is carried out in a parallel or series circuit, but with the obligatory precise calculation of their internal resistance.
The principle of connecting a subwoofer to a two-channel amplifier
In this option, the connection is made using a bridge circuit. This connection technology works great with virtually all two-channel amplifiers, to which you need to add another subwoofer. Here, too, everything is simple - we take the positive wire from one channel, and the negative wire from the 2nd channel and feed it to the corresponding terminals of the subwoofer.
When making this connection, special attention should be paid to the internal resistance of the subwoofer, which should be 4 ohms. In addition, you should take into account that with this option, the output power of both channels is added
If the amplifier has the function of switching mono and stereo modes, then in this case the wires are connected to the positive and negative terminals of one channel. If there is a need to connect two subwoofers to the amplifier, then the speaker cable from them is fed to different channels.
For correct and clear operation of the subwoofer, you should provide an LPF low-pass filter, which will set the upper limit of the low frequency.
The principle of connecting a subwoofer to a four-channel amplifier
The standard connection of a speaker system to a four-channel amplifier is considered to be a scheme with two speakers and one subwoofer.
So, the typical way to connect an audio system to an amplifier would be the option of two speakers and a subwoofer. In this case, the sub is connected to the amplifier via a bridge circuit, and the audio speakers are each connected to their own channel. The peculiarity of this connection is that the speakers must work with the front channels, and the sub with the rear ones. But at the same time, it is possible to connect a pair of subwoofers to different rear channels.
Home theater connection
By home theater, users mean different sets of devices. This is either multi-channel acoustics or a set of TV, player and speakers. Next we will look at two options:
- How to use a PC as a source of sound and image by connecting a TV and speakers to it.
- How to directly connect existing cinema acoustics to a computer.
Option 1: PC, TV and speakers
In order to reproduce sound on speakers from a home theater, you will need an amplifier, which is usually a supplied DVD player. In some cases, this may be a module built into one of the speakers, for example, a subwoofer. The connection principle in both situations is identical.
Option 2: Direct speaker connection
This connection is possible if the amplifier and computer have the necessary connectors. Let's look at the principle of operation using the example of acoustics with 5.1 channels.
- First we need four adapters from 3.5 mm miniJack to RCA (see above).
- Next, we use these cables to connect the corresponding outputs on the PC and the inputs on the amplifier. To do this correctly, you need to determine the purpose of the connectors. In fact, everything is quite simple: the necessary information is written next to each slot.
- R and L (Right and Left) correspond to the stereo output on the PC, usually green.
- FR and FL (Front Right and Front Left) are connected to the black “Rear” jack.
- SR and SL (Side Right and Side Left) – to gray with the name “Side”.
- The center speakers and subwoofer (CEN and SUB or SW and CE) are connected to the orange connector.
If some sockets on your motherboard or sound card are missing, then some speakers will simply be unused. Most often, only a stereo output is available. In this case, the AUX inputs (R and L) are used.
It is worth keeping in mind that sometimes, when connecting all 5.1 speakers, the stereo input on the amplifier may not be used. It depends on the principle of its operation. Connector colors may differ from those shown above. Detailed information can be found in the instructions for the device or on the manufacturer’s official website.
Sound settings
After connecting the speaker system to your computer, you may need to configure it. This is done using the software included with the audio driver, or using standard operating system tools.
Read more: How to set up sound on your computer
Conclusion
The information provided in this article will allow you to use the equipment at hand for its intended purpose. The process of creating a symbiosis of a home theater with a computer is quite simple, you just need to have the necessary adapters available
Pay attention to the types of connectors on devices and adapters, and if you have difficulties determining their purpose, read the manuals
Describe what didn't work for you. Our specialists will try to answer as quickly as possible.
Amplifier connection diagram
Connecting a two-channel and four-channel amplifier
We have combined this section because these amplifiers have a very similar connection diagram, one might even say more simply, a four-channel amplifier is two two-channel ones. We will not consider connecting a two-channel amplifier, but if you figure out how to connect a four-channel amplifier, then you will not have any problems connecting a two-channel amplifier. Most car enthusiasts choose this option for their installations, since this amplifier can connect 4 speakers, or 2 speakers and a subwoofer. Let's look at connecting a four-channel amplifier using the first and second options.
Connecting a 4-channel amplifier to a battery is recommended using a thick cable. How to choose the right power wires and connect the interconnects, we discussed all this above. Amplifier connections are usually indicated in the manufacturer's instructions. When an amplifier is connected to an acoustic system, it operates in stereo mode; in this mode, this type of amplifier can operate under a load of 4 to 2 ohms. Below is a diagram of connecting a four-channel amplifier to speakers.
Now let's look at the second option, when speakers and a subwoofer are connected to a four-channel amplifier. In this case, the amplifier operates in mono mode, it takes voltage from two channels at once, so try to select a subwoofer with a resistance of 4 ohms, this will save the amplifier from overheating and going into protection. Connecting a subwoofer will not be a problem; as a rule, the manufacturer indicates on the amplifier where to get the plus to connect the subwoofer, and where to get the minus. Take a look at the diagram of how to bridge a 4-channel amplifier.
Connecting a monoblock (Single channel amplifier)
Single-channel amplifiers are used for only one purpose - connecting to a subwoofer. A notable characteristic of amplifiers of this type is increased power. Monoblocks are also capable of operating with resistances below 4 ohms, which is called a low-impedance load. Monoblocks are classified as class D amplifiers, and they have a special filter for cutting frequencies.
Installing a single-channel amplifier will not require much effort, since its connection diagrams are very simple. There are only two outputs - “plus” and “minus”, and if the speaker has only one coil, then you just need to connect it to it. If we are talking about connecting two speakers, then they can be connected either in parallel or in series. Of course, you don’t have to limit yourself to just two speakers, but before you connect the amplifier and subwoofer to the radio, will the latter cope with a high level of resistance?
How to connect with your own hands
To connect an amplifier you do not need to have deep electrical knowledge. Just follow the instructions that come with the device. Regardless of the modification of the device, the connection is made according to the following diagram.
1. First, the amplifier housing is fixed in a selected place in the car (where it will not overheat).
2. To prevent accidental breakage of the line, the wiring should be laid under the interior trim. How to do this is determined by the car owner himself. However, when laying the interconnect cable, it is important to remember: location in close proximity to the power wiring of the machine will lead to distortion of the audio signal due to electromagnetic radiation.
first option for laying the power cable
3. The power cable can be laid along the main wiring of the car. At the same time, it is important to secure it so that it does not fall under the moving elements of the machine - the steering wheel, pedals or runners (this often happens if the work is not performed by a specialist). In places where the cable passes through the body wall, it is necessary to use plastic bushings. This will prevent the wire from chafing. For greater safety, the line must be laid using tubing (corrugated tube made of non-flammable material).
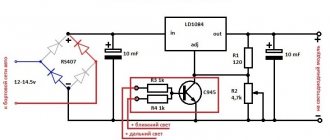
4. The negative wire (black) must be secured to the car body. In this case, you cannot use screws and twists - only bolts with nuts, and the contact area must be cleaned. The terminal on the amplifier marked GND is ground, or minus. The Remote terminal is where the control wire from the radio is connected (can be powered from the antenna connector). It sends a signal to activate when the tape recorder is turned on. Most often, the kit includes a blue wire or with a white stripe for this purpose.
second option for laying the power cable
5. The signal cable is connected to the Line-out (radio) and Line-in (amplifier) connectors. In many models there may be several of these jacks: front (Front), rear (Rear), subwoofer (Sub).
6. The speakers will be connected according to their operating instructions.
7. If the radio is two-channel, and the amplification device is four-channel? In this case, you should use an interconnect cable with a splitter. There are two “tulips” on one side and four on the other.
Connecting an amplifier to a radio without tulips
Budget models of car radios have conventional connectors with clamps. In this case, you will need to purchase a special adapter to connect the line cable. On one side it has ordinary wires, and on the other - “tulip mothers”.
To prevent the wire strands between the adapter and the radio from breaking due to constant rocking of the device, you can wrap it in foam rubber (it won’t rattle while driving) and fix it on the body of the head unit.
How to connect two or more amplifiers
When connecting a second amplification device, additional factors must be taken into account.
- The presence of a powerful capacitor (at least 1F) is mandatory. Installed using a parallel connection with the battery.
- The connection of the signal cable depends on the modifications of the amplifiers themselves. The instructions will indicate this. Often a crossover (frequency distribution microcontroller) is used for this.
The following review explains why a crossover is needed and how to set it up:
Car audio. Secrets of Settings No. 1. Crossover.
Connecting a two-channel and four-channel amplifier
To connect the amplifier, in addition to the device itself, you will also need special wiring. As already mentioned, the signal wires must have a high-quality screen so that there is no interference in the sound. Power cables must withstand high voltage.
Two-channel and four-channel analogues have similar connection methods, depending on what effect you want to achieve.
Two channel amplifier
Two-channel models are popular among most car audio enthusiasts. In budget acoustics, such modifications are used as an amplifier for front speakers or for connecting a subwoofer. Here's how such an amplifier will be connected in both cases:
- Frontal acoustics. In this case, the amplifier will be used in stereo mode. In this case, the signal cable can be connected at a high level (if the radio does not have linear outputs, then the amplifier has a high level input port for this) or at a low level (when the radio is equipped with linear outputs - ordinary tulip-type sockets). When connecting, it is important not to confuse polarity and channels. You should also use an HPF or low pass filter. The load on each channel can be 2 ohms.
- Subwoofer. In this case, the amplifier is connected in “bridge” mode. This scheme is available for most two-channel models. The scheme is as follows. The plus of one channel of the amplifier and the minus of the other are taken and connected to the subwoofer. It is worth noting that most models operate at a minimum load in bridge mode from 4 Ohms. In such a connection scheme you will need an LPF filter. It cuts off signals with a frequency of 50-100Hz coming from the subwoofer.
Four channel amplifier
Connecting such an amplifier has an almost identical circuit. The only difference is the ability to connect either four speakers or two speakers and a subwoofer. You need to power the device using a thick cable.
In most cases, along with the amplifier, instructions for connecting in different ways are included in the kit. This applies to both stereo mode (the speakers are connected in accordance with the polarity indicated in the diagram in the instructions) and mono mode (2 speakers and a sub).
To connect a subwoofer, you must strictly follow the speaker manufacturer's instructions. The connection diagram is identical to that of connecting a subwoofer to a two-channel amplifier - two channels are combined into one bridge. Only in the four-channel version two speakers are also connected.
Connection diagram for an amplifier in a car
Connecting car speakers to the amplifier is carried out with copper stranded wires, which can be laid in the lower part of the car or on top under the decorative upholstery. The top connection is considered more reliable. The subwoofer is usually placed in the trunk of a car, so it should be securely mounted. The amplifier output is implemented in the form of screw terminals or via RCA connectors (Tulip). In the second case, it is better to purchase a ready-made set of connecting cables.
It is not difficult to connect a car amplifier to the radio, since its outputs and inputs of the amplifier are equipped with RCA connectors. The outputs of the left and right channels of the car radio are connected to similar input connectors of the terminal device. All screw connections should be tightened to maximum torque to ensure reliable contact when driving on any road. If you do everything correctly, according to the descriptions and drawings, then there will be no problems connecting a sound amplifier in the car.
Leave a request and we will call you back within 48 hours!
How to install and connect a subwoofer
Installing and connecting a subwoofer in a car yourself will require some tools and supplies. In addition to the amplifier and subwoofer, we will need:
- wiring (power, “tulips” and positive wire to the amplifier and car radio);
- fuse;
- capacitor;
- pliers and wire cutters;
- insulating tape;
- screed;
- a set of wrenches and an adjustable wrench.
Passive subwoofer connection diagram
The subwoofer, together with the satellites, is connected to the amplifier, and it, in turn, is connected to the car radio. The amplifier receives the signal from the radio and distributes it between the low-frequency speaker (subwoofer) and high-frequency speakers (satellites). Often a subwoofer with an amplifier is installed in the trunk, since that is the only place there is for it. Therefore, we need to stretch the wires through the entire cabin from the battery to the trunk.
Before you start connecting, make sure that all safety regulations are followed. To avoid a short circuit, the car battery must be disconnected.
The power wires, especially the “plus” ones, must be protected by something, for example, corrugation. At the very least, the part that will be located in the engine compartment must be protected. Also, you need to install a fuse on the positive wire as close to the battery as possible. You can buy a ready-made wire with a fuse installed. Its rating can be determined by finding out the maximum current consumed by the amplifier and adding 5 amperes just in case.
Step-by-step instructions for connecting a subwoofer and amplifier
This algorithm is suitable for both a classic box and a stealth subwoofer. The whole process takes approximately 1-3 hours, and the most difficult part is running the power cable to the amplifier. Let's start with this.
- We find a technological hole. It is often closed with a rubber plug, and in domestic cars it may not be closed at all. If there is no hole, you need to drill it, and after pulling the cable, fill it with sealant. To prevent the cable from fraying, it is better to insert a rubber bushing (for example, a piece of hose).
- We lay the wiring in the engine compartment in the standard wiring harness and bring it out into the cabin. It is better to think in advance where the power cable will be laid. In some places it is necessary to remove (or partially loosen) the sill trims, interior trim and other elements under which the wiring will be routed. Be careful not to pinch the wiring. After pulling the wires, you can put everything back in place.
- In the trunk, where we have the amplifier, the wires are also routed through a technological hole. We connect “plus” and “minus” to the amplifier, respectively.
- The amplifier is connected to power, now it needs to be connected to the car radio. For this, standard RCA cables are used - “tulips” and the amplifier power control wire (a thin single-core wire, often blue). To remove the radio, you can use special keys, but if there are none, a knife or screwdriver will do.
- We connect the tulips in accordance with the colors of the connectors. It happens that the wire has red and black plugs, and the radio is red and white. In this case, we connect red to red, and white to black. We also connect the positive power wire if you want the subwoofer to turn on along with the radio.
- Next, we stretch the wires through the interior along with the power wire. We connect the RCA connectors to the corresponding ports of the amplifier.
- If you connected the power cable to the tape recorder, then you need to connect it to the amplifier so that it turns on along with the tape recorder. We find the terminal and connect the power cable from the radio to it.
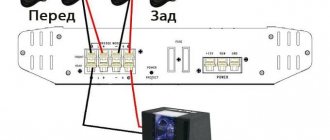
- All that remains is to connect the subwoofer to the amplifier. In our example, the amplifier is two-channel, and we connect the subwoofer to both channels so that the amplifier can optimally distribute power between them.
It is not necessary to install a capacitor, but it is advisable. It should be connected when the maximum power of the amplifier exceeds 400 Watts. Where to install the capacitor is up to you, either in the trunk or in the engine compartment.
If you connect a powerful amplifier directly, it will consume a lot of energy and the battery will quickly discharge. The battery charge from movement is not enough to maintain constant operation of the amplifier. The amplifier can also be connected to the button and turned on separately from the radio.
We carefully check that all wires are connected correctly and that they are securely fastened. Some amplifiers are not protected in any way from polarity reversal, which can damage the transistors. Do not mix up the amplifier wires.
We connect the terminal to the battery, listen and enjoy.
https://youtube.com/watch?v=A0dT42R3ZfY
How to determine plus and minus on a speaker
In heavily worn, dubious speakers and loudspeakers, polarity information may be missing. In this case, the polarity of the speakers is determined using simple experiments.
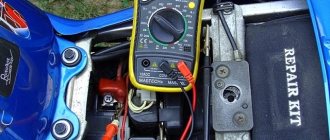
Multimeter
The speaker impedance is low (from 2 to 4 ohms). It can be checked with a multimeter, but it rings equally in both directions. However, when connecting the red (positive) probe to the “+” speaker, the negative (black) probe to the “minus” speaker, the diffuser will move slightly forward (towards the listener). This movement is best determined by touch with your finger rather than visually.
Using a battery
When connecting the plus of the battery to the + of the speaker, the minus of the battery to the minus contact of the speaker, the cone will also move frontally, along which the speakers can be phased. Even if you phase all the speakers in reverse polarity, the sound quality will be the same as in direct polarity. The main thing is that all speakers work in the same phase. The battery should be connected for a short time (one or two seconds), otherwise you can “burn” the speaker.
Video - how to find out the polarity of the speaker:
Under no circumstances should you check the polarity of speakers and speakers using a car battery or charger. Even a short-term connection of the speaker to the battery can damage it.
Using a battery and a sheet of paper
Sometimes (for example, in a speaker) the speaker cone is covered with mesh or fabric. In this case, you can put a light sheet of paper on its surface. When voltage is applied, the sheet of paper will move forward or backward due to the sound pressure of the air. By the direction of movement one can judge the polarity.
Read with this
- Subwoofer and amplifier connection diagram
- Vacuum brake booster repair
- Sound in the car: selecting an amplifier
- Connecting the radio to the car yourself
- How to choose a subwoofer and connect it correctly
- Instructions and diagram for connecting a capacitor to a subwoofer (amplifier) in a car
- Which car cigarette lighter wires are best to choose for use in winter and why?
- How to choose speakers
- How to change the brake vacuum on a VAZ 2110
- How to properly connect (connect) and install an active antenna to the radio in the car
Good nutrition is the key to success
The amplifier connection procedure begins with the power wires. Wiring is the most important element of a car audio system; the volume and sound quality depend on it. Amplifiers need a stable power supply, otherwise the power will not be enough and the sound will become distorted.
To understand why you need to pay attention to the quality of wiring and how it affects the sound reproduced by a loudspeaker, you need to know what a music signal is.
Some suggest that it represents a sine wave, however, the musical sinhala is characterized by a large difference between the normal and peak value. If sharp signal bursts are not important for car speakers, then in the case of an amplifier the situation is completely different. If the signal exceeds the permissible power for even a second (or even a millisecond), then these “anomalies” will be audible even to those who cannot boast of a good ear for music.
If the car amplifier is connected properly, the signal will flow through the wires undistorted. Carelessly done work or incorrectly selected wire cross-section will result in the sound being more compressed, rough and sluggish. In some cases, wheezing may also be clearly audible.
How to choose a wire cross-section?
Wire is the most common metal with a certain level of resistance. The thicker the wire, the lower the resistance of the wire. To avoid sound distortion during large voltage fluctuations (for example, when playing powerful bass), you must install the correct gauge wire.
An amplifier is considered to be a rather electrically intensive device. For its effective operation, high-quality grounding is necessary so that it is possible to receive the necessary energy from the battery. To choose the correct wire cross-section, you need to make some calculations. First, look at the instructions for the amplifier (or directly at the box from the manufacturer, if there is no documentation, use the Internet) and find the rated power value (RMS) there. Rated power is the signal power an amplifier can deliver over an extended period of time to one channel of 4 ohms.
If we consider four-channel amplifiers, they usually have a power of 40 to 150 watts per channel. Let's say that the amplifier you purchased produces 80 watts of power. As a result of simple mathematical operations, we find out that the total power of the amplifier is 320 W. Those. How did we calculate this? It’s very simple to multiply the rated power by the number of channels. If we have a two-channel amplifier with a rated power (RMS) of 60 W, then the total will be 120 W.
After you calculate the power, it is advisable to also determine the length of the wire from the battery to your amplifier and you can safely use the table to select the required wire cross-section. How to use the table? On the left side the power of your amplifier is indicated, on the right you select the length of the wire, go up and find out what cross-section you need.
The table shows the cross-sections of copper wires, remember that a large number of sold wires are made of aluminum coated with copper, these wires are not durable and have more resistance, we recommend using current copper wires.
Fuse selection
In order to secure the connection of the car amplifier, it is necessary to protect the power supply from the battery to the amplifier using a fuse. Fuses should be placed as close to the battery as possible
It is important to distinguish between a fuse that protects the device itself (whether it is an amplifier or a radio) and a fuse installed on the power wire
Connection
After studying the types and types, we move on to the question of how to connect a subwoofer to a car radio without an amplifier:
To start connecting an active subwoofer, first we find two inputs on the back panel of the car radio, then using a linear wire we connect the input of the head unit to the subwoofer input. Then we connect the power - to do this we stretch the power wire from the “plus” terminal of the battery to the subwoofer A “negative” » we connect the subwoofer and the battery with a wire. When connecting an active subwoofer to a car radio, it is necessary to install an additional (very important) component - a fuse. It should be installed near the battery itself. The installation diagram of a subwoofer without an amplifier is shown in the first picture of the article. When low-frequency sounds are played, the subwoofer's electrical power consumption increases significantly , as a result of this, the load on the elements supplying the on-board network of the machine increases. Therefore, for the safety of the power circuit, an additional capacitor is installed in the subwoofer power circuit
- After connecting the subwoofer to the car radio, we proceed to setting up our speaker system
- As a rule, the whole setup comes down to creating a limit for the upper limit of operation for the woofer, then choosing the correct oscillation phase for the speaker
Now, how to connect a subwoofer in a car without an amplifier, you usually have to completely redo the audio power system, so here is an approximate list of necessary purchases:
- 5 meters 8AWG power cable(red)
- 1 meter of cable 8 AWG black
- 5 meters of control cable (thin) with a cross section of 0.75 mm
- Fuse holder FH58
- 40 Amp fuse
- Interconnect cables
- 2 meters of tubing
- Terminals and ties
The circuit of the sound system is simple, so there is no point in describing it in full, see the first photo of this article:
- The fuse is placed 10-15 centimeters from the battery, throw the power cable into the tube
- All cables inside the cabin are laid under the carpet
Subwoofer terminals
How to connect a subwoofer in a car without an amplifier - see the designation of the outputs on the subwoofer:
- +12V output is power (supplied only to the battery through a fuse)
- REM is the control wire, it comes from the radio, and connects to a blue/white wire (for Pioneer car radios, if you have a different one, then see the radio connection instructions), which usually sticks out of the bundle of wires coming from the radio
- The GND terminal is ground (negative wire)
- LOW INPUT contact (under tulips) - RCA wires are connected (to the subwoofer from the radio, if any)
- HI-INPUT contact - connect here if there are no RCA outputs on the radio
Now it’s clear how to connect a subwoofer to a car without an amplifier, all that remains is to wish you success in this matter; to better understand the topic, we recommend watching our training video.
How to connect 2 amplifiers in a car
Before installing two amplifiers in a car, be sure to ensure that they are very hot. Radiators of amplifiers should not be located nearby, and a flow of fresh air should be provided to them. This does not mean that the amplifiers are located under the hood; the main thing is not to cover them with thick fabric or install them in a narrow space.
First, let's consider connecting 2 amplifiers in the car to the on-board circuit, that is, supplying power to them. A prerequisite for any method remains the installation of a fuse, the fuse link of which is designed to burn out when the maximum current increases by 1, 2 -1, 3. The maximum current develops at the maximum output power and is indicated in the technical data sheet for the sound amplifying device.
There are two ways to connect power:
- Connecting the power wire directly from the first amplifier. That is, one line with one fuse is laid to the installation site, which is designed for the total current of two amplifiers. In this case, it is necessary to take into account the cross-section of the conductors, since if this condition is not met, the wiring will overheat while listening to music at high volume, which will lead to dire consequences, including fire.
- Laying two separate lines requires the installation of two separate fuses designed for the current of each amplifier. This method has its advantages associated with the separation of power circuits, but also disadvantages associated with the purchase of long-length wires. The cross-section of the wire is calculated, like the fuse, for the operation of one amplifier installation. This method is used when connecting powerful stereo systems.
Power is routed to the devices in such a way as to reduce the amount of interference when listening, so it is recommended to separate the power and audio signal wires on opposite sides of the car.
What's the pinout?
The pinout is presented in the form of a schematic drawing or, if possible, a color table. In which are given:
- information about the contact number,
- its short name,
- the color of the cable sheath is indicated,
- its functional purpose,
- electrical characteristics.
In the drawing version, the connection side. That is, the view of the connector from the side of the connecting cable or from the side of the device connected to it.
The world's major manufacturers of automotive electronics and related equipment, in order to ensure user convenience, try to adhere to a single standard for all devices and connectors, developed by the International Organization for Standardization (ISO)
With minor technical and color deviations that do not play a particularly important or noticeable role during installation work on pinouting wires for the Pioneer radio