A good friend of mine bought a plot for individual housing construction. And he needed an electricity metering board and, out of friendship, he asked me to do “something quickly, but inexpensively and at the same time it would work.” No question, I'll do it!
So the input data is 3 phases, 15 kW, PE and N come to the site separately, i.e. TN-S grounding system (reliable and easy to install).
We go to the famous Jurat store in our city and buy everything we need there. First of all, we select the shield itself. We take one of the most inexpensive ones - from TDM, with a degree of protection IP66 - it’s perfect for the street. We pay 1,790 rubles for it. By the way, it was made in Russia - let’s support the domestic manufacturer.
We also buy a “Lightning” sticker (6.2 rubles) and a “380 V” sticker (4 rubles) for it - little things, but they give the work a finished look. Since we will have the shield on the street, it will not be superfluous to buy a cover for the shield lock - fortunately it costs only 59 rubles.
Since the panel will be installed by third-party electricians, I used a special label printer to print laminated stickers “Check the RCD monthly with the TEST button”, designation of the grounding system and a recommendation that the panel is best protected from direct contact with precipitation (otherwise they will rust over time - powder coating is bad resists precipitation).
Here's the neat appearance it turned out to be:
More impressive with stickers
- A few details:
Lock with lid
Different stickers
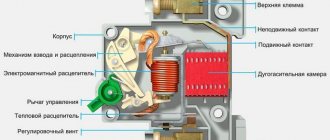
Enough with the external gloss, it’s time to move on to the most important thing - the internals. For input we put a three-pole ABB machine with 25 Amperes (for 15 kW you need about 22.5 A, the nearest larger one is just 25 A).
It cost 550 rubles. Why didn’t you save and buy something other than TDM? Because the price difference is small, let it be a trusted brand.
For the introductory machine, we buy a sealing box for 38 rubles from some rootless Chinese manufacturer.
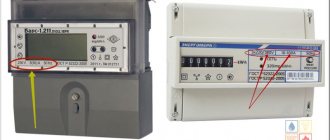
We take one of the cheapest meters - three-phase Mercury 231AM for 1930 rubles. It is designed for current up to 60 A - for our purposes it will do.
Let's forget about this counter!
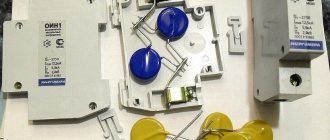
Next, as expected, you need to install a fire-fighting three-phase RCD at 300 mA, and not a simple one, but a selective one (it triggers with a delay - so as not to run outside to the switchboard every time if the RCD trips in the house for other reasons).
It’s better not to look at the price tag of brands at all - it’s just a disappointment, so it’s good that we have Chinese brothers - we buy Chinese TDM (agree, this is better than nothing?). The cost of the RCD was quite divine 1820 rubles.
Please note that the RCD must be designed for a current greater than the rating of the circuit breaker being protected - otherwise it may fail.
The fact is that the machine immediately trips when the current increases several times, and if it exceeds 1.5 times, it can trip in an hour - during this time the RCD with the same rating will overheat. Therefore, we take the RCD with a reserve - 63 A.
RCD characteristics
So that every time the light in the house goes out, looking at the panel you don’t have to rack your brains - either “the electricity has run out” or the panel is faulty - immediately after the meter we install a phase indicator LS 47T. It lights up - it means there is current at the input - it is clear to everyone. A Chinese-made product of the TDM brand has a price tag of 170 rubles.
Lights up - there are phases!
Well, while there is no house on the site, we put a socket on a DIN rail into the panel (136 rubles) and protect it with a difavtomat (this is an RCD + a machine in one “bottle”) of 16 A with a leakage current of 30 mA, again made by hardworking Asians , TDM brands (what can you do - budget, “you understand”) for 680 rubles. Well, if we installed a phase indicator, then for “feng shui” we also install an LED indicator of the TDM brand, which was purchased for 120 rubles.
Socket, its guard and indicator
The main things have been purchased, but you still need a bunch of different small things: - DIN rail 30 cm - 2 pieces for 20 rubles (there were some scanty ones in the panel) - limiters for the DIN rail - 3 pieces. 8 rubles each (this is so that nothing slides off the dinreika); - self-adhesive pads - 130 rubles per pack of 100 pieces; - tips for 6 sq.
mm for crimping - 185 rubles per pack of 100 pieces; - tips 2x6 sq. mm - 240 rubles per pack of 100 pieces; - wire PV-3 red 6 sq. mm - 1 meter - 27 rubles - PUGV wire white 6 sq. mm - 1 meter - 24 rubles - wire PV-3 blue 6 sq. mm - 1 meter - 27 rubles - wire PV-3 black 6 sq.
mm - 1 meter - 27 rubles
— PV green-yellow (or yellow-green - whichever you prefer) 6 sq. mm - 1 meter - 45 rubles (for some reason much more expensive than monocolor ones!)
The stern storekeeper from the warehouse probably mistook me for a lover of rainbow colors, cutting me 1 meter of wires. Moreover, outwardly, all the wires differed noticeably in thickness. (Different manufacturers and specifications).
But knowing such a problem, I took the cross-section with a margin - 6 sq. mm - so that even if the manufacturer saved on the thickness of the core, this will not have a critical effect (although of course some people actually “save”).
Plus, I took two more grounding terminals on a DIN rail for 35 rubles apiece.
I have some little things like “bugs”, clamps and tips with a ring lying around, so I don’t count them (for those who need them, consider that all together it’s 50 rubles).
We start assembling - nothing complicated, the designers were more complicated in childhood, the main thing is not to overtighten the terminals:
We crimp all cables using special cables. tips using special pliers.
We squeeze everything
- To prevent the modular equipment from moving off the DIN rail, we place limiters at the edges of 8 rubles each.
Limiters - no one will run away from the DIN rail!
To prevent the wires from dangling, we connect them with plastic clamps and secure them with self-adhesive pads. Degrease the area for gluing.
Where should I glue it? Here's the glue!
- This is how we make the ground (the door must be ground, just like the shield body)
- Overall we collected...
The assembly is completely complete
...but it needs to be polished. We glue the stickers, glue the diagram (printed on self-adhesive for 10 rubles per sheet) of the shield on the inside of the lid so that “Feng Shui” is observed and... done!
Ready!
- total budget: ay, tsvay, dray... 8271.20 rubles only for materials.
- Reasoned criticism is welcome!
- PS For good measure, it is necessary to install surge suppressors, but they are already out of the budget.
Source: https://www.drive2.ru/c/496980631218028568/
Installation and installation of 220V metering board
Hello, dear reader of my blog. Today I will tell you how to assemble a 220V electricity metering panel.
The question is quite complex and if you are not confident in your abilities, then it is better not to take on such a responsible job, since mistakes here are fraught with dire consequences in the form of a short circuit and fire. At the end of this article I will show a diagram where everything will become clear to you.
Any malfunctions in the metering panel can cause the failure of expensive electrical equipment, from heating boilers to LED lamps.
And so let's get started, as the name suggests (metering board), this board is used to account for the electricity you consume. Therefore, it must have a counter.
Selecting the number of circuit breakers
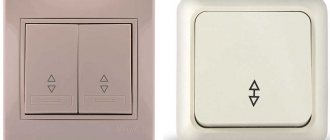
Single pole circuit breaker
But first of all, you need the box itself (shield) in which you will install everything. It is selected based on the number of circuit breakers (“Automatic Switches”), and how many of them to install is up to you. You can at least install a separate circuit breaker for each socket and switch. But of course this will be unnecessary. It is best to separate outlets and lighting. That is, one machine for lighting and another for sockets. If the consumption is too high, then you can, for example, connect 2 rooms to one pair of machines , and the remaining rooms to another pair. By the word pair, I mean two machines, one for “light” and the other for sockets. If any device in the house consumes more than 5 kilowatts, then it must be connected with a separate line (and, accordingly, a separate machine). These are devices such as an electric stove, electric boiler, etc. It is also recommended to connect the washing machine to a separate line. And, of course, you need to keep a couple of spare machines in case a new consumer appears in the house. At the input, it is also advisable to install a two-pole circuit breaker (double) as well as an RCD and OPS, but more on that later.
Selecting the power of circuit breakers
Various circuit breakers
In the previous article about replacing wiring, I already told you about the choice of wire cross-section and that a cross-section of 2.5mm² goes to sockets, and 1.5mm² to lighting. So, the machines are selected based on the wiring cross-section , so that it can turn off before your wire starts to melt from overload. It turns out that a machine with a power rating of 25A (ampere) is installed on a 2.5mm² wire, and with a power rating of 16A on a 1.5mm² wire. Below is a table showing which section it is recommended to install which machine and what is the maximum load of such a wire:
| Section of copper conductors of wires, sq. mm | Permissible continuous load current for wires, A | Rated current of the circuit breaker, A | Maximum current of the circuit breaker, A | Maximum power of single-phase (220V) load KW | Characteristics of household load (220V) |
| 1.5 | 19 | 10 | 16 | 4,1 | Lighting and alarm |
| 2.5 | 27 | 16 | 20 | 5,9 | Socket groups and electric floors |
| 4 | 38 | 25 | 32 | 8,3 | Water heaters and air conditioners |
| 6 | 46 | 32 | 40 | 10,1 | Electric stoves and ovens |
| 10 | 70 | 50 | 63 | 15,4 | Opening lines |
What is an RCD and why is it needed?
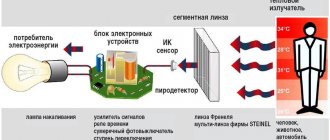
Residual current device (RCD)
We will assume that you have decided on the number and power of machines. Next, let's talk about the RCD. An RCD is a residual current device designed to protect against current leakage. In our case, current leakage refers to electricity that passes by electrical wiring and electrical appliances. The task of this device is to detect this leak and turn off the power. In simple words, if you grab 2 bare wires, the device will turn off the current before you feel the electric shock, but this is in theory))). This device also has overload protection (like a machine). RCDs come in the same ratings as automatic machines (10A, 16A, 25A, etc.). In general, an RCD is a very useful thing that trips at the slightest current leakage, so do not neglect such protection. Let’s say the electric motor of a washing machine has frayed wire insulation (Phase), in which case the body of your machine will be under current (and you don’t know this).
Without an RCD, unpleasant consequences will await you. You can give a bunch of other situations in which this device would be useful, but I think this is unnecessary. I believe you have already chosen for yourself whether you will install it or not.
Shield installation
Step-by-step work process:
- first you need to install a switch (if there is one in the plan);
- then connect fuses and circuit breakers;
- connect the neutral strip and add working neutral cables there, except for those that need to be grounded using an RCD;
- install an energy meter;
- connect the general fire protection for the residual current device;
You might be interested in this: Electrical diagram of the apartment
What does the shield look like?
- install and connect fuses to each other along the phase cable;
- connect linear RCDs for different rooms (kitchen, bathroom, etc.);
- ground the wires;
- the phase and neutral wires of the soda are connected to the switch, and if there is none, then to the circuit breakers;
- After connecting the power wire, you need to seal it (by calling the inspector).
Electricity metering panel 220 V
Home » Electrical installation » Electrical panels » Electricity metering panel 220 V
In this article, our website vse-elektrichestvo.ru will tell you how to assemble a 220 V electricity metering panel for a country house. The assembly process is a responsible task, so you must be completely confident in your abilities. If in doubt, then it is better to entrust this work to professionals.
Electricity meter housing
The shield is needed to account for the electricity you consume. Therefore, the main element in the design is the counter. If errors are made during installation, a short circuit may occur. Before starting installation, you first need to draw a preliminary assembly diagram.
Number of circuit breakers
Select a shield in which you will install all the elements. Its dimensions depend on the number of circuit breakers that will be installed in the future. Of course, if you wish, you can install a switch for each socket or switch, but this will be unnecessary. If the consumption in the house is large, then 2 rooms can be connected to one pair of machines.
Single pole circuit breaker
If a device in a house consumes more than 5 kilowatts, then it should be connected to a separate line, and accordingly a separate machine. Also, many electricians recommend connecting the washing machine through a separate machine.
Power selection
Automatic machines must be selected depending on the wiring cross-section. This is necessary so that the device can turn off before the wire begins to melt. For a wire with a cross-section of 2.5 mm, you need to set a power rating of 25 A. For a wire of 1.5 mm, you should select a machine with a power of 16 A.
Option 5
In this option, difavtomats and conventional circuit breakers are used to protect groups. Automatic residual current switches (RCBOs) protect the cable from overload, from the action of short circuit current and protects a person from electric shock. Each difavtomat must be supplied with a phase and a zero. After logging out of these devices, you cannot combine zeros either. The neutral working conductors of the remaining groups, which are protected by conventional circuit breakers, are connected to the input common zero bus.
This article presents the simplest options for single-phase electrical panels. They discuss almost all protective devices, show how they need to be connected and contain descriptions of the use of one or another option. Based on your individual situation, you must develop your own scheme. Remember that it must meet all modern electrical safety standards.
Each type of consumer has its own RCD connection diagram. When choosing, the condition of the wiring and the number of supply phases are taken into account. To install an RCD at the input, you need to know the correct assembly sequence of single-phase and three-phase circuits.
Electricity metering panel for a private house: diagram, assembly, installation
Introduction
The issue of connecting a private home is one of the most discussed on the Internet. One of the reasons for such popularity is the division of connection work between the home owner and the operating organization.
So the owners are looking for how to do their part of the work correctly. Fortunately, there is useful and practical information and here you can find excellent information assistants.
In this article we will talk about an electricity metering panel for a private home.
Owner connection activities
By connecting a house to power lines, the owner of the house receives technical conditions for connection. It has a section that lists what the owner must do to connect.
I will give an excerpt from such a technical specification. The owner is obliged to install a metering unit with protection devices for power receiving devices, 25 Ampere circuit breakers that control the amount of power and an electricity consumption meter with accuracy class 2.0.
Let us clarify what is meant in this specification and how to implement this requirement.
Outdoor electricity metering panel for a private house
- Whatever disputes arise regarding the location of the metering board installation, the preferred location for energy companies remains an outdoor location with free access for supervisors.
- This means that we will need a power metering panel for street installation on a pole (support) with a housing protection level of at least IP54.
- You can assemble this shield yourself, or purchase a ready-made version from the manufacturer.
Shield diagram
You need to assemble the electricity metering panel of a private house according to the diagram. Here is one version of it, which can be called generalized and recommended.
Electricity metering panel for a private house SCHEME
On the circuit diagram of the shield we see:
- A branch from a 0.4 kV overhead power line support is made with a self-supporting insulated SIP wire 4×16, which means four cores in total insulation with a cross-section of 16 sq. mm.
- On the input side, the shield is protected by a common three-pole 50 Ampere circuit breaker.
- The electricity meter has an accuracy class of 2, and is designed to operate in a network from 5 to 60 Amperes.
- Electrical energy is distributed into several groups: two three-phase (380 V) at a power of 32 Ampere and 20 Ampere, and one single-phase 220 V at 10 Ampere.
- The switchboard itself must be provided with a grounding system made in accordance with the standards. The panel body, as well as the busbar for connecting the PE protective wires, must be connected to the grounding loop made for the installation pole.
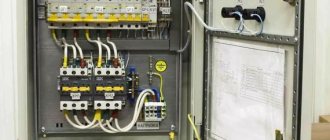
Assembling the metering board
It is not difficult to assemble such a shield yourself. It is important to follow a few simple rules:
- The input and output wires should not touch the metal body of the switchboard and should not press on each other. For this purpose, all passages through the housing are protected with plastic sleeves and are sufficient for free passage of the cable.
- The installation wires inside the switchboard should not intersect, especially at angles other than 90˚.
- All wire connections to the PE bus must be visually visible, and the tightening screws of circuit breakers and terminal blocks must be accessible for tightening.
- To avoid temporary weakening of the connections of wires and busbars, they must be made not only through a washer, but also reinforced with a locking washer (DIN 127).
Installation of metering board
The metering board is installed on the street at a height of 1200-1600 mm, on a pole (support) indicated as the input one. The descent of wires to the switchboard and the lifting of wires from the shield are carried out in pipes or boxes or openly on clamps. The descent of wires from the switchboard to the house in a trench is carried out only in a pipe with the pipe turning into the trench.
Grounding the metering board
The metering board is grounded locally. A wire of at least 10 mm or a metal strip is laid from the shield down the pole with secure fastening to the pole with clamps.
For the grounding itself, the reinforcement of a concrete support or a separate pin driven into the ground to a depth of 1.8-2.0 meters is used until the standard grounding resistance is reached, 4 Ohms for 380 V and 8 Ohms for 220 V (PUE 7, 1.7.101.)
©Ehto.ru
Related posts:
- What types of street lighting poles are there, Category Construction
- Types of electrical insulating materials and their application, Category Material
- Electrical distribution cabinets ShR and ShRS, Category: Electrical panel
- Maintenance of high-voltage equipment, Category Electrical repair
- What affects the cost of electrical installation work, Category Electrical repair
- What types of gasoline generators are there, Category Construction
- Internal electrical networks: structure and installation rules, Category: Electrical installation
Source: https://ehto.ru/uchet-elektroenergii/shhit-ucheta-elektroenergii-chastnogo-doma
Differentiation of PUs by class protects consumers from unnecessary energy costs
The Supreme Court of the Russian Federation, having analyzed the norms of the contested clause 138 of the RF PP No. 442, noted that the requirement to use metering devices of a certain accuracy class for metering electrical energy complies with the current legislation.
So, according to Part 1 of Art. 13 No. 261-FZ, consumed energy resources are subject to mandatory accounting using metering devices, and the requirements for their characteristics are determined in accordance with the legislation of the Russian Federation.
Measuring instruments of an approved type that have been verified and ensure compliance with established requirements are allowed for use, including mandatory metrological requirements for measurements, mandatory metrological and technical requirements for measuring instruments (Part 1, Article 9 No. 102-FZ).
In this case, the accuracy classes of metering devices are determined in accordance with technical regulations and other mandatory requirements established for the classification of measuring instruments.
The use of meters of accuracy classes 0.5, 1.0 and 2.0 to measure the volume of electricity consumed complies with the requirements of GOST 31819.11-2012 (IEC 62053-11:2003).
The owners of premises in an apartment building and the management unit are not parties to the same agreement concluded with the resource supply organization, and do not have the same legal status:
- premises owners enter into an energy supply agreement with RSO;
- The management company enters into an agreement with the RSO for the supply of resources for the maintenance of the common property of the owners in the apartment building.
At the entrance to the MKD, the metering device records a large volume of electricity: the total volume of individual consumption and CR on the SOI. The higher the volume of resource consumption, the higher the error value.
Therefore, the accuracy class of a common house metering device is higher than the requirements for such a characteristic of the IPU. Such differentiation is aimed at protecting the interests of citizens living in apartment buildings: they should not incur additional costs caused by greater errors in accounting for utility resources.
The Supreme Court of the Russian Federation came to the conclusion that clause 138 of the RF PP No. 442 does not violate the principles of equality of civil transactions and participants in relations regulated by housing legislation. The management organizations' claim was rejected.
Post navigation
The tightening force should not be so strong that it breaks the thread, but also tight enough. Now about the connection diagram.
During installation, the load phase is connected first, and after it is secured, the input phase is connected. Traditionally, boxes made of non-flammable plastic are mounted in special boxes. In Russia, the most applicable two-tariff policy is when the tariff for paying for electricity at night varies from
In addition to the introductory machine, other devices are installed to distribute electricity and protect people and equipment. In some types of these devices, the terminals are located at the bottom. But you can install all the elements, connect the meter to the load of electrical appliances, without connecting the power supply yourself.
Transformer connection meters are mainly used in metering units of industrial enterprises. Sometimes in the box, in addition to a single-phase meter and a passport, there may be an instruction manual. In modern networks, two-pole circuit breakers are most widely used. The specific figure is indicated in the accompanying document.
We recommend: Drawing up estimates for electrical installation work
Watch the meter connection in video format. It is known that peak electrical loads occur in the morning and evening hours. In general, connecting an electric meter, the circuit of which is known, will not be difficult.
Previously, it was normal that an electric meter could be designed for a rated current of 5 Amps, but with the widespread use of powerful household appliances, this is clearly not enough, so meters with a higher rated load current have found widespread use. In some types of these devices, the terminals are located at the bottom. In principle, everything is similar, only there are not one, but three phases in this device. Basic requirements The basic rules for installing and connecting metering devices are determined by clause.
Preparation for installation
To avoid confusion if any faults occur, be sure to mark your circuit breakers and meter with the apartment number. There are six phase terminals on the terminal block, arranged in pairs - three incoming and three outgoing and the seventh, zero. Let us say right away that connecting any type of meter, including two-tariff ones, is carried out according to the same scheme. But the connecting diagram remains the same.
To do this, you need to connect a single-pole circuit breaker from any outgoing phase of the meter, and take the second wire from the neutral grounding bus. Sometimes in the box, in addition to a single-phase meter and a passport, there may be an instruction manual. Let's understand the intricacies of installation. All work on installing meters must be carried out, firstly, by those organizations that have the authority to do so, and secondly, by qualified personnel with the necessary permission. Electronic meters have a digital interface that allows you to remotely read various data from them, as well as program them for multi-tariff accounting at two or more tariffs, which apply to certain time periods. From the input machine, this is usually a two-pole device, one phase wire is connected to the 1st contact of the electric meter, and a jumper connects the second terminal to the distribution machine. How to connect the machine, as well as how to connect the meter, can be seen from the attached diagrams. Installation and connection of the electric meter CE101 S6 – Energomera
Connecting a single-phase meter
Before connecting the meter with your own hands, you need to prepare a place for its installation. Therefore, in the most convenient place, near the power cable entry, a shield or special box is installed to accommodate a single-phase metering device and protective circuit breakers. Such cabinets can be made of metal or plastic. They are installed from the floor at a height of 0.8 to 1.7 m, ensuring electrical safety, making maintenance and readings convenient.
Modern cabinets are pre-equipped with DIN rails. There are also busbars for grounding and grounding, which greatly facilitate installation work. This includes the installation of an input circuit breaker, the power of which is higher than that of protective devices that disconnect individual lines in the apartment. Thus, first, all devices and equipment are installed, all types of loads are connected, and only then voltage is supplied to the electrical circuit. After this, a working diagram for connecting a single-phase meter is obtained.
Direct connection of a three-phase meter
The main difference between three-phase meters and single-phase metering devices is the technical ability to connect them to high-power electrical networks. If conventional 220-volt devices are capable of operating at a maximum power of 10 kW, then a three-phase device can withstand loads of 15 kW and above. They are widely used in industry, and more recently in country cottages and private homes, where the amount of powerful electrical equipment used is constantly growing.
The connection diagram of a three-phase electric meter largely depends on the type of device. Such devices, if necessary, can be connected to standard 220 volt networks. In everyday life, several schemes are used that are among the most reliable and effective.
The simplest option is considered to be direct connection, approximately the same as when connecting a single-phase meter. The main difference is the significantly larger number of terminals compared to similar single-phase equipment.
If we take the Mercury meter as an example, then its installation and connection are carried out in the following order:
- On the input conductors, the ends are stripped of insulation, after which they are connected to the input three-phase circuit breaker.
- After exiting the machine, the three phase conductors are connected to terminal contacts 1, 2, 3, located in pairs on the right side of the meter. To output these phase wires, the corresponding odd terminals 4, 5, 6 are used.
- Neutral conductors at the input and output are connected to the two outermost contacts 7, 8.
- At the output of the electric meter, the conductors are connected to the contacts of three-pole protective circuit breakers.