Everything on your site should be perfect and beautiful. Gazebo, loggia, terrace, garden and, of course, sidewalk. Today there are several options for tiles made from different materials, with different properties and at different prices. Let's consider polymer-sand paving slabs in this article.
Three hundred years ago, our ancestors walked on compacted earth and were happy with everything. But today the requirements for landscape design of a personal plot or cottage plot are clearly higher. This is clearly visible in the example of terraces, sidewalks, garden paths, courtyards and other local areas. I would like to pave them with such material that later I would not be ashamed of the appearance of the entire household.
Now we can note the use of three types of coating - asphalt, cement tiles and polymer-sand compositions. The last option is the newest and most successful.
Advantages of polymer-sand paving slabs
In fact, polymer-sand tiles are similar to their concrete-cement sister. Only her sand is bound into a single substance not with a cement-based solution, but with a special polymer. Thanks to this, it was possible to achieve a number of qualities that were not available in previous options for yard and decorative coverings. Although recently plastic paving slabs and rubber tiles for summer cottages have been gaining popularity.
The products are used for laying pedestrian areas, various sites, cafes, shopping pavilions and other premises.
7 advantages of polymer-sand paving slabs:
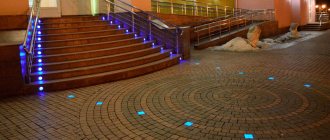
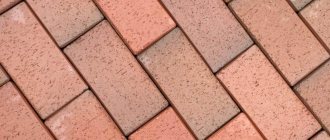
- High aesthetic qualities . Industry and private companies produce this type of coating for every taste and color. The main shape is rectangular. But you can’t count the textures and shades. This tile does not crumble, does not fade under the influence of direct sunlight, and looks nice both day and evening. We can definitely say that the peak of popularity of polymer-sand tiles and tiles is yet to come. Only the most advanced owners use it on their plots. The neighbors marvel at her beauty and are just beginning to select acceptable options for themselves. Read about options for laying sand-polymer paving slabs at this link.
- Reliability and durability . The average active life of polymer sand tiles is 50 years. Unlike cement tiles, they do not crumble due to sudden temperature changes. Its frost resistance index is equal to 500 freezing and thawing cycles. Moderately elastic and hard, it does not chip at the edges and does not crumble from the heavy weight placed on it. That is why polymer-sand tiles can be found in areas where landscape design issues are dealt with competently. You will find all the information about plasticizer for paving slabs here.
- Environmental Safety . When heated, asphalt releases hazardous particles into the atmosphere. But ordinary tiles crumble and release extremely harmful cement dust into the air. It’s not even worth mentioning that this is harmful to plants, animals, and humans. Children especially suffer from cement dust and scattered sand. They may even develop an allergic reaction. Polymer-sand paving tiles do not emit anything into the air. To feel any unpleasant odor, it must be heated to +250 °C. And in winter it can easily withstand frosts of fifty degrees.
- Acid and oil resistance . Aggressive environments do not destroy the structure of polymers. Therefore, tiles made from bonded sand do not react in any way to spilled machine oil, strong acid, detergents and other potentially destructive substances.
- Abrasion is not higher than 0.05% . This means that in twenty years the polymer-sand sidewalk will still be the same height and density. For this reason, such tiles are used in production, in the garage, in workshops and workshops. In dacha and garden plots, such mechanical resistance makes it possible to place heavy tables, gazebos, tools and other bulky things on it.
- Viscosity. It is impossible to slip on polymer-sand tiles either in summer or winter. In summer, the roughness will prevent the sole of the shoe from slipping. And in winter and autumn, any water will flow freely between the gaps, without hardening on the surface of the sidewalk and without turning into dirt.
- Manufacturability and maintainability . Laying this type of tile is faster. Both manually and using automated tools. If there is a need to remove tiles for excavation or other work (for example, laying new communications), then everything can be done quickly and without much labor. Tiles weighing from 2.5 to 4 kg can be easily removed and then simply put back in place.
Video about the manufacture and production of sand-polymer tiles
The video details the production and manufacture of polymer-sand paving slabs:
Laying plastic tiles - full installation
The work is similar to laying conventional paving slabs, but has a number of its own features:
Step 1: marking
We are marking our plastic path to a bright future. This is done using twine and pegs at places where there are turns or changes in the width of the canvas. Of course, to begin with, you should limit yourself to one straight section; it is advisable that its width be a multiple of the dimensions of the tile - in order to cut it less.
Step 2: Digger
The total depth of excavation depends on the type of soil; usually you need to dig a ditch 30-40 cm deep using a bayonet shovel. Interestingly, a flat bottom and walls in this case are not as important as the absence of any traces of vegetation at the bottom. To prevent a hidden sprout from eventually turning around our road creation, the entire wide ditch needs to be carefully scanned in search of such “surprises from the kingdom of Flora.” And thoroughly uproot them, without a trace and without pity.
Some experts recommend treating the walls and bottom of our flat pit with pesticides or other chemicals, and if your area has lush vegetation, this advice should be followed. Just be careful when working with such compounds, they are very toxic. Drainage pipes with an appropriate slope are laid on the side - if mounted on both sides of the path, then with a width of up to 1 meter, a slope of the finishing surface will not be needed
Step 3: Fundamental
The screed is made from an ordinary mortar based on sand and cement, up to 3 cm thick. On the sides of the ditch with a margin of width for future curbs, the screed is not poured, a clean sand layer remains there. If there is no precipitation outside, the screed will “set” within a few days. You will have to work while standing on the screed, so it must be completely dry, otherwise the base will collapse under your feet before the installation is complete.
Popular articles Tulips and daffodils in landscape design
Step 4: plastic installation yourself
The first rows of plastic boards should be laid as evenly as possible. Stretch the fishing line between the edges of the path and check each tile with a level. With an even screed, the layer of binding solution can be minimal - as long as it is enough to level each element. If you doubt the accuracy of the first rows, remove them, scrape off the mortar and reinstall them.
Each element is compacted with a rubber mallet after installation in place. First, the entire space of the path is covered in solid slabs. Insets and corners are installed later. It is better to cut plastic paving slabs with a regular hacksaw; a grinder or other mechanized element leaves thermal marks on the polymer.
Step 5: final
After laying the main path fabric, curbs are placed on its sides. Their height can exceed the road level by 3-5 cm. The space between curbs and solid slabs is filled with inserts. This operation is more difficult than it seems, it is necessary to maintain strict horizontality! The seams between the tiles are filled with a liquid mortar of cement, sand and moisture-resistant compounds (liquid glass and others). The seams are rubbed in several layers, leaving voids is unacceptable.
You can use the plastic track for its intended purpose after the mounting solution has completely hardened - that is, after two days. Since the path looks almost finished even before the installation is completed, it is wise to provide a temporary fence for it - otherwise naughty children could damage all our many-day efforts. And redoing is always more difficult than doing anew.
Photo of polymer paving slabs, mmmcentr.com
Photo of polymer tiles for a summer residence, mmmcentr.com
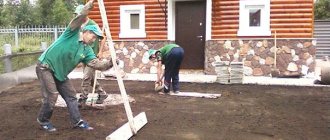
Photo of surface preparation for tiles, mmmcentr.com
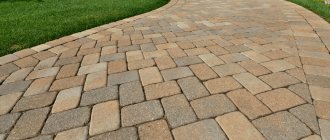
Photo of polymer tiles for garden paths, ukr-prom.com
In the photo - plastic tiles for a summer house, doska123.com
Negative aspects of polymer sand paving stones
Among the shortcomings, only the novelty of the material should be noted, as a result of which not all people have yet understood the intricacies and specifics of using polymer-sand paving and roofing coverings.
There is also a slight variation in prices, when some suppliers indicate the cost per square meter, others give a piece price, and still others, in general, put rubles per kilogram in their price tags. You will find out why geotextiles are placed under paving slabs in this material.
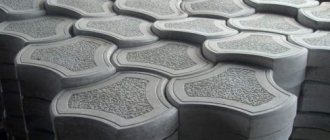
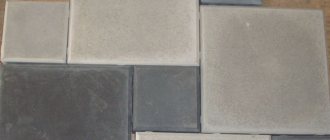
In the photo - polymer sand tiles:
Average prices
- The standard size that can be found from most manufacturers is 330x330x20 mm. Such tiles cost an average of 37 rubles per piece.
- If you take tiles at the price per square meter, then suppliers give a price of 340-380 rubles.
- Depending on the presence of cavities, patterns on the surface and texture of the product, the price can reach up to 450-500 rubles per 1 sq. m. meter.
It is possible that information about the proportions of mortar for paving slabs will be useful to you.
Technology of styling with your own farts
There are 3 main types of laying polymer-sand paving slabs with your own hands.
- On the sand.
- For dry cement-sand mixture.
- Laying paving slabs on concrete (on a concrete base).
Video: how to lay on the sidewalk
The video shows the laying of polymer-sand paving slabs (technology):
Laying tiles on concrete
- First of all, pour a layer of crushed stone. Its thickness should be at least 150-200 millimeters.
- Create a concrete screed. Its thickness will be 50-100 mm.
- Polymer sand tiles are laid on the screed. The binding element is either cement and sand in a ratio of one to three, or ordinary tile adhesive.
- The seams must be filled with a mixture of cement and sand.
High impact strength, wear resistance, low water absorption and frost resistance, aesthetics - these are the qualities that distinguish this tile. The service life is more than 30 years.
We also recommend that you familiarize yourself with the technology of laying paving slabs on dry mix in this article.
What you need to know before starting work:
- The area must first be planned and cleared of turf, dry and live grass, roots, etc.
- The larger the sidewalk area, the wider the joint distance.
- The sand used to fill the seams must be fine-grained and free of organic salts and moisture.
- Regular tile adhesive has proven itself to be the best adhesive for adhesion of tiles to concrete.
- Laying work should not be carried out during rain or high humidity.
Sand-polymer paving slabs are a high-tech and easy-to-install material. Its advantages and diversity allow you to create a landscape of any type and direction on your site. Today, polymer-sand tiles are most actively used for laying out interior spaces in the yard, for terraces (terrace tiles), recreation areas, etc. How to lubricate molds for paving slabs is described here.
Frost-resistant tiles for porches made of a polymer-sand mixture can withstand more than 250 freeze-thaw cycles.
Required tools and materials
To work you will need:
- rubber tiles or roll coating;
- curbs;
- polyurethane based adhesive;
- construction vacuum cleaner;
- glue container;
- notched spatula;
- rubber hammer;
- knife;
- level, ruler, chalk.
Popular articles Making an alpine slide with your own hands at the dacha
Materials and tools for laying crumb rubber coating (self-leveling floor):
- rubber crumb;
- glue;
- acetone;
- color pigments (if necessary);
- mixer or concrete mixer;
- scales for dosing components;
- buckets and a wheelbarrow for transporting the mixture to the work site;
- squeegees, half-offers, rolling roller for leveling and compacting.
To install a solid base you will need:
- cement;
- river or washed sand;
- small crushed stone;
- polyethylene film;
- geotextile fabric;
- primer for concrete.
Reviews
There are both positive and negative reviews:
- Alexey: “A year ago, we completely changed the image of our summer cottage. Or rather, I ended this shift by laying polymer-sand rectangular tiles. Progress in technology is obvious - there is no dust from it, it does not collect puddles and dirt, it does not crumble and always shines. The popularity of this type of tile can be observed at least by the fact that this year three neighbors have also ordered polymer sand tiles for their yard, large gazebo and sidewalk on the street.”
- Boris: “The neighbors made their yard from polymer-sand tiles. I also followed fashion trends and ordered several thousand worth of this material. And now I just can’t understand how it is attached to the cement-sand screed. After all, the neighbors used concrete as a substrate, and I am stuck with crushed stone, geotextiles, cement and sand. Can anyone here tell me what to do?”
- Denis: “Hello, I would like to leave my review about polymer-sand tiles. Perhaps I was unlucky with the manufacturer, but four years after installation, it began to crumble and “tuck in.” Probably next year they will make a new coating. Working with polymer-sand tiles is really simple and fast. But just as quickly it becomes unusable. Now I don’t know whether to go back to concrete or take more expensive tiles?”
Advantages and disadvantages of plastic tracks
Regardless of the type of plastic tile, it is worth noting the general advantages and disadvantages that plastic garden paths have. Among the positive aspects it is worth noting:
- The light weight of the material makes it easy to move and transport.
- Affordable price. Plastic has a low cost compared to natural materials, which makes it very popular.
- Simple installation and installation that does not require special knowledge and skills. In addition, when working with plastic, there is no need to equip an additional coating; it is enough to carry out basic preparatory work.
- Quick dismantling that can be done at any time of the year.
- Waterproof. The material is so impervious to moisture that even when in water it will retain its performance properties and characteristics.
- High strength and long service life. Modern garden paths made of plastic do not burst, can withstand heavy loads, do not rot and are not afraid of temperature changes.
- No slipping thanks to the textured surface.
At the same time, it is worth noting the disadvantages of plastic, including:
- Negative reaction of the material to certain chemical compounds. For example, acetone can deform the tile, rendering it unusable.
- Tiles with a smooth coating are slippery and dangerous.
- Garden paths made of plastic do not tolerate direct sunlight well and under constant exposure to ultraviolet radiation they lose their color and attractive appearance.
Popular articles How to get rid of weeds on your lawn
- The material wears out much faster than concrete or stone garden paths.
- Plastic is not able to withstand excessive loads; for example, it cannot be used in the entrance group (in front of the garage), since it will bend under the weight of the car, and the docking locks may break.
- If the surface is 100% plastic, it is brittle, cracks easily and can only be used as a temporary covering.