Floor tiling and plumbing installation require a level and strong base, so leveling the floor should be taken as responsibly as possible. You can do this kind of work yourself, the main thing is to strictly adhere to the technology. There are different ways to properly level a bathroom floor, and they all have their pros and cons. After carefully studying all the options, you can easily choose the most optimal one.
How to level a bathroom floor
Requirements for bathroom floors
Before leveling the floor in the bathroom, you should consider two important points that affect the correctness of further repairs:
- Since there is a high probability of water leakage in the bathroom, to protect other rooms of the apartment or house from flooding, the floor in the bathroom should be lower than in neighboring rooms. Knowing this will help you determine the correct height of the leveling layer and not make it too high.
- For the same reason, in the bathroom it is necessary to approach the issue of waterproofing with special care. Regular caulking of cracks will not help here. It is necessary to equip a waterproof “trough” that will reliably protect the premises below from flooding. In addition, it is necessary to waterproof the leveling layer to protect it from the destructive effects of dampness.
Worth knowing: Renovation work in the bathroom can be divided into 3 stages: first, we remove the old tiles, do the leveling, and move on to laying a new face covering.
Removing old floor finishing
When you have knocked down the old tile, you need to decide the fate of the screed. The screed does not need to be removed if it is fairly smooth, without defects or cracks. Please note that you will have to waterproof this surface and lay a new floor covering, so the height of the finished floor should remain below the floor level in the entire apartment or house. Otherwise, the screed will also have to be dismantled.
To improve the quality of renovation in the bathroom, it is better to remove everything that was on the floor slab - flooring, old screed, waterproofing. When breaking the screed, be careful not to damage the floor slab itself. The smoother and stronger the surface of the concrete slab, the better, so it is necessary to carefully seal all cracks and crevices, remove exfoliated parts of concrete, knock down protrusions, bumps and cut off mounting loops with a grinder (if any).
After completing the preparatory work with your own hands, do not forget to vacuum the surface and remove all debris, because even the slightest particles of dust can prevent the new waterproofing from adhering to the slab. To improve the adhesion of the new layer and prevent dust, the base can be coated with a primer.
We do waterproofing
Any leveling of the bathroom floor begins with waterproofing work. Previously, waterproofing in the bathroom was done using roofing felt. But since this material is not durable and efficient, it is better to choose more reliable modern products. For this you can use:
- rolled waterproofing materials;
- penetrating waterproofing;
- coating compounds.
Attention: the selected material must be applied not only to the floor of the room, but also to the walls to a height of at least 100-150 mm.
After installing the waterproofing, we determine the height difference on the floor in the bathroom. This will allow you to correctly calculate the required height of the screed so as not to significantly raise the floor level in this room. For alignment, you can use one of the methods described below.
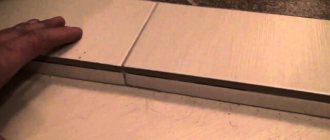
Leveling a wooden floor under tiles
In this case, it is recommended to use sheet materials, for example, moisture-resistant plasterboard. Alignment is done like this:
- Prepare the base by removing skirting boards and securing loose elements. Clear the premises from construction waste.
- Cut out the sheet material. Plywood or chipboard is cut into squares of 60 x 60 cm. Drywall does not require cutting.
- Lay out the sheets at a distance of 2-3 mm from each other. If necessary, trim the material in corners and niches. The parts are numbered, specifying the order of installation.
- Treat the material with an antiseptic. Start laying from the far corner. Self-tapping screws are used for fixation. They are screwed in, recessing the cap into the material. Self-tapping screws should not fit into the gaps between the boards.
At the last stage, the seams are sealed with acrylic sealant and rough areas are treated with sandpaper. After removing the dust, apply a primer.
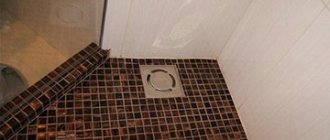
Beacon screed
Pouring floor screed in the bathroom under the tiles
To level the surface with your own hands with a height difference of 3-7 cm, it is best to use a cement screed poured along the beacons. The sequence of actions is as follows:
- The finished floor level must be applied to the walls of the room. It can be determined by adding the minimum permissible thickness of the screed to the highest point of the room. To find the highest mark on the floor from the horizontal line drawn on the walls of the room in an arbitrary location, the distance to the floor is measured. This will help you find the lowest and highest points on the floor. To find high points in the center of the room, you can use a stretched rope. A laser level will make this job much easier.
- Now you can begin installing beacons. For these purposes, it is better to buy metal plaster profiles. The first row of beacons is mounted from the walls at a distance of at least 20 cm. All subsequent rows are placed with the same step, which should be slightly less than the length of the rule. Beacons are installed on mortar piles and leveled using a level. Further work can be carried out after the solution has hardened.
- A damper tape is attached to the walls along the perimeter of the room, which will compensate for deformation changes in the screed and protect it from cracking.
- Now you can proceed to preparing the solution for pouring the screed. For these purposes, you can choose a cement-sand mixture (1:3) with the addition of water or buy ready-made dry mixtures, to which you only need to add water in the amount indicated on the package for preparation.
- We place the prepared solution between the beacons and level it with a rule along their upper edge. It is better to fill the entire floor in one day so that the solution does not have time to set between pours.
- Cover the screed with plastic wrap and periodically moisten it with water to ensure uniform evaporation of moisture. After a couple of days, the film can be removed.
- After the screed has completely hardened, ceramic tiles can be laid.
Proportions of cement and sand for screed
First you need to understand the concepts and remember that the brand of cement and the brand of screed are not the same thing. SNIP requirements usually indicate the brand of screed, which can be seen in the table below. The resistance of the screed to static loads on the surface directly depends on the proportions of cement and sand.
| Brand of Portland cement | Proportions cement:sand | Brand of screed |
| M300 | 1:3 | M100 |
| M300 | 1:1 | M200 |
| M400 | 1:3 | M150 |
| M400 | 1:1 | M300 |
| M500 | 1:3 | M200 |
| M500 | 1:2 | M300 |
| M600 | 1:3 | M300 |
| M600 | 1:4 | M200 |
To level the floor in an apartment, a grade of screed M150 - M200 will be sufficient, since the room will not experience heavy loads. Based on the table, you need to purchase cement grade M300 or M400. If you don’t want to prepare the mixture yourself, then you can purchase ready-made mixtures of the appropriate brand, which you just need to fill with water, but their cost is 2-3 times more expensive than the cost of sand and cement separately.
Important! The choice of screed brand directly depends on the size of the tile. If you are using large floor tiles 50x50 cm or larger, then you can make a grade of screed M150, but if the size of the tiles is small, then we recommend increasing the strength of the screed to M200.
We take out the beacons after pouring the screed
If desired, the beacons can be left in the screed or removed for reuse. Wait until the poured solution dries to such a state that you can safely walk on it without leaving marks. Use shoes without treads or, as a last resort, use small sheets of plywood, placing them under your feet.
You remove the beacons using a spatula, which can be used to cut the surface of the screed along the beacons. Fill the remaining grooves from the beacons with mortar and smooth them with a spatula to the level of the main plane. After removing the beacons, you can pour a thin control layer of screed from a liquid solution by rolling it out with a needle roller.
How to measure the floor level?
The choice of floor leveling method, first of all, depends on the degree of surface unevenness, which is difficult to determine with the naked eye - special devices will be needed. The following tools are used for these purposes:
- normal building level. If its length is not enough, then a building rule is placed under it;
- a hydraulic level allows you to more accurately and easily take measurements in large areas, but when filling the instrument with water, it is important to avoid airing its working tube;
- Laser levels are even easier to use and allow you to take measurements with maximum accuracy, and their wide functionality makes the entire measurement process much easier. The error is no more than 1-2 mm/m, and when measuring it is better to wear safety glasses;
- The level is a professional geodetic instrument, quite complex to use, it provides ideal accuracy and allows measurements to be taken over vast areas, therefore it is used mainly in large-scale construction.
When leveling the floors in the apartment, you need to bring them to zero level. After all work is completed and finishing is completed, the floor level should be the same in all rooms, which means that when leveling, the height of the finishing material used must also be taken into account. Thus, the height of the subfloor level in rooms where different coatings will be used may differ by 1-2 cm.
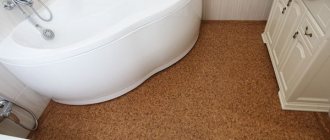
Leveling with expanded clay
If the height differences in the bathroom are significant, then to level such a floor with your own hands it is better to use a screed with expanded clay. It will allow you to raise the surface to the desired height without overloading the ceiling.
This method is rarely used, since height differences in the bathroom are rare. However, in some houses (with joists on the floor slabs) it may be necessary to raise the finishing surface to a significant height and not put too much stress on the old slabs. In this case, this method is perfect. The sequence of actions is as follows:
- In the same way as described above, we find the finished floor level and install guide profiles.
- Then we fill in fine expanded clay between the guide profiles. We compact the backfill so that the height of the layer does not reach the top edge of the beacons by 3 cm.
- To increase the strength of the layer and improve adhesion, the expanded clay backfill is poured with cement laitance. Sometimes reinforcing mesh is laid to increase strength.
- After the cement laitance has set, you can begin pouring the screed mortar. We distribute the mixture as a rule among the beacons.
- Drying of such a screed occurs in the same way as in the previous method. The surface must be covered with plastic film and periodically moistened with water. After three days we remove the film.
- After the screed has dried, you can protect it from moisture and lay the selected floor covering.
Leveling materials
Preparation begins with the selection of the main components, as well as tools for leveling the floor. Typically, such mixtures have a base in the form of gypsum or cement material. Based on the characteristics of the use of bathrooms, it would be reasonable to give preference to the second option. These solutions can be recognized by their characteristic paper packaging with a polyethylene layer that protects against moisture.
Self-leveling floor
If, when opening the bag, there is an expired or damp solution inside, then its use is not recommended, since a high-quality screed will no longer be obtained. It is also worth noting that the mixtures include special components that increase the elasticity of the coating and its other performance properties. For example, the synthetic component can significantly reduce the number of microcracks during screeding.
Self-leveling mixtures
If your bathroom has height differences on the base of more than 3 cm, then you can use the easiest leveling method - self-leveling mixtures. Choose a special composition for rooms with high humidity levels. Leveling work is carried out in the following sequence:
- A damper tape is installed around the perimeter of the room.
- According to the instructions on the manufacturer's packaging, prepare a liquid solution for pouring the screed.
- Now the solution is poured evenly onto the floor and leveled over the surface with a spatula. This will allow the composition to spread faster.
- In a large room, it is better to work together so that the first portion of the mixture on the floor does not have time to set before pouring the next portion.
- After pouring, the surface must be treated with a needle roller to remove air bubbles. To walk on the screed, special shoes with spikes are used.
- There is no need to cover such a screed with film or moisten it with water. After a week, you can proceed to laying the flooring.
No. 4. Leveling with gypsum fiber sheets (GVL)
Leveling with GVL is called dry screed. This process is much simpler and faster, but the quality of the finished screed is inferior to a monolithic one. A layer of expanded clay is laid under the gypsum plasterboard, which plays the role of a heat insulator. The technology allows the use of other materials that have similar thermal insulation properties.
Leveling of GVL begins by cleaning the surface from dust and dirt, after which a waterproofing material, which can be a polyethylene film, is spread over it. Its strips are laid with an overlap of about 10-15 cm and overlapping the walls by 10 cm. Along the perimeter of the room, it is better to use an edge strip, which is placed between the plastic film and the expanded clay layer.
Expanded clay must be carefully compacted and leveled to the intended level. The first plate is mounted in the corner closest to the door, secured with self-tapping screws. When the first layer of gypsum plasterboard is ready, proceed to the installation of the second, which is attached with glue. It is imperative to shift the sheets by 25-30 cm relative to the first layer. For reliability, the second layer can be attached with self-tapping screws to the first. Some experts recommend installing beacons in the form of wooden blocks or metal U-shaped profiles. To move on expanded clay, sheets of plywood or gypsum fiber board are used.
At the final stage, the joints of the plates and the fastening points with self-tapping screws are primed, then the rest of the surface is primed, and the excess plastic film and edge tape are trimmed. An important advantage of this method of leveling the floor is the ability to perform it in stages, in several approaches, and not in one day, and this greatly simplifies the process when leveling the floors is done with your own hands.
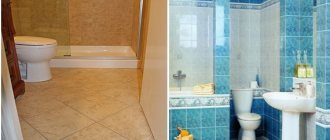
How to level the floor in the bathroom without knocking down old tiles?
Types of bathroom floor waterproofing under tiles: characteristics and cost of work
The desire to level the floor without removing old tiles is often driven by savings and the desire not to stir up excess dirt. In practice, there are cases when it is simply impossible to knock down old tiles. Such cases include:
- Risk of violation of the integrity of the ceiling. This problem often occurs in older buildings with wooden floors. Removing tiles may compromise the integrity of the floor structure, or the neighbors below may have their ceiling collapse.
- Damage to communications. Such cases occur when pipelines, wiring or other communications were laid in a screed under the old tile and its dismantling will lead to a violation of the integrity of the systems.
However, there are situations where removing old tiles is highly recommended to prevent future problems. Such cases include:
- Poor condition of the old coating. If the old tile has cracks and falls off on its own, it is better to remove it. It is also recommended to take a hammer or mallet and tap the surface of the tile. If an empty sound appears under the tile, this indicates the presence of voids under the tile or its loose fit. This coating also needs to be removed.
- Inspection hatches. If connecting or corner nodes for sewerage, electrical or plumbing are hidden under the old coating, then it is better to install inspection hatches in such places. This will allow emergency services to quickly access important components in the event of an accident without dismantling the floor.
- Raising the floor level. Here you immediately need to consider whether raising the floor will interfere with the normal opening of the door. Sanitary standards require that the floor level in the bathroom be lower than the general level of the apartment, so the area of accidental flooding of neighbors will be limited only to the bathroom.
If the floor level can be raised by no more than 1.5 centimeters, then it is recommended to level it without a screed. Here, tile adhesive will serve as a screed, which is applied to a previously prepared surface and the tiles are immediately laid level.
Video: laying tiles in the bathroom using old tiles
Technology for leveling floors using old tiles
If the old tiles are held very tightly and there is no need to remove them, then you can start leveling the floor. Surface preparation on old tiles is carried out using self-leveling mixtures. If the tile does not have a smooth glaze coating, then it must be thoroughly washed with soapy water and degreased with acetone or gasoline. Then cover the entire surface with primer and pour in the self-leveling mixture, rolling it out with a needle roller.
Important! It is strongly recommended that before pouring the self-leveling mixture, you clean the seams on the old tiles, or it is better to remove them altogether using a grinder with a stone disc. It is enough to cut the seams by 5-8 mm, clean them with a vacuum cleaner and fill them well with primer. This will ensure reliable fixation of the poured floor and increase its resistance to mechanical loads.
If the tile has a glaze coating, it is recommended to remove it. This can be done using a grinder with a cutting disc for stone by applying notches cross to cross diagonally. In this case, at least 50% of the glaze must be removed to ensure good contact.
An even better option would be to completely sand off the glaze using a sanding disc and roughen the surface. If the thickness of the mixture on the old tile exceeds 2 cm, then it is recommended (in addition to deepening the tile joints) to drill additional holes in the tile, from 2 to 6 pieces depending on the size of the material.
Next, clean the surface from dust using a vacuum cleaner and cover it with a high-quality primer to ensure good adhesion of the mixture to the surface. As a primer, we recommend the following compositions:
- Concrete contact from the Knauf company;
- Ivsil Basis for concrete;
- Ceresite CN 94;
- Plitonite Soil Supercontact.
The primer is applied in several layers, and between each layer it is maintained for 2-4 hours until the previous layer has completely dried. Next, the self-leveling mixture is poured or the tiles are laid with tile adhesive if the thickness of the adhesive layer does not exceed 1 cm.
Important! Some experts often mix tile adhesive with cement and do this in cases where tiles are laid without a screed and the layer thickness reaches up to 3 cm. These manipulations will reduce glue consumption and increase the speed of its drying. However, it must be remembered that any interference with the balanced composition of the adhesive will lead to a violation of its technical characteristics. Adding cement will lead to loss of elasticity of the composition during operation and will deteriorate the adhesive qualities.
Types of screeds
According to the technology of preparation and installation, screeds are divided into three types: dry, semi-dry and wet. The best option for a bathroom is pouring a wet screed, but it is possible to use semi-dry technology. Dry screed is intended for residential and other dry premises, and in the bathroom it can be used subject to a number of conditions:
- Thorough waterproofing of the base, the junction of the walls and the walls themselves to a height of 15–20 cm with coating compounds.
- Using 10 mm thick GVLV sheets as an additional layer, increasing the rigidity and strength of the coating.
- Laying floor tiles with grouting of joints with waterproof compounds.
Methods for leveling a concrete base
The following technologies are used to level the floor on a concrete base in bathrooms and other wet rooms.
Wet screed
The traditional option to get a strong, reliable and durable foundation is to pour a regular cement screed. The solution can be prepared from separate cement and sand, or you can use ready-made mixtures - special floor levelers. Ready-made mixtures are easy to use: just mix the mixture with the amount of water specified by the manufacturer, after which you can pour the screed. When preparing sand-cement mortar yourself, the proportions are calculated independently. There is an advantage to this: you can use more cement to increase the strength of the screed. The minimum layer for concrete is 20 mm, when using a thermal insulation layer - 40 mm.
The advantage of wet technology is the ability to pour a thick screed, which allows you to eliminate any defects in the base. The disadvantages include the labor intensity of the work, shrinkage and cracking of the cement surface during the setting process, and a long drying period.
Semi-dry screed
For semi-dry screed, a sand-cement mixture with the addition of fiber or other lightweight fillers is used. The peculiarity of the technology is the use of a minimum amount of water to prepare the solution. The finished solution is applied to the base in a layer of up to 10 cm, after which it is leveled and compacted using a special trowel. The minimum thickness of semi-dry screed is 50 mm.
The advantages of semi-dry leveling technology include the absence of shrinkage and cracking, as well as a short period of drying and strengthening of the screed (14 days). Among the disadvantages, the higher cost of work and materials is noted.
Self-leveling floor
Self-leveling mixtures are an ideal option if you need to compensate for small differences in height or repair minor damage to the base. Depending on the manufacturer, mixtures can be applied in layers from 2–3 to 100 mm. When preparing the solution, you must follow the manufacturer's instructions and maintain the mixing proportions. After hardening, a durable, perfectly flat and smooth surface is formed, suitable for laying any floor covering.
Advice! It is not profitable to level large differences with self-leveling flooring. If the difference is more than 2 cm, it is better to make a classic sand-cement screed.
The advantages of using self-leveling mixtures for floor leveling include convenience and high productivity when performing work, quick setting and drying of the screed, and the absence of shrinkage and cracking. Disadvantages include high cost for large layers.
Leveling with tile adhesive
When laying tiles, it is allowed to use tile adhesive as a leveling layer (the adhesive layer, for example for Ceresit CM 11, should not be more than 10 mm). But without experience, such installation will be problematic, since you need to carefully monitor the level of installation of each tile. If you use even the cheapest glue to make a leveling screed, its cost will be very high. Some craftsmen, when pouring cement screed into the solution, add dry tile adhesive (approximately 50×50), thereby increasing ductility and strength, as well as reducing shrinkage and cracking of the coating when drying.
Laying tiles on a thick layer of glue to level the base is not the most rational solution
A more economical option for using tile adhesive for leveling is to pull the adhesive mixture along the floor in a long line to fill all the uneven areas. After the leveling layer has set, the tiles are laid on a regular layer of glue under the comb. This method is only suitable for small irregularities.