Types of heat-shrinkable tube (according to GOST)
There are several types of insulation classification. There are options based on the material of manufacture, installation method and wall thickness.
Material
Tubes on the market are classified according to the type of plastic used in their manufacture. The most common varieties are:
- PVC or polyvinyl chloride;
- polyester;
- fluorine rubber;
- polyethylene;
- polyvinylidene;
- polyethylene terephthalate;
- materials containing polyolefin.
PHOTO: i1.photo.2gis.com PVC is a simple and cheap material that has significant disadvantages
PVC pipes
They are based on thermoplastic polyvinyl chloride. This material is distinguished by its high insulating properties. At the same time, its significant drawback is the small range of operating temperatures, which can vary from -20ºС to +80ºС.
PHOTO: plastirub.be Polyester is superior to PVC in all respects
Polyester shrinkage
A material that has become a development of conventional polyvinyl chloride. Compared to the latter, it has higher physical strength and resistance to chemical attack. Often used in the production of thin-walled and thick-walled heat-shrinkable tubes.
PHOTO: sc01.alicdn.com Photopolymer has a high production cost
Photopolymers
Another group of materials with very high performance characteristics, which makes their use indispensable in creating reliable protection against physical and chemical influences. The disadvantage is the high cost due to the complexity of production.
PHOTO: home.premiumfull.ru Polyolefin shrinkage is the most modern and high-quality insulation option
Polyolefin tubes
A material that is obtained by chemical processing of polyethylene with the addition of dyes, plasticizers and additives that prevent combustion to the finished product. It has a wide range of operating temperatures (from -50ºС to +125ºС). It also has high resistance to strong oxidizing agents, but gradually deteriorates with prolonged contact.
PHOTO: build-experts.ru Foamed or synthetic rubber can withstand low temperatures, but is destroyed when exposed to fuels and lubricants
Elastomer tubes
The basis of this material is synthetic rubber. This option, due to the original qualities of the base composition, is highly resistant to high temperatures, but at the same time practically does not withstand the ingress of fuels and lubricants. Another significant disadvantage is the high cost of production, which also determines low demand.
PHOTO: ad-cd.net Silicone is chemically inert and relatively cheap, but does not withstand exposure to solvents
Silicone products
Tubes made from silicone are flexible and virtually non-toxic. Another positive quality of silicone products is chemical inertness and electrical strength. The disadvantage is the lack of resistance to organic solvents.
How to use heat shrink tube?
Heat shrink tubes are installed quite simply; no special tools or skills are required.
The main characteristic that you need to pay attention to before using a heat shrink tube is choosing the desired diameter
Interestingly, insulating wires using such tubes is much faster than using insulating tape.
The first step is to select a heat-shrinkable tube of the required diameter. This is done in such a way that the diameter of the fully seated tube is less than the minimum diameter of the insulated product.
For example, to insulate wires with a diameter of 3.5 mm, a tube with a pre-shrink diameter of 4.8 mm and a maximum post-shrink diameter of 2.4 mm can be used, or a tube with a diameter of 6.4 mm, the maximum diameter of which after shrinkage is 3.2 mm.
A piece of the required length is cut from the heat shrink tube. The cut must be smooth and without burrs, otherwise a tear may occur at the site of the uneven cut. A piece of tube is placed over the area to be isolated.
After this, you can proceed directly to shrinkage. This is best done with a heat gun. If you don't have one, you can use a torch, lighter or other suitable tools.
Shrinkage can be carried out in two ways - from the middle of the tube to its edges or from one edge to the other.
The optimal shrinkage temperature of the heat-shrinkable tube can be found out from the seller or selected experimentally. Increasing the temperature does not affect the speed of the process, so using higher temperatures is pointless.
Moreover, if it overheats, bubbles may form in it, it may become charred and even burst.
Application areas of adhesive heat shrink tubing
The excellent anti-corrosion properties of adhesive heat-shrinkable tubes allow them to be successfully used as waterproofing and anti-corrosion protection for various equipment and materials.
On the inner surface of special adhesive TUT there is a hot-melt adhesive layer, which not only protects equipment from external factors due to additional mechanical strength.
The glue seals the joints, preventing the influence of moisture on the insulated materials.
During the shrinkage process, the glue is evenly distributed inside, air cushions, irregularities, and voids are filled with it. If the adhesive HERE is seated correctly, then it is practically impossible to dismantle
This is very important, for example, to protect an electrical cable running underground.
Adhesive HERE can be applied to a metal or wood post before installing it in the ground to prevent metal corrosion or wood rotting. With the help of an adhesive thermal tube, the mechanical strength, frost resistance of equipment, etc. can be significantly enhanced.
Foreign automakers use special rigid heat shrink for anti-corrosion and mechanical protection of brake hoses and fuel lines of cars.
I hope this article helped you figure out how to use heat shrink tubing!
Scope of application of heat shrink tube
So, you know what heat shrink tubing is for? —
They are used to insulate joints and seams. Let's look at its capabilities in more detail.
One type of heat shrinkage is tubes containing adhesive compounds. Such materials can reliably isolate the connection not only from electrical breakdown, but also from moisture or water. It also gives the structure additional protection and strength.
The method of installing adhesive pipes is no different from the classic ones.
It is placed on the surface, taking into account the diameter, and then heated with a lighter, burner or hairdryer. The glue first melts, then the heat shrink fits tightly onto the surface and distributes it evenly over the entire plane.
As a result, the cable or pipe is filled with a layer of durable and moisture-resistant glue, and the connection is well sealed.
Adhesive compounds are used to protect wires running in damp areas, laid in the ground or outdoors.
Often heat shrink tubing (HERE) is placed on wooden posts or piles that are buried in the ground. It plays the role of moisture insulation much better than roofing felt and resin, due to complete sealing.
It is allowed to use heat-shrinkable tubing for car repairs. It can be used to insulate brake and fuel lines (be careful with open flames).
Sometimes joints on plumbing fixtures are insulated using an adhesive pipe, but be careful - dismantling it will be difficult. Dried glue is quite difficult to remove.
Insulated socket wires
What is heat shrinking: principle of operation
The operating principle of heat shrinkage is based on the shape memory effect. During the manufacturing process, the polymer is exposed to a stream of charged electrons, due to which the molecules of the material receive additional connections in the transverse direction of the product (cross-linking technology).
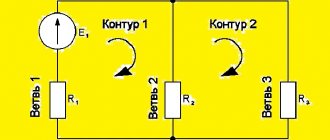
Diagram of the connection of polymer molecules with the cross-linking effect:
- Initial position of polymer chains in the material.
- Irradiation of polymer and abstraction of hydrogen atoms.
- Combination of carbon atoms and formation of cross-links.
Thus, when exposed to temperature, the polymer returns to its original size, changing not in the linear (longitudinal) direction, but in the radial (transverse) direction. This tube has a long shelf life without reducing its basic performance characteristics.
Important! In the electrical goods market, this product can be known under various names: thermal cambric, thermal tube, heat-shrinkable (shrinkable) insulation. https://www.youtube.com/embed/GVtq6fan0Lw
Advantages and disadvantages
When compared to other types of insulation, heat shrink has at least four advantages.
Firstly, since the heat-shrinkable tube fits very tightly, it does not move due to various mechanical influences. Secondly, installation is a simple and quick process, but you still need to know some rules of use. Thirdly, after shrinking, the insulation material becomes stronger, so the wire becomes even more resistant to mechanical damage and acquires additional rigidity at the junction. And the service life is much longer than that of conventional electrical tape. The fourth plus is a wide range of applications.
Among the disadvantages of the tube HERE, the following can be noted:
- It cannot be reused, because when heated it changes its diameter, so it will definitely be damaged when removed.
- The price of heat-shrinkable tubing is higher than the price of electrical tape, but not so much that it becomes a decisive factor when choosing a protective and insulating material.
If during use some other shortcomings are discovered, then these are shortcomings of the selected manufacturer.
The video below provides a visual comparison of heat shrink and electrical tape:
Heat Shrink Tools
In fact, there are only five heating construction tools. Let's look at them:
- construction high-temperature hair dryer for heat-shrinkable tube;
- special butane-based burners;
- gas soldering irons;
- propane burners;
- infrared device.
The best option for heating heat-shrinkable, thin-walled elements is a construction hair dryer . Its temperature conditions can be adjusted; in addition, you can purchase special nozzles for uniform heating.
Its disadvantage is that the heating of thick-walled material will take a long time, and the quality of compression will be unsatisfactory.
Before you start heating with a hairdryer, you need to hold the heating area with your hand so that the strong air flow from the nozzle does not cause the element to move from its place.
A burner with infrared radiation does not have these disadvantages, since heating is carried out in a matter of minutes, without a strong air flow.
Important! When using infrared radiation, you should know that elements of black or dark shades absorb heat faster, so there is a high probability of burning through the thermal insulation when heated.
Gas burners are good to use because the flame has several functions. It is worth understanding that shrinkage should be done on the softest flame. How can you tell if the flame is soft? Adjust the burner so that all flames are yellow; the same indicators should be used when using a gas soldering iron.
Interesting to know! Since this thermal insulation is used everywhere, including in mechanical engineering, the question arises: how to heat the heat-shrinkable tube for a gas pipeline. There is one most important limitation: open fire in any form cannot be used for heating. It is better to use a hair dryer or an infrared emitter to insulate the gas pipeline.
A propane torch is the most suitable tool for compressing thick-walled thermal insulation elements.
Specifications
Currently, you can buy a large number of heat shrinks on the market, which differ from each other in their properties. In what ways do they differ:
- Shrinkage coefficient, that is, the ability to reduce its size (2-6 times).
- Resistance to different operating environments - heat-resistant, oil- and petrol-resistant, chemical-resistant, light-stabilized.
- With and without an adhesive layer.
Types of heat-shrinkable tubes
In addition, we can add that heat-shrinkable tubes differ in color and the material from which they are made. As for the color design, there is not much variety here, because manufacturers try to approach this issue from the perspective of the color design of the cable cores. By the way, yellow-green tubes for grounding conductors are also available.
Now, regarding the raw material. In principle, any polymers are suitable for the manufacturing technology HERE. These include polyvinyl chloride, fluoroplastic, elastomers, polyolefins, and so on.
Main parameter
Yet the main indicator of heat shrinkage is the diameter of the tube, which indicates the size before and after shrinkage. The first size shows the diameter of the product that is supplied to the retail chain from the factory. The second shows how much the first can decrease during the heating process. This is usually how the product designation is indicated. But there is another type of marking, where only the original diameter is shown, and in addition, another indicator is the shrinkage coefficient. Eg:
- This is how heat shrinkage is marked according to the first option - 6/4 or 6 mm/4 mm.
- This is marked according to the second option - 10/2:1, that is, the shrinkage will occur twice. Essentially, this is the same as 10/5 (in the first case).
Asian manufacturers, including Russia, indicate the diameter of heat-shrinkable tubes in millimeters. European and American in inches. Converting one to the other is not difficult, because 1 inch is equal to 25.4 mm. By the way, inch tubes are more expensive than millimeter tubes, but keep in mind that the size is in inches - this does not always mean that the product was made in America or Europe.
Most often, manufacturers offer the following ratios: 4:1, 3:1, 2:1. Adhesive heat shrinks do not have a standard ratio; it varies in the range from 2.8:1 or 4:1, it all depends on the diameter of the product itself.
Form
As for the shape, in stores you can find round, oval, and flat (flattened) tubes. Why such diversity? It's all about ease of storage and transportation.
- Flat and oval are thin-walled or large-diameter heat shrink.
- Round ones are thick-walled tubes and heat-shrink with an adhesive layer. Sometimes the products are thin-walled with a small diameter.
Delivery to the retail chain is made in coils and slices. By the way, it is the flat models that are supplied in coils. Depending on the diameter, pipes with a length of 10 to 100 mm are placed in coils. When cut, heat shrink comes in a length of one meter or 1.22 meters - that's four feet. But tubes with an adhesive layer have a standard length of only 1.22 m. They are not supplied in coils due to kink. The same applies to pipes with thick walls - they are not sold in coils.
Heat shrink tubing is used for electrical insulation, sealing, mechanical and corrosion protection. You put the tube on the object, heat it, and it shrinks, repeating the shape of the object. But the nuances are in the details.
What to seat
Products are shrinked using a jet of hot air, a soft yellow flame of propane-butane burners or other heat sources capable of heating the materials above +120 ° C (the required temperature depends on the type of tube). At home, this is done using matches, a lighter, or by placing the tube in boiling water, if this is permissible. Special heat guns and industrial hair dryers with a set of nozzles and a temperature controller are ideal for working with heat-shrinkable materials.
How to prepare an object
- Clean and degrease the surface using a solvent.
- Clean the surface of cables with a PVC (polyvinyl chloride) sheath with fine sandpaper, and preheat the surface of cables with a PE (polyethylene) sheath.
- Clean the metal surface with sandpaper and heat it with a flame.
How to prepare heat shrink
Select a suitable tube according to technical characteristics and dimensions. Tube diameter after shrinkage
must be at least 20%
smaller than
the size of the object on which it is seated, otherwise the tube will not fit tightly or even fall off.
The diameter of the tube before shrinkage
, on the contrary, must be
larger than
the size of the object, otherwise the tube will not initially fit onto the object.
Pay attention to the shrinkage coefficient of the tube. Most often, the tube is reduced in diameter by half, but there are tubes with a large shrinkage ratio, even 6:1.
If the tube has a thick wall or large diameter, heat it to half the shrink temperature before shrinking. This is necessary for uniform shrinkage.
How to seat
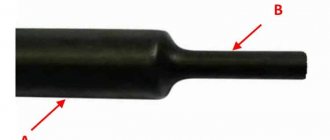
- Place the tube on the object or surface to be insulated (Fig. 1).
- Set the heating temperature between +120 and +200 °C for PBF type tubes and from +70 to +110 °C for TST tubes (China). The shrink temperature should not exceed the specified temperatures to avoid overheating of the material from which the heat-shrinkable tube is made, melting, curling or wave-like shrinkage of the tube.
- Start shrinking from the middle of the tube (Fig. 2). Heat the tube around, trying to get uniform shrinkage. The central part of the tube should fit tightly to the surface of the object.
- Shrink the tube from the middle to the ends (Fig. 3). Heat the tube evenly, constantly moving the heat source along its surface to prevent local overheating. A properly seated pipe should be smooth, without bumps or bulges (Fig. 4).
- If the inside of the tube is coated with glue, then after shrinkage the glue should flow out of both ends of the tube.
- Leave the insulated item to cool completely.
Additional Information
And again the heat shrink tube. Answers to the main questions
Total versatility, or 10 unusual uses for heat shrink tubing
How to use heat shrink for wires
All that remains is to find out how to use heat-shrinkable tubing. So, first you should choose the appropriate size of heat shrink. If you need to insulate the wires, then you need to cut off a suitable piece that would cover the insulated area, taking into account the fact that there will be longitudinal shrinkage when heated. Usually it is up to 10%, this information is indicated by the manufacturer. There should be no damage or any burrs on the surface, as well as on the sections of the cut tube, because they can contribute to the rapid destruction of the material.
First, the tube HERE is pulled onto the cable, and then you need to make a connection, over which the heat shrink will be put. After joining, it must be heated with movements from one side to the other, so that large longitudinal shrinkage does not occur. This can also be done by heating from the middle of the joint to the edges. The second method is applicable on fairly long sections.
It should be remembered that it is impossible to warm up at both ends at the same time because an air bubble may remain, and this is very undesirable. Wrinkles may also appear on the surface. The heat-shrinkable tube should be heated very carefully and evenly so as not to overheat in some place, as a bubble or surface rupture may appear.
The heating rate and temperature are determined by experiment. However, you should not rush, especially if you have no experience in this area. Heating too quickly or at too high a temperature may damage the heat shrink.
The insulation process itself is not too complicated; if you wish, you can insulate the wire yourself. However, first you can experiment on some piece of wire and make sure that everything is done correctly, and only then start insulating the critical connections.
Finally, we recommend watching a video that clearly shows how to use heat-shrinkable tubing for wires using a hair dryer and a lighter for heating:
Now you know what a heat shrink tube is, what it is needed for and how to use this device at home. We hope that the information provided was informative and interesting for you!
You probably don't know:
- Which electrical tape is best for electrical wiring?
- How to protect the cable from mechanical damage
- What types of cable channels are there?
Types of Heat Shrink Tubing
All products available in specialized stores differ not only in the main material used in production, but also in a number of other parameters. Happens:
- Adhesive heat shrink tube. A special adhesive is applied to its inner surface, which during heat shrinking creates a durable waterproofing coating.
- Product without adhesive inner coating.
You can buy material with different wall thicknesses. According to this parameter, all tubes are divided into:
- thin-walled;
- with average thickness values;
- thick-walled.
By interaction with electricity there are:
- electrical insulating;
- semiconductors;
- tubes with the ability to equalize the electric field voltage.
In terms of resistance to the operating environment, there are products:
- oil and petrol resistant;
- chemically inert;
- high voltage;
- heat-resistant or non-flammable.
All products differ in color:
- Colored heat shrink tubing is often red, white, black, green, blue and yellow. Two-color yellow-green tubes are used for ground insulation.
- Transparent tubes are used for marking wires. Under the insulation is placed paper with the inscription of the cable brand, its cross-section, power supply and other things.
Size range of heat shrink tubes
The product range (in our case, size range) depends on manufacturers and suppliers. You can get complete information on this issue on the official websites of manufacturers or their dealers. As an example, we provide information on the size range HERE®.
Table: available sizes from the manufacturer HERE®
How to choose heat shrink tube?
Before purchasing a set of heat shrink tubing, it is important to decide on a number of parameters:
- Product operating conditions
. This parameter is considered one of the most important, because you need to take into account the range of possible temperatures and the conducted voltage in which the wires will be exposed, the impact of bad weather factors, the possible ingress of chemicals (oil, gasoline) and some others. - Purpose of use
: cable insulation, grounding, wire marking. - Product diameter
. It is selected based on the “-10+20” rule. This means that, according to the size of the wires, the minimum and maximum shrinkage limits are the specified parameters. - Length
. This indicator is not as important as the diameter, but you shouldn’t forget it either. When heat shrinking, high-quality products are shortened by only 5-7%, while inexpensive materials can shrink by 20%.
Heat shrink tube - dimensions
When carrying out a number of high-precision works, it is worth taking into account the size range of the product, which includes the following parameters:
- The diameter of the product as delivered, which in many CIS countries is measured in millimeters. It can vary from 12 to 140 mm. Large-diameter heat-shrinkable tubing is also available for sale, used by professionals when carrying out a number of complex jobs.
- The maximum diameter of the tube after complete heat shrinking can be from 3 to 42 mm and above.
- The wall thickness after shrinkage can be from 0.4 to 1.2 mm.
- The thickness of the adhesive layer after heat shrinking can be from 0.5 to 1 mm.
- Length of the product. Sets of tubes 50-100 cm long are sold for private use. Craftsmen purchase the product in a roll, the length of which varies from 25 to 200 m.
Marking of heat shrink tubes
To successfully select a product, you need to understand the markings indicated on each package by the manufacturer. More often they indicate:
- Heat shrinkage coefficient
. It can be expressed either as a percentage or as a ratio, for example 2:1 or 3:1. - The inner diameter of the tube before and after heating
. It can be indicated in millimeters or inches depending on the country of production and looks like 10/5, 60/25, etc.
Application of various methods for heating
There are several heating methods, each of which can provide high-quality heat treatment. But there are also some that are not recommended.
The most common, but at the same time controversial, option is a lighter or matches. This option can be used if there is no other source of high temperature at hand. You can only shrink a small section of wire with a small cross-section using this method. This option is not suitable for large structures.
If we are talking about large products, then heating will take a lot of time, and the connection itself will turn out to be of poor quality. And how many times will this procedure need to be repeated if it is necessary to process several areas with a large cross-section?
The same can be said about the lighter. Some home craftsmen try to use a regular hair dryer for shrinking, which every housewife has. But it is worth remembering that this device cannot provide the required temperature, so high-quality compression of the insulation will not work.
Important! Depending on the brand of material, the heating temperature is 90-150 degrees.
A household hair dryer produces a stream of hot air t 700 C at the outlet of the nozzle. If you use a narrow nozzle, then of course it is possible to heat a small area with a small diameter; as for large sections, the hair dryer will simply fail, and the insulation will turn out to be of poor quality and unreliable. Do not forget that there are some heat shrink models that can be compressed at a heating temperature of 350 degrees.
The result of such work may be a loose fit of the material to the insulation site, into which moisture can easily penetrate, so it is worth using a special tool.
Characteristics of Heat Shrink Tube
First you need to know what heat shrink for wires is made of. It is made of polymer, thanks to which it can change and shrink. The size of the tube HERE can be reduced by half or even six times. The shrinkage ratio of the product varies from 2:1 to 6:1.
Heat shrinks also come with an adhesive layer; they are used when connections need to be very reliably sealed to protect them from moisture and corrosion. The adhesive layer provides additional strength to the joints.
Heat-shrinkable tubes differ in their polymer composition. Some are made from PVC, elastomers, polyolefins and various other materials
It is important that the product is resistant to fire, ultraviolet rays, and also has good mechanical properties
It is also important to talk about the sizes of heat-shrinkable tubes. All manufacturers put a designation on the product that will indicate its dimensions
The diameter is indicated both before and after shrinkage. The first numbers indicate the internal size before shrinkage, and the next ones indicate either the diameter or the coefficient by which it can be calculated. The basic or standard ratio is 2:1. The maximum diameter of the HERE tube is 120 mm, and the minimum size is 2 mm before shrinkage.
The most required heat shrink sizes are provided in the table:
If you want to know how to select heat shrink tubing, we recommend watching the video provided below:
Rules for installing heat shrink
To crimp the heat shrink tube as best as possible, you need to follow simple rules:
- When cutting a piece of thermal tube to the required length, make a small margin. When heated, the length of the TUT will decrease, albeit slightly - by a maximum of 15%.
- If you need to insulate a metal surface or a product with high thermal conductivity, warm it up first. This way the surface will be protected from condensation, and the walls will stick together more tightly, without distortions and “cold scars”. This advice is especially relevant when using large diameter tubes.
- Before placing heat-shrink tubing on an entire wire or other product, it is advisable to clean and degrease the surface with a cloth moistened with solvent or alcohol. Sharp edges on metal should be removed and sanded.
- Start heating long heat pipes from the central part, smoothly moving to the edges. This will help avoid gaps and air bubbles. This advice is especially relevant for HERE with an adhesive layer.
- Avoid rushing. First, warm up and shrink HERE around the entire circumference, and then gradually move on.
- Do not forcefully lengthen or expand the heat shrink tube when heated. It is not difficult to change the dimensions of the tube, but this will reduce the wall thickness and reduce its electrical and mechanical strength.
Advantages and disadvantages of heat-shrinkable products
Heat shrink for wires has the following advantages:
- the ability to hermetically crimp products with complex relief surfaces, providing electrical insulation and mechanical protection;
- high strength with respect to tensile forces;
- abrasion resistance;
- chemical resistance to acids and alkalis;
- simple installation that does not require special skills or special tools;
- elasticity and ease of deformation during installation;
- resistance to open flame.
Note! The tube HERE reliably crimps wire connections, the diameters of which vary significantly. Thanks to tight crimping, the connected products do not move when exposed to mechanical factors, and the conductors themselves become more rigid and resistant to damage
Crimping HERE for conductors of different diameters
Among the shortcomings HERE, the following circumstances are noted:
- The thermotube is a disposable product. If it is necessary to remove it from the conductor, the polymer will have to be cut along the entire length of the fitting.
- The cost of heat-shrinkable tubes is higher compared to the price of traditional electrical tape.
- With increased abrasive loads during repeated contacts with foreign bodies, it is preferable to use several layers of electrical tape or corrugation (plastic or metal).
How to use heat shrink for wires
All that remains is to find out how to use heat-shrinkable tubing. So, first you should choose the appropriate size of heat shrink. If you need to insulate the wires, then you need to cut off a suitable piece that would cover the insulated area, taking into account the fact that there will be longitudinal shrinkage when heated. Usually it is up to 10%, this information is indicated by the manufacturer. There should be no damage or any burrs on the surface, as well as on the sections of the cut tube, because they can contribute to the rapid destruction of the material.
First, the tube HERE is pulled onto the cable, and then you need to make a connection, over which the heat shrink will be put. After joining, it must be heated with movements from one side to the other, so that large longitudinal shrinkage does not occur. This can also be done by heating from the middle of the joint to the edges. The second method is applicable on fairly long sections.
It should be remembered that it is impossible to warm up at both ends at the same time because an air bubble may remain, and this is very undesirable. Wrinkles may also appear on the surface. The heat-shrinkable tube should be heated very carefully and evenly so as not to overheat in some place, as a bubble or surface rupture may appear.
The heating rate and temperature are determined by experiment. However, you should not rush, especially if you have no experience in this area. Heating too quickly or at too high a temperature may damage the heat shrink.
The insulation process itself is not too complicated; if you wish, you can insulate the wire yourself. However, first you can experiment on some piece of wire and make sure that everything is done correctly, and only then start insulating the critical connections.
Finally, we recommend watching a video that clearly shows how to use heat-shrinkable tubing for wires using a hair dryer and a lighter for heating:
Related Posts
- Cambrics for insulating wire connections
- Copper pipes and their use in air conditioners
- Why does the air conditioner gurgle when not working when there is wind?
- How to glue fiberglass correctly?
- Benefits of using a duct extension for radiators
- How to cut metal using a grinder
- Wood screws: table with dimensions, features of choice and nuances of use
- How to update old tiles in the bathroom
- The door handle creaks: causes of the problem and solutions
- What role does the drain pipe play in the operation of the air conditioner?
- Calculation of well volume
- Fum tape technical characteristics, how and how much to wind on the thread
- Which pipes are best to choose for a water well?
- Options for making shelves for the garage with your own hands
- Disadvantages of polypropylene pipes in home heating
- Hidden video surveillance in an apartment: installation purposes, choice of cameras and legality
- Technology of painting wallpaper with water-based paint
- What and how to drill into the tiles so that they don’t crack?
- Liquid Nails
- How to independently secure a cable to a wall or ceiling using dowel clamps
- Making a stand for a drill with your own hands: instructions, drawings, video
- How to use a multimeter correctly
- Alabaster: what is it? how to divorce? where to apply?
- Hydraulic level
- Connecting the toilet to the sewer without corrugation
Read with this
- Cambrics for insulating wire connections
- Copper pipes and their use in air conditioners
- Why does the air conditioner gurgle when not working when there is wind?
- How to glue fiberglass correctly?
- Benefits of using a duct extension for radiators
- How to cut metal using a grinder
- Wood screws: table with dimensions, features of choice and nuances of use
- How to update old tiles in the bathroom
- The door handle creaks: causes of the problem and solutions
- What role does the drain pipe play in the operation of the air conditioner?