how to make a USB when, while experimenting, I myself extended the USB cord of a regular web camera by 18 meters for simple video surveillance, (more details) . That is, I extended a regular web camera to a distance of 18 meters from the laptop! This is an excellent result, since at first I was not able to extend the USB webcam even by a meter. Using the same homemade USB extender, I subsequently extended the 3 G modem and other USB devices - everything works fine.
USB extension cord that worked smoothly in fifteen minutes and cost mere pennies. At the same time, on sale, a two-meter high-quality high-speed USB 2.0 cord with ferrite filters costs about $15. At the same time, it is not yet known whether it will work normally with all USB devices. I have repeatedly seen meter-long USB extension cords through which only mice and keyboards worked normally. Even flash drives didn’t want to be identified through them. Therefore, I started thinking about how to make a working USB extender for a web camera, 3G modem and other remote USB devices.
What to make a USB extension cable from.
What to make a USB - at first, I tried to make a USB extension cable from double shielded microphone wire of various brands. I sent D+ and D- USB signals through the central cores of the cable, and 5 volt “+” and “-” power through the shielding braids. I tried other options for a USB extension cable using shielded wires. But nothing came of it. On such a USB extension cable, devices were not detected even on a meter-long cord. It would seem - a good shielded wire, channels D+ and D- are separated and have separate screens, what else is needed? But USB devices did not work on it! Fruitless experiments with USB and shielded wires continued until I realized that a differential signal was simultaneously transmitted D+ and D- . This means that for a USB extender you need to use a symmetrical line - twisted pair !
Required materials and tools
In order to make an extension cord with your own hands, you will need a minimum set of tools that every home craftsman has - a soldering iron with solder and rosin, as well as a sharp knife. It is advisable to have a hair dryer and a soldering iron in your arsenal. The USB cable itself consists of a twisted pair cable or another variant with at least four conductors. You also need a socket and plug of the appropriate format. You can purchase them separately or try to extract them from old unnecessary equipment.
USB signal at the physical level.
signal is a differential signal . Two signals traveling along the D+ and D- pair of wires simultaneously in antiphase (inverted). Without the participation of a common wire. An example of a differential signal is the signal output from a transformer winding. The amplitude of such a signal is not the amplitude relative to the common wire, but the amplitude relative to these two conductors. Accordingly, the signal diff receiver records the amplitude between these two inverted signals, and not the amplitude between the signal wire and the negative of the power supply.
The USB bus is a symmetrical communication line. A high-quality method of transmitting high-frequency signals without losses and common-mode interference, carried out over a pair of wires without the participation of a common wire. The method has increased noise immunity due to the fact that the noise acts equally on two antiphase conductors simultaneously, being subtracted from the useful signal in the end.
Therefore, a reliable USB extension cable must be made from twisted pair cable . The most affordable twisted pair option for a USB extension cable is twisted pair for computer networks, a regular “network” wire.
USB-OTG
What is OTG?
OTG (“On-The-Go” - “On the Go”) is the ability to connect a flash drive, mouse, keyboard and other USB peripherals to a smartphone or tablet. Unfortunately, not all mobile devices have this capability.
A special adapter is required for connection. Nuances: • The flash drive must be formatted in FAT32. • The capacity of the connected flash drive is limited by the hardware capabilities of the smartphone. • The hard drive and other energy-intensive devices require a separate power source.
You can find out whether your device supports OTG mode from the list on w3bsit3-dns.com. True, the list of devices is not complete.
To connect, for example, a flash drive to a smartphone, an adapter “USB AF - USB micro AM” is most often used (read about the meaning of these abbreviations in the article “USB 2.0”). A flash drive is connected to the “mother” (USB AF), and the plug (USB micro AM) is connected to the smartphone.
Miniature OTG adapter on GearBest ▶
How to make an OTG cable yourself?
The OTG cable consists of a USB micro (or mini) plug and a large USB socket (like on a computer). The plug can be taken from a data cable, and the socket can be taken from a USB extension cable.
The main feature is that in the USB micro/mini plug, pin 4 must be connected to pin 5 . It is by the presence of a jumper between pins 4 and 5 in the plug that the device determines that it is being given an active role.
OTG cable wiring diagram. USB micro plug shown from solder side ▼
Installing a jumper on a plug filled with insulation ▼
The soldering ends of the USB micro are staggered. The odd numbers are assigned to one wall of the plug, the even numbers to the other. Through the translucent insulation you can see the black, green, and red wires on one side. Carefully melt the insulation on the black wire and solder one end of the jumper to the GND contact. We look from the opposite side: an unused contact and a white wire are visible through the insulation. We melt the insulation at the unused contact and solder the second end of the jumper to it.
Wiring the USB mini ▼
All that remains is to solder the USB mother from the USB extension cable to the color-matched plug we converted. If the cables are shielded, then we also connect the shields.
Is it possible to charge an active device in OTG mode?
Yes, this mode is provided by the developers, but not every portable device supports this mode . The charging mode when working with peripherals is called ACA (Accessory Charger Adapter). To switch to this mode, a special OTG cable is required - in the USB-mini/micro plug, pins 4 and 5 (ID and GND) must be closed through a resistor RID_A=124 kOhm.
Source of information: “Battery Charging v1.2 Spec and Adopters Agreement (BC1.2)” (thanks to our reader Victor for the information)
On the “LF” forum, the owner of the Lenovo Ideaphone K900 smartphone reported that he successfully connected a flash drive while charging the smartphone. In his case, RID = 25 kOhm.
Tags: OTG, USB, Gadget, Cable, Computer, Mobile, Connector, Pinout
Discussion: 443 comments
- Yulich:
May 16, 2021 at 02:07Dear Rones ! Is it possible to implement such a thing: solder an OTG cable and parallel another input to the input to connect a charger (only power wires + and -)? In general, connect and use a flash drive and charge the gadget at the same time. For what - I think it’s clear.
Answer
- Oleg:
December 27, 2021 at 07:30
Hello! I have one problem - there is a cable, one end is micro USB, the other is like on 3.5mm headphones, the cable near the micro USB plug has broken off, please advise where I can buy it or how to make a similar one???
Answer
Rones:
December 27, 2021 at 07:57
Here is a special article about wiring such a cable - The wiring diagram depends on the model of the device for which this adapter is intended. If you buy such an adapter, buy it from the manufacturer of the device it came with.
Answer
November 25, 2021 at 01:51
Dear author. To connect the Digma FreeDrive 550 Dual car recorder, Incar purchased a microUSB plug to USB plug adapter. The point is the same: the adapter is always inserted into the recorder so as not to disturb the connector. In the car, then connect it with a USB extension cable to the included charger, and when you sometimes remove the recorder and take it home, connect it to the TV and laptop without any cords. However, when connected to a TV or laptop with this adapter, the recorder immediately switches to video recording mode, as if power was supplied and recording was automatically turned on. Those. Selecting the data mode from the memory card as a removable storage device does not occur. Are there really no clever adapters to turn on the desired mode when you connect the recorder to your car and at home? In general, what can you advise with this idea?
Answer
- Rones:
November 25, 2021 at 07:52
To connect the recorder to a TV or laptop, you need a regular data cable, not OTG.
Answer
← Previous comments
Your comment Cancel reply
Homemade twisted pair USB extension cable.
a homemade twisted pair USB extension cable as follows: - I had a piece of PRIME CAT5 E UTP cable - 18 meters. Conventional unshielded computer twisted pair cable for indoor installation. The cheapest network cable. To connect the web camera via USB, I needed a piece of cable 10 meters long, but I decided not to cut the piece I had and connect it all - for the experiment. As it turned out, it was quite successful.
the twisted-pair USB extension cable with dismountable female and male USB connectors purchased at a radio store.
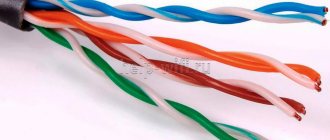
Important point! I connected the blue pair of cable wires to D+ and D-. Why blue? – All four twisted pairs of the cable cores have different lay pitches. This is clearly visible if you remove the overall sheath of 10 - 15 centimeters from the UTP cable. So, the USB extension cable worked perfectly if the D+ and D- signals were sent through a blue or green pair of wires . If we put D+ and D- on the orange pair, then the USB extension cable did not work at all. The brown pair worked intermittently. Probably, the laying pitch of the blue and green pair of cores is ideal for the passage of a high-frequency USB signal (resonance, impedance, etc.).
I paralleled the other three pairs of cable cores and ran power through them - three colored wires plus, three striped wires minus.
A homemade twisted-pair USB extension cable works great - all USB devices connected to it are detected and work without problems. USB flash drive , USB card reader , USB Wi- Fi adapter , 3 MTS modem EasyCap – video capture device, USB DVB- T receiver – SDR radio, USB web camera . This is all that I tested on this homemade USB extension cable .
After a series of unsuccessful experiments with a short shielded wire, the functionality of the 18-meter USB extension cable seemed unrealistic. Subsequently, I made many USB extenders using this technology, and they all worked up to a length of 20 meters . For a longer length, I was never able to get the USB extension cord to work properly. USB devices are no longer detected.
Making a USB extension cable for a 3G/4G modem
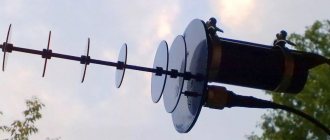
Greetings to subscribers and just readers of the blog. Today, due to numerous requests, I will finally tell you how to make a homemade USB extension cable in “makeshift” conditions for connecting a 3G modem , which is located at a great distance from the computer, for example, on an antenna that amplifies the 3G signal. This extension cord will work over a considerable distance; I assembled and successfully tested a line with a length of 40 m. Conventional USB extension cords do not give such a result, the maximum that can be achieved from them is 8-10 m long from two articulated high-quality cords. Of course, 40 m is a long distance, and I don’t think that data transmission at such a distance is advisable, but the fact is that the extender really works.
This method was shared by one of our readers Alexander_01
, in his comments to the article “Do it yourself 3G antenna,” he talked about how to make a USB extension cable from a coaxial cable and an electrical wire, for which we thank him.
What will you need to make an extension cord? First you need to find a regular USB extension cord, maybe a used one, an old one, I think everyone has one of these, on one end of the cord there will be a USB male, on the other a USB female. We also need a regular two-core flexible electrical wire and a coaxial (antenna) cable (75 Ohm is possible).
The main problem with USB extension is power attenuation in the conductor, the supply voltage of USB devices is 5 V; on a long line the consumer does not have enough power. Power is also dissipated into space when transmitting data. USB consists of four conductors, two of which are power and two are data. Below is the USB pinout.
USB pinout:
We transmit power through an electric cable, and data through the central cores of a coaxial cable. The cross-section of the electrical cable will allow the power not to fade over a long distance, and the braiding of the central cores will protect the data transmission channel. You need a high-quality coaxial cable, made entirely of copper, and with a dense braid. Two-core copper wire with a cross-section of 0.75 mm2 for a line up to 20 m, and a cross-section of 1 mm2 if you are going to make an extension cord of more than 20 m.
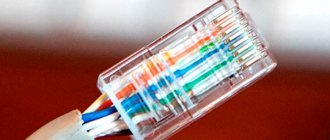
We cut the pre-prepared USB cable, under the braid and foil there are four wires, usually white, black, green and red, red and black are power, we connect them to the electrical cable. We take two coaxial cables and connect their central cores with white and green, all the braids are also connected to each other, we do the same on the other side of the extension cord, “mother” at one end, “male” at the other. The entire manufacturing process is illustrated in the photo.
All connections except the braid should be soldered, the wires soldered together should be insulated, then all braids should be connected. All twisting must be shielded using foil. For convenience, the cables can be secured with electrical tape along their entire length, so we will have a fairly thick wire consisting of two antennas and one electrical cable.
As you can see, there is nothing complicated in making a USB extension cable of the length we need, the cost of such a “device” depends on the length, the coaxial cable will be needed twice as much as the electric one. I will try to answer all questions in the comments or in more detail on the forum.
Maximum length of USB extension cable.
According to the standard, USB cables and extension cables should not exceed five meters for Full-Speed mode (12 Mbit/s speed). But this is a general case - the minimum specification for guaranteed operation of any USB device.
In practice, everything is much more interesting. It all depends on the specific UTP cable - the pitch of the twisted pair, the thickness of the conductors, the single-core or multi-core conductors, the material of the conductors and insulation, the presence of a screen. The operation of a USB extender is subject to the complex theory of high-frequency signal transmission. That is, physically, a USB cable is not just a cord of four wires, but a high-frequency symmetrical communication line .
The maximum length of a USB extension cable is also affected by the drop in supply voltage. Therefore, 5 volt power in the USB extension cable must be supplied over three parallel twisted pairs to increase the cross-section of the power line.
I managed to make USB extension cables from twisted pair cables a maximum length of 20 meters . Longer extension cords had already stopped working - the high-frequency signal faded, or the supply voltage dropped significantly on the wires. Below, I will give all the reasons I have encountered for the USB extender not working.
How to do it yourself?
The process of assembling an extension cable for a USB connector is very simple. First of all, you need to prepare the plug itself. If you are using a connector from an old cable, you should carefully remove the inner part from the rubberized insulation. To do this, the contour of the rubber fill is cut through with a sharp knife to the metal. To make it easier to remove the inside of the plug, the shell should first be heated with a hairdryer and a soldering iron. It is advisable to do all this work carefully - perhaps the rubber fill can be put back on the new cord using glue.
Now that the insulating layer has been removed, you can remove the metal shell of the plug. It comes off easily when prying with the tip of a knife. After this, access to the wires appears. The old conductors must be disconnected from the contact pad without damaging the tracks. A USB port usually does not have multilayer insulation, which means there should not be any difficulties with accessing its contacts.
The contacts of the connector and plug must be tinned for a reliable connection with the signal conductors.
Next, you need to prepare the cable. Both ends are cleared of the main insulation, and about 2 - 3 mm of the insulating sheath is removed from the tip of each conductor. Only 4 wires are needed to operate, but some can be used in pairs. The stripped ends should be tinned before further soldering.
When all the components are prepared, you can assemble the extension cord. When connecting, it is important to take into account the correspondence of the contacts on the mother and father - if they are mixed up, the cord will not work. It is advisable to install an electrolytic capacitor with a capacity of at least 1500 μF between the positive and negative power contacts on the socket. Thanks to it, the power of the USB device will not drain. When connecting a capacitor, it is important to observe the polarity of the connection.
Now you can isolate the parts of the plug and port that are not needed when using it. You can try to re-glue the rubber shell, and fill the contacts of the socket with the capacitor with silicone glue from a heat gun.
If all conductors are soldered correctly, the USB extender should work properly. Instead of a USB connector at the end of the wire, you can use a micro USB type plug.
Why the USB extension cable does not work - reasons:
1) The wires of the USB extension cable are not twisted pair.
No shielded microphones, etc. You should not use wires for a USB extension cable! Only twisted pair! The best cable for a USB extender is a standard computer twisted pair UTP made of solid copper wires (not soft stranded patchcord wires). Lines D+ and D- MUST be a twisted pair of wires!!! Just a twisted pair of wires!!!
It is also possible that you will come across a low-quality twisted pair cable with high signal attenuation. In this case, if all the options below do not help, you need to take a UTP cable of a different brand, manufacturer, etc.
2) The wrong twisted pair of wires is used for the D+ and D- signals of the USB extender.
A “ computer twisted pair UTP ” cable, under its sheath, has four twisted pairs of wires with different lay pitches. This is done to reduce the parasitic effects of pairs on each other in the cable. However, the laying pitch of the pair also affects the parameters of the passage of a high-frequency signal through it. Therefore, for the D+ and D- line, it is advisable to try all four pairs and determine on which of them USB devices work most stably. When making USB extension cables, I most often had luck with blue or green twisted pair cables. The D+ and D- line on these twisted pair cables worked almost always perfectly. Probably, these conductors of the pair have the “right” lay pitch. But for some reason, the orange pair of wires most often failed on long USB extension cables (15-20 meters).
3) Large drop in supply voltage on the USB extension cable.
For power circuits, it is necessary to parallel the wires of the USB extension cable! Power to the USB device via a USB extension cable must be supplied via the remaining three twisted pairs in parallel - to increase the cross-section of the wires and reduce their resistance. If the 5 volt supply voltage drop on the extension cord is significant, then the USB device will not be able to work normally. It will not be detected by the computer. This is the truism of Ohm's Law !
4) The USB extension cable is not connected to the main USB sockets of the PC.
The USB extension cable must be connected to the USB sockets located on the back of the PC case! It makes a difference where you connect the USB extension cable! Additional PC USB connectors located on the case are most often connected to the motherboard using regular wires rather than twisted pair. Therefore, naturally, the symmetrical signal D+ and D- is greatly distorted on such wires, causing interference. But the USB sockets located on the back of the PC (mounted directly on the motherboard) will not distort the D+ and D- lines.
Wireless USB extenders
But the technology didn’t stop there - USB transmitters were also developed that work wirelessly via our beloved WiFi.
In addition to models that work via an Ethernet cable, there are also wireless extenders. The difference between them is that communication between the two transmitters is carried out via wireless communication.
They can be distinguished by their characteristic antennas, although in some models they may be hidden in the body. The kit includes two transmitting devices that transmit information using their own closed and secure WiFi protocols, so you don’t have to worry about the safety of information. Also, as a rule, the transmitters are pre-configured for each other, so you just have to connect them to the USB ports of devices - one with a computer, the second with another device - and that’s it, it should appear in the list of gadgets connected to the computer.
If you want to purchase such a device in a wireless version, keep in mind that the higher its cost, the more stable the signal will be.
Icron also has a wireless active USB extender - this is the Icron WiRanger USB 2.0 Hub model with 4 ports. Externally, it is almost no different from the Ranger 2104, the only difference being that instead of an Ethernet port it has a WiFi antenna. It is inferior in speed (up to 54 MB/s) and range (up to 30 meters) to its cable counterparts
For me, the advantage of wireless IP gadgets is obvious - no wires plus access for an unlimited number of users. At the same time, the distance and speed are quite enough for stable work within the apartment.
Ask questions about WiFi USB cable extension in the comments..
How to extend USB - even other options.
If you don’t feel like soldering at all, but urgently need to extend your 3 G modem or webcam , then you can buy a ready-made device - a set of USB-RJ45 adapters.
Me and Diode. © yaidiod.ru.