Good morning, afternoon and evening Dear DIY masters!
Today I want to tell you about one of the most popular Chinese measuring instruments today, the DSN-VC288 volt-ampermeter. With operating parameters for measuring voltage from 0 to 100V and current from 0 to 10A.
The DSN-VC288 volt-amperemeter, today, is one of the most popular and in demand for measuring voltage and current among radio amateurs and DIYers. Installed on various electrical devices. The price of this device is very budget-friendly. In online stores it ranges from 100 to 200 Russian rubles. Which today can be considered practically a gift.
The DSN-VC288 volt-ampermeter is not very suitable for assembling a laboratory power supply. Since the minimum step for indicating current readings is 10 ma. Incl. It can be placed in a LBP with not too high requirements for the accuracy of measuring the output voltage and current. That is, in a home power supply where very high accuracy is not required.
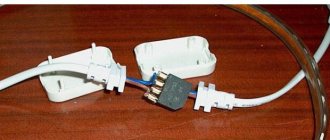
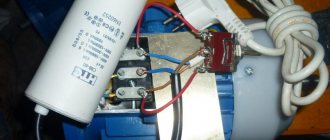
This device is very easy to connect. This device has two connectors. The 3-pin connector serves to supply power to the device itself. After all, this is an electronic system and also likes to consume electricity, although quite a bit. The power supply of the volt-ammeter fits into a plug from 5 to 30 V. Contact for removing the measured voltage on the load. The measured voltage is the voltage that we will take directly from the load from 0 to 100 V. The third contact is a minus. The 2-pin connector is used to measure the current in the circuit. It is connected to the circuit through the negative in series from the power source to the load. Also on the board of the DSN-VC288 volt-ampermeter there are two trimming resistors. Which serve to calibrate the indication of the measured voltage and current, respectively.
Many who have encountered the above-mentioned measuring device are dissatisfied with the low quality of the calibration trimmers. Here, as they say, some are lucky and some are not so lucky.
As always, a little about safety precautions. This is important, respect electricity, do not stick your fingers into the socket, do not measure the voltage with your tongue and it will not touch you.
For those who like to watch rather than read, I suggest watching, with pleasure, a video clip with a detailed description of connecting the DSN-VC288 voltammeter.
Video instruction:
Tools for connecting the measuring device:
1. A soldering iron, preferably designed for soldering electronic circuits, and not old basins. 4. A benchmark tester you trust. To check the accuracy of measurements using our device, voltage and current. And further calibration of the DSN-VC288 voltammeter. 5. Any load for control measurement (you can use an LED lamp of the appropriate voltage). 7. A utility knife for stripping insulation and preparing wires for soldering.
Consumables for connection:
1. Solder. 2. Soldering acid or rosin. 3. Set of wires for installation. 4. Insulating materials, electrical tape or heat shrinkage. 5. A little electricity to test the device.
The procedure for connecting our volt-ampermeter DSN-VC288:
There are two connection diagrams for our volt-ammeter. Diagram number one, connections. It is collected if the measurement voltage fits into the plug of the used supply voltage of the voltammeter. That is, from 5 to 30V.
In this case, the (+) of the device and (+) of the measured load are powered at one point. When the measured voltage drops out of the 5-30V (0-5V or 30-100V) plug, the positive power supply wire of the device and the positive voltage relief wire are connected from different voltage sources. If you apply a voltage less than 5V to the device, the device will not work. If you apply a voltage of more than 30V, the device will fail.
Why is there an ammeter in a car?
An ammeter connected to the vehicle's electrical network shows the current used to charge the battery and provides more information about the state of charge of the battery. The scale makes it easy to understand the indirect signals that the on-board network sends. As a result, it is easy to calculate the following parameters:
If you connect classic devices, the motorist will receive all the information listed. When a car owner connects a new generation ammeter model to the network, then, in addition to basic information, the driver will be provided with data in an expanded format, more informative.
Small-sized voltmeter - ammeter DSN-VC288.
Purpose, technical characteristics, connection diagrams.
A small-sized, easy-to-use, very convenient voltmeter-ammeter can be used in chargers, power supplies and other devices where it is necessary to measure direct voltages from 0 to 100V and currents from 0 to 10A. You can buy it for up to $2 here or in the photo below.
This is what it looks like close up:
Specifications listed on the seller's website:
| Designation | Color | Purpose |
| Vcc | Red thin | Device power supply (+3.5 - 30 V) |
| GND | Black thin | Common/Ground |
| Vin | Yellow thin | Measured voltage (0 - 100 V) |
| I+ | Red thick | Current input + (0 - 9.99 A) |
| I- | Black thick | Current output - (connected to common) |
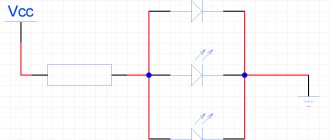
If the measured voltage is in the range from 4 to 30 V, then the DSN-VC288 device itself can be powered from it (diagram above on the right).
If the measured voltage exceeds 30V or is below 4V, then the device must be powered from a separate source with a voltage of 4 to 30V and a current of at least 20mA (above diagram on the left).
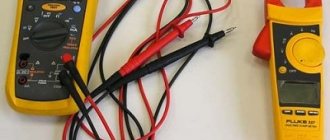
The devices are sold already configured, but if during operation there is a need to adjust the measurement accuracy, this can be done in accordance with the photo below:
Several schematic diagrams of the DSN-VC288 device are available on the Internet, but I did not find one that completely matches the sample. The most suitable one for my sample is given below:
Features of operation and notes on these devices.
When purchasing some samples, the colors of the wires in the connectors are mixed up. Before turning on for the first time, be sure to check the photos on the connection diagrams. For example, in one sample I overlooked that the thick red and black wires for measuring current were reversed. The device did not fail, but did not measure the current until the wires were swapped (they are easily removed from the connector).
Another feature that people pay attention to on the forums. If a source of measured voltage is used to power the device itself (connection diagram on the left), then the thin black power wire of the device itself does not need to be connected (this is written on the diagram). Otherwise, they say, the track on the device board will burn out. I can’t confirm this, I have a thin black wire connected and nothing lights up. I think it will burn if, with a high current, the contact of the thick black wire is lost and a large load current flows through the thin black wire.
The video below shows an example of using this voltmeter-ammeter in a universal power supply-charger:
Choosing an ammeter for a car
Modern auto shops present different models of diagnostic devices. Most of them are offered at a price of 200-400 rubles. However, such devices are designed for low current values and quickly fail. We recommend giving preference to higher quality and more expensive models that are equipped with shunts made of manganin or its analogues. This allows the meter not to change resistance when heated.
In the selection process, it is important to pay attention to the main criteria:
How to connect a voltmeter and ammeter to the charger?
Size: 48mm x 29mm x 21mm. Display color: Red - voltmeter; Blue - ammeter. Display: 0.28 - inches 7. Minimum resolution V: 0. Current consumption 20mA. Measured current: 10A direct measurement, built-in shunt. Mounting cutout: Damn guys, maybe one of you can tell me.
This device arrived, connected according to the diagram, everything worked, both volts and amperes are shown, I unhooked the terminals to connect another battery, everything went out. I connect another battery - from the hum of the transformer I hear that current is flowing through the device, that is, the battery is charging, but the device itself does not light up. Switched to another battery without removing the voltage. Well, I think I got a defective one, wrote to the Chinese, took a video, they say it doesn’t work, ok, the money was returned, I immediately ordered a second device, from them.
Today it arrived, I connect it - everything works, without disconnecting it from the network, I switch to another battery - the same thing, the device goes out but I can hear the hum of the trance, the current is flowing through it.
Question - am I the only one or has anyone else encountered this problem? I’ll write to the Chinese again, and the money will most likely be returned, but do they have a device without any kind of protection, or what? In appearance, everything on both devices is intact, not blackened or burnt. Can the device be connected through a diode like a thread so that it doesn’t happen again?
After all, you’ll be in the garage, let’s say, charging, but you just loosely attached the crocodile to the terminal, unhooked it, plugged it back in and everything was on, giving your little Chinese little soul to the harsh Russian current. Look at the connection diagram at the beginning of the recording... Common minus... Measuring the current in the positive output gap. Hello, when connecting the battery to the terminals, without connecting to the network, does the voltammeter show the readings?
All this depends on the connection method, if both the power supply and the measurement circuit go directly to the output, of course the battery voltage will show. S1 fits in without any problems. Good day. I screwed the same indicator to my charger and a strange thing happens: I connect the charger to the battery, I see the voltage on the battery, the current is zero. I turn on the charger and the display turns off completely. I turn off the charging and the indicator turns on. I hung a light bulb on the charger and it shows both voltage and current.
I connect the battery again, turn on the charging and the indicator turns off again. I don’t understand what’s going on. Have you supplied separate power to the circuit? No, the power supply to the circuit and the charging voltage are parallelized.
I noticed this thing: when the charge current drops below 1 A, the indicator turns on and works normally. The Chinese seem to have lied again about 10 A, apparently they didn’t install the power supply. Today I passed a current of 5A through the device for an hour, the shunt does not heat up, the flight is normal within the range of A, the readings are correct, the load is a rheostat plus a laboratory ammeter.
You can try to organize food in one ms LM Buy a car on Drome. Dimaszds on mobile. Register or login:. Good afternoon. Where is the blue wire connected? Red and black wire going to the battery. I thought it should work in minus mode. What's not on the front instead of the switch? He won’t fit in there... There’s not enough space.... It’s cool... But I don’t want to redo it anymore... The places there seem to be right next to each other.... Almazsaif Good day. Hmm, what’s wrong with me, what kind of strange behavior is this?
Why is there an ammeter in a car?
Those who are older remember that some kind of ammeter was installed on domestic cars. That device worked “in both directions”, and primitively showed where the current was flowing relative to the battery - from it, or to it. In fact, the ammeter served only to monitor whether the battery was charging or, conversely, discharging.
Modern ammeters allow you to learn much more information about currents in automobile circuits. This is possible due to the fact that the devices are now digital and can show not only the direction of the current. Based on their readings, you can find out the load accurate to tenths of an ampere. And this significantly expands the capabilities of the device.
This article is not about those devices that are an analogue of Soviet pointer “ammeters”. Today they are sold in the form of a plastic box with several LEDs of different colors. Such devices do not measure current. They are only suitable for roughly understanding whether the battery is charging or discharging.
Using a digital ammeter in the car, you can constantly monitor the following parameters of the on-board network:
This is not the entire list of capabilities of the ammeter built into the on-board network. For example, if an accurate device is installed, then even leakage currents can be assessed when the car is parked.
Connecting Chinese Voltmeter Ammeter to Charger
I came across a sad and undocumented feature of Chinese voltammeters of the DSN-VC type. This device was supposed to be used in a charger for car batteries. The device itself is a converted AT standard power supply from a computer. I will publish a description of the power supply modifications and photographs later. Now I will describe the essence of the problem that has arisen. An ammeter shunt was used as a current sensor for the current limiting circuit in the charger. A simple and beautiful technical solution. Everything works, BUT!
How to properly connect an ammeter in a car
While driving, the motorist receives all the information from the instruments located behind the wheel. This information helps determine the current state of the vehicle components and systems.
Not all cars have an ammeter, but an up-to-date reading is an excellent addition to diagnosing the electrical system. Some car owners install this device themselves, displaying its display on the dashboard.
Choosing an ammeter for a car
It’s worth noting right away that those ammeters that are sold in tons from the Chinese and cost no more than 3-5 dollars are not suitable for a car. They are not designed for high currents, and will instantly fail. For connection to a car, devices designed for this purpose are sold with appropriate shunts in the form of a thick metal plate with terminals.
There are several types of such ammeters, and it is extremely important to navigate this issue. Otherwise, nothing will work, and a very expensive device will simply burn out.
When choosing an ammeter for a car, you need to look at the following characteristics:
It is also worth noting that on the market, without any problems, you can find an ammeter and a shunt for it, designed for currents of hundreds of amperes. This, on the one hand, will simplify installation and allow you to “check out” the starting currents. On the other hand, such an increase in the measurement limit will significantly affect the accuracy, and you will not be able to carry out other, more interesting measurements.
A little theory about the ammeter
If you have a good idea of how an ammeter works, then you can skip this section. For those who are not well versed in this topic, brief information is offered that will help them understand the material presented below and avoid some dangerous mistakes.
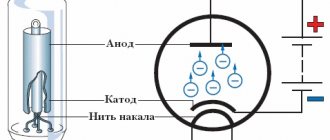
An ammeter for a car consists of two main components, namely a calibrated current shunt and the device itself with electronic filling and a display. A current shunt is a short conductor of strictly defined resistance. This is achieved by selecting the material, length and cross-section. To calibrate the shunt, cuts are made on it, due to which the cross-section gradually decreases, which means the resistance increases.
The ammeter itself for a car is nothing more than a regular voltmeter, which is calibrated for a specific shunt. That is, the ammeter does not measure amperes (current), as many believe, but volts (voltage). The device only displays the current strength on the display, obtaining data about it through simple mathematical calculations, which the electronic filling “does.”
It all works as follows. The shunt is installed in a wire break through which we want to measure the current flowing. Since the shunt has some kind of resistance (albeit very small - fractions of one ohm), a certain voltage drops across it. This means that there is a potential difference (voltage) at its ends when current flows. The ammeter measures this voltage and, “knowing” the exact resistance of the shunt, uses Ohm’s law to calculate the current in real time. The result of these calculations is displayed on the display in amperes and its fractions (tenths or hundredths, depending on the accuracy of the ammeter).
The ammeter in today's popular multimeters works in exactly the same way. Inside it there is a shunt (thick wire), at the ends of which the device measures the voltage, converting the resulting values into amperes.
Purely theoretically, the current in any wire we are interested in can be measured without an ammeter. To do this, while the wire is de-energized, we need to find out its exact electrical resistance in ohms. Then, as current flows through it, the voltage at the ends is measured. Knowing the resistance of a section of the circuit and the voltage drop across it, it is easy to calculate the current. To do this, the voltage must be divided by the resistance.
But the problem is that the resistance of the wire is very small, and it is almost impossible to measure it accurately with ordinary household multimeters. The same goes for tension. It is so small there that the accuracy of inexpensive voltmeters is simply not enough. Automotive ammeters are very sensitive milli- or even micro-voltmeters that can determine this voltage drop with high accuracy.
BY42A connection diagram
Those who need high measurement accuracy can use the BY42A . Such a device will give one more decimal place.
The BY42A voltmeter-ampmeter is designed for a higher measured voltage - up to 200 V, but the supply voltage of the device should be in the range of 3.8-30 V.
BY42A can also be found in two board versions, but the color marking of the wires remains the same.
Using a voltammeter in your car charger, you can not only visually monitor the battery charging process, but also timely diagnose the condition of the battery. It will be enough to connect the charger, where the voltammeter is installed, to the battery, and we will see what voltage is currently on it.
READ How to connect a laptop to an internet cable
Source
An alternative to connecting an ammeter in a car (clamp clamp)
As a conclusion, we will briefly consider how you can do without building in an ammeter (since it is not so easy to do) and measure the currents of interest to us. To measure leakage currents, a conventional multimeter is sufficient. For other measurements you will need a current clamp. Of course, their cost will make few people happy, but believe me, a good quality ammeter with a shunt for a car will cost no less.
To measure leakage currents, you need to turn the multimeter into ammeter mode with a limit of up to 10 A, not forgetting to move the positive probe into the corresponding connector on the device. The ammeter is connected to the gap between the battery and one of the terminals disconnected from it. The device readings are the leakage currents. Attention! Carry out the described procedure only with the engine and electrical consumers turned off. It is absolutely forbidden to start the engine or turn on a powerful load (headlights, external acoustics, stove) while the ammeter is in the circuit.
Well, to measure the cold cranking current (starter inrush current), battery charge and discharge, and energy consumption of devices, it is enough to buy current clamps. They are very easy to work with. Using pliers you need to cordon off the wire through which the currents of interest flow. For example, to measure the starting current, the clamp is installed on the positive wire going to the starter. The remaining parameters can be measured by installing the device in places where the current shunt is installed using the methods described in the article.
Source
Comments and reviews (12)
Sergey
You can only put a voltmeter in the cigarette lighter. The ammeter is connected to the circuit between the generator and the battery.
Alexander
Buy a car voltmeter that is inserted into the cigarette lighter, it is very convenient to monitor the battery, they are available in every car store
Sergey
Isn’t anyone confused by the fact that the Ammeter M42101 is actually a Voltmeter? And you can turn it on in any way, the only difference will be in which direction the arrow deviates
It seems that some people commenting on this issue do not have a clear understanding of the term "shunt". A resistor is connected in series with the ammeter, which cannot be called a shunt. The shunt is connected parallel to the terminals of the measuring device.
Nikolai
You can plug both a voltmeter and an ammeter into the cigarette lighter, BUT. The ammeter will require some modification: it will be necessary to calculate the value of the shunt (resistor) and calibrate the scale (just business). But this fate is for a specialist. It’s easier to buy a ready-made voltmeter, which is widely available for every taste and color.
Haterok
People, it’s clear that the person doesn’t understand why they thought he actually had an ammeter? Damn psychics.
Anatoly
When the ammeter is plugged into the cigarette lighter, there will be a short circuit and the cigarette lighter fuse will blow. You need a voltmeter, and it is better to contact a specialist.
Sergey
A very common mistake. “Let’s measure the current in the network!” and plug the ammeter into the outlet. The ammeter is connected IN SERIES with the load!
Cossack
If you use the ammeter as a voltmeter (with a shunt), it will be even more useful. By !
Arkady
For a beginner, it is of course easier to buy a voltmeter. For a professional, it is important to know what current the ammeter measures. If the current measured by the device is mA, then it is enough to connect the resistance in series with the device and we will get a voltmeter.
Makarov Dmitry (Expert)
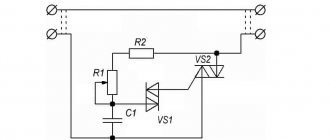
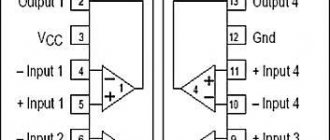
Nowhere, the ammeter shows the current strength, if you connect it to the car’s cigarette lighter, then the scale of the device will display the amount of current that the cigarette lighter consumes, but will not help in any way to monitor the condition of the battery. The thing is that the ammeter itself represents a minimum resistance, practically tending to zero, which is why it cannot be connected to a circuit alone, it will simply short-circuit it. Therefore, the ammeter is connected in series with some load, for example, with a charging unit, which shows with what current something is being recharged from your cigarette lighter, in this case the circuit looks like this:
I understand that you most likely just have such an ammeter, but while the car is moving, using it to monitor the battery charge is useless. The only thing that could be done with it is to include it in the generator circuit to control the battery recharging current, but this is too complicated a procedure, which in fact will not tell you anything useful. If the electrolyte or lead becomes unusable, then current data will be of little help; a rapid voltage drop will report this much more quickly. Therefore, it is much easier and more convenient to control the voltage on a car battery; quite a large number of voltmeters powered by cigarette lighters are sold online.
Source