Changeover switch
Circuit options
Equipped with two inputs and outputs, has four terminals, and immediately switches a pair of contacts. Not used as often, but in some cases indispensable. Makes it easier to move around at night:
- in a large corridor or hall with many doors;
- in an apartment with three levels;
- a bedroom with a switch at the entrance and two next to the bed;
- while in the house, it is possible to control the lamps in the garage, on the terrace, in the gazebo.
To equip staircase lighting in a three-story building, it is necessary to create three control points. The cross type rocker switch is not used by itself. It must be connected in the gap between the pass-through switches. Knowing the procedure for connecting a pass-through, it’s easy to figure out how to make a rocker switch.
Their number can be up to 10, but they should always be located between the passageways.
How to connect a pass-through switch
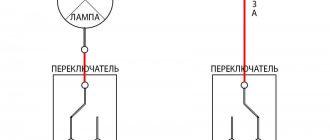
To assemble a standard control circuit using marching switches, you will need two devices. One is installed at the beginning of the corridor (or at the entrance to a room or apartment), the second - at the end point of the path (or at the end of the corridor). When analyzing the circuit, it becomes clear that you can assemble or break the power circuit with any switch, regardless of the position of the second one.
Standard scheme for using two pass-through switches.
Marking on the switch body
The part of the switch where the contacts are located usually has special markings indicating the characteristics of the switching product. At a minimum, these are voltage and current ratings, as well as IP ratings and wire terminal designations.
If the switch is selected for circuits with fluorescent lamps, then its marking must contain the letters “X” or “AX” (on ordinary ones there is only “A”)
When the light in fluorescent lamps is turned on, a sharp surge of inrush current occurs in the circuit. If LED or incandescent light bulbs are used, then this jump is not so large.
Otherwise, the switch must be designed for such high loads, otherwise there is a risk of burnt contacts in its terminals
This is why it is so important to choose special switches for fluorescent electric lamps
For installation in a bedroom or hallway, a switch with IP03 is quite suitable. For bathrooms, it is better to raise the second digit to 4 or 5. And if the switching product is installed outdoors, then the degree of protection should be at least IP55.
Contact clamps for electrical wires on the switch can be:
- screw with and without a pressure plate;
- screwless spring.
The former are more reliable, while the latter greatly simplify electrical installations. Moreover, the best option is screw clamps with an addition in the form of a pressure plate. When tightened, they do not destroy the wire core with the tip of the screw.
According to GOST requirements, if the conductor has a cross-section of up to 1.5 mm, then it is unacceptable to use a screw clamp in which the end of the screw is rotated along the core to connect it to the switch
Also in the switch markings there are terminal designations:
- “N” – for the neutral working conductor.
- “L” – for conductor with phase.
- “EARTH” – for the neutral protective conductor to be grounded.
Plus, usually using “I” and “O” the position of the key in the “ON” and “OFF” modes is indicated. Manufacturer logos and product names may also be present on the case.
How to connect a pass-through device
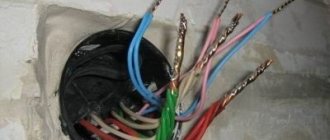
The current is supplied through a distribution box. Select a suitable location, install it and remove the three-core cable. In addition to phase and neutral, it is equipped with a grounding wire, which makes the system safe. Factory color coding of the cores simplifies installation. More often it is a copper flexible cable, the cross-section of individual wires is from 1 to 1.5 mm.
Preliminary markings are made where the switches and lamps will be located. Then the walls are tapped and the conductor lines are laid out. Drill niches for mounting the switch mechanism. After the preparatory work, you can connect the entire system.
For a correct and safe connection, the following sequence must be observed:
- First of all, you need to make sure which wire in the box is the phase, it is usually red.
- Turn off the voltage.
- A phase is supplied to a nearby switch and connected to terminal “1”.
- According to the markings on the terminal block, connect the remaining conductors, remembering the corresponding colors.
- Do the same work on the other switch.
- The core from the second switch with the lamp phase is connected to the bright wire in the junction box.
Then you can apply current for several hours and check the operation of the system. Each switch must turn the lighting device off and on independently of the other. If this does not happen, you should check the correctness of the diagram. Detected pockets of heat are a sign of poor contact. It is necessary to de-energize the system and reconsider the connection.
Disadvantages of pass-through devices
You should always check the circuit before connecting. The input and output contacts of the changeover switch can be located differently
The position of the keys does not allow you to determine whether the system is turned off or on. For example, it may not be possible to immediately understand whether the lights are turned off or a light bulb has burned out. It is impossible to control a lighting device from different places at the same time. A large number of connected devices means a lot of twists in the junction box. Connection errors force you to reassemble the entire circuit.
The pass-through switch has many functionalities. But to connect it, you need to purchase another device. The number of connecting wires also increases, which increases the overall cost of the system. An ordinary switch has a relatively low price, but loses in functionality.
We do it ourselves
If your store does not sell specialized switches, then there is no need to be upset - you can make them yourself. Let's look at how to make a pass-through switch from a regular switch. To do this, you need to buy one classic one-button switch and one two-button switch. Choose devices from the same manufacturer and the same size. Then, in the two-key mechanism, swap the terminals so that the circuits can be turned on and off independently. It turns out that in one position the first circuit is always turned on, in the second - the second. Then swap the two keys for one, and your switch is ready - it can be installed anywhere.
If you need to install three switches, you will need more complex 4-pin systems - two for input and two for output. Such a circuit must be powered with a four-wire wire, connecting the contacts in pairs.
Now you know, so that all questions disappear, look at our device connection diagrams.
Connection diagram
Let's look at how to properly organize the connection process. To do this, you will need special switches with three contacts. They are called walk-throughs. They allow you to turn the light on and off from several places.
Connection diagram of two points
This is very convenient if you live in your own home, have large rooms or long corridors. Imagine - you need to walk a six-meter corridor at night. At the entrance you turn on the light, cross it, and at the exit you turn it off. The same can be done in the bedroom, turning off the lights in the bed, in the office and other rooms. Such a scheme will also help on the street for lighting paths, gazebos, areas, etc. It allows you to save effort, time and electricity. Of course, you can replace it with a motion sensor, but this is not always convenient, and in most cases it is not practical to spend money on purchasing one.
How to connect a single-key light switch
Connection diagram for a single-key switch to a light bulb:
The circuit itself consists of one, two or several lamps that are connected in parallel. This diagram also resembles the connection diagram for a pass-through switch.
Basically, how the wires are arranged doesn't really matter. They can be located inside the wall itself or on the surface. An exterior switch in an apartment is recommended if a high-quality renovation has recently been made and there is no need to destroy walls or install ducts.
There are several ways to install a single-key switch. Here is an option for installing an external single-key switch.
As a rule, under the switch there is another device - a socket or a grounded socket. Taking this into account, assemble the cables of these devices into one corrugation.
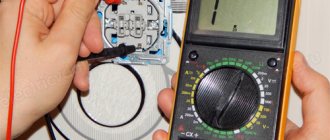
- In order to check the absence of voltage in the cable, you must use an indicator screwdriver. After carrying out all the necessary manipulations to turn off the power, it’s time to start installing the switch.
- You need to reach the switch key with your hand.
- After this, it is necessary to remove the operating mechanism for closing/opening the electrical circuit. It does not have special springs, tabs or holders. With that in mind, take it off fairly easily.
- Then you need to decide where the switch will be mounted. After this, you need to place points on the wall to install the fasteners. To do this, you will need to take an empty case and attach it to the wall.
- Now you need to level it and then mark the points for drilling using a marker. After this, using a drill you will need to make holes for fasteners. You can also choose an alternative fastening method.
- Now you need to remove the elastic plug from the switch body. It is usually located on top. Then it must be inserted into the hole in the wire, then passed to the end of the corrugated pipe. This pipe usually starts from the ceiling.
- In total, you should get a neat and tight connection between the corrugation and the body. He must have open access to the wires for further work.
- Now you need to start connecting the switch. At the end of the wires there is an insulating material (8-10 mm). It needs to be cleaned out.
- After this, you need to connect the white wire to the terminal (marked L). The blue wire is connected to the other terminal (label 1).
- The wire that leads to the socket must be routed into the circuit of the working unit. Then you need to bring it out into the hole in the housing from below. The second end of the corrugated pipe must be inserted into the same hole.
- Now you need to put the switch back together. To do this, you need to put the front panel in place, and then fix the key.
At the final stage, testing needs to be done. To do this, you need to turn on the power supply and press the key a couple of times. If the device lights up after turning on, everything is done correctly.
DIY marching switch
The prevalence of self-manufacturing of pass-through switches is due to the fact that they are much more expensive than conventional ones, and are not available for sale in every household electrical equipment store.
The most common method of manufacturing marching switches is to assemble them yourself from ordinary devices - single-key and two-key in various combinations.
Pass-through switch - from a conventional single-key switch
To control one lighting device (without dividing the lamps in it into groups), a single-key main switch is used. Unlike the model for hidden wiring, a pass-through device for outdoor installation can be difficult to find on sale, so it is the surface-mounted marching switches that are most often assembled independently.
A pass-through single-key switch for external wiring can be assembled from two ordinary ones - also single-key. In this case, it is necessary that the switches are of the same model, and the arrangement of internal components in the housing is symmetrical. As a rule, products from one manufacturer are used for assembly. A proven option are switches from Schneider Electric, on one of which we will consider this operation.
Using a screwdriver with a narrow blade, the key is pryed up and removed from the housing, after which the dielectric base is pushed out of the switch by pressing on the front part.
The extruded base is separated from the standard plastic socket box.
Using the same screwdriver, 4 latches around the perimeter are snapped off, and the base is divided into two parts, each of which is symmetrical about the vertical axis.
All the operations described are carried out with the second switch, but only in order to remove the rocker arm from it - metal contacts and a graphite rod. The removed rocker arm is turned over around its longitudinal axis and installed in the base of the first switch - in ready-made grooves next to the existing contacts, but in the opposite direction. A second rod is also inserted into the paired socket, after which the dielectric base is assembled - a jumper (common contact) is installed between the two contacts on one side, the two halves are folded and snapped into place.
Upon completion of assembly, it is necessary to “ring” the pass-through switch with a tester at different positions of the key.
Accordingly, this device is paired with another one – also from two ordinary single-key devices.
Main switch - from a regular two-key switch
For this method of manufacturing a pass-through switch, you will need one two-key switch.
Assembling a main product for hidden wiring is most easily accomplished by reworking products from the Anam, Legrand or Panasonic brands, which have a modular design.
To remake the switch, the keys are removed from it, after which access to the modules mounted on guides in the housing appears. One of the modules needs to be removed and, turning it upside down, again installed in its original place.
The fit of the module must be pinpointed with drops of hot-melt adhesive, since in this position its latches may not coincide with the standard grooves.
The switch is assembled in the reverse order and a device is obtained, the modules of which, after turning one of them, turn out to be working in antiphase.
Therefore, on the back side of the switch it is necessary to install a jumper between the contacts on one side - it will be the common contact of the device. The two keys that are in place must be firmly connected to each other, for example, by filling the gap between them with a sealant of a suitable color.
Pass-through two-key switch
A two-key main switch is designed to control from several places two groups of lamps of a lighting fixture, for example, tiers of a chandelier. Pressing one key on the switch will supply power to one group (tier), and the second to the other. The product consists of two single-key pass-through switches mounted in one housing. Each key has one input and two outputs, for a total of 6 contacts per switch in total.
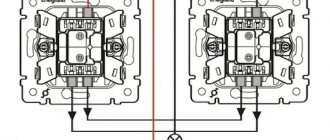
Thus, single-key and two-key pass-through switches have a common operating principle, but connecting a dual device is more complicated - the phase is supplied to both inputs of the first two-key switch, which is connected to the second by four conductors. To avoid mistakes, it is better to study the methods of connecting two-key marching switches using diagrams, here is one of them:
Assembling and installing a two-key main switch with your own hands is only possible when using two converted devices mounted on the wall next to each other and connected accordingly. To control two groups of chandelier arms from two different places, you will need four converted switches. The cost of conventional devices for assembling two-key switches in this case will exceed the price of a finished switch from the manufacturer. In addition, the finished product is superior to one assembled from two converted ones in terms of compactness and aesthetics, which is why they very rarely resort to self-assembly of pass-through two-key switches.
Connection diagram for control from two points
There is nothing complicated in the circuit; anyone who knows how to hold a screwdriver can connect the wires. The only difference is in the number of connecting terminals and wires. The switch itself is connected so that the phase goes to it, and not to the light source to which zero is supplied. You need two pass-through switches of the same size and a junction box. The junction box contains a three-wire switch cable and a lamp electrical wire. The light does not turn on at two points at the same time.
Connecting pass-through switches for one lighting point
Step by step guide
Step 1. Connecting the phase. From the junction box the phase is led to the input electrical contact of the first switch.
Step 2. Both output electrical contacts are connected to similar electrical contacts of the other mechanism.
Step 3. The input electrical contact of the second switch is connected to the connecting wire of the lamp.
Step 4. The second wiring from the lamp is connected to the zero of the junction box.
Important! The switching cable is purchased taking into account the power of lighting devices
This is what device switching looks like
Practice
In practice, to make a switch you will need, for control from two places, two single-key switches and two two-key switches of the same company and one series. One series is needed to match the key sizes.
- Next, we take the two-key switches and disassemble them, removing the keys;
- The general task is to turn one contact group 180 degrees and install one common key instead of two;
- Not every switch will allow itself to be damaged, so for these homemade products you need to choose the simplest switch models possible.
Note: most often you have to be creative in making a pass-through switch for open wiring. Pass-through switches for open wiring are difficult to find. The photo shows a pass-through switch for hidden wiring.
After rotating the contact group 180 degrees, all that remains is to assemble the switches and install one instead of two keys.
- Next, the resulting two pass-through switches are mounted according to the diagram in the place where it is necessary to control the lighting from two places.
For example, in the bedroom, placing one switch at the entrance, and the second at the bed. Or in the house, placing one switch in the hall and the second on the second floor. Or in a long office corridor, placing switches at different ends of the corridor. Here's a good example, albeit without a corridor:
Related articles: LED lighting - theory, types and applications of LEDs
lighting control from two places
lighting from three places
Installation of pass-through switch
Control circuit for walk-through switches
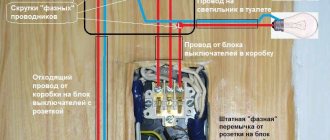
The connection diagram differs slightly from the installation of conventional switches, but the presence of three wires instead of two makes you think. Let's consider the purpose of each of them. Two wires are used as jumpers between switches located throughout the room, and the third is used to supply the phase. Before you start connecting the pass-through switch, buy a junction box in which the wires will be connected.
The ends of the wires are freed from insulation by 2-3 cm - this is necessary for twisting. If the wires are connected with connecting blocks, then the wire is stripped no more than 1 cm. In the distribution box, the wire supplying power from the distribution board is twisted with the input contact of the first switch. The two remaining output contacts are connected to the same wires from the second device. The input contact of the second switch is twisted with the wire from the lamp. The neutral wire from the lighting fixture is connected to the zero coming from the panel. All twist points are covered with insulating tape. The cross-section of wires for main switches is selected according to the power of the controlled lighting.
The difference between a pass-through switch and a regular one
Pass-through switches (we have already discussed what they are on the website) are convenient to use to control one lighting fixture from different places.
Therefore, it is necessary to install several controls for the lighting source in the electrical circuit, i.e. several pass-through or marching switches. Such switches are very convenient in long passage rooms: corridors, stairs, passages. Nowadays they are often installed in the bedroom - one at the entrance (“walked in - turned it on”), the other by the bed (“lay down - turned it off”). The convenience of using them is that you don’t have to go back to turn off the light.
Pass-through switches can be connected together with a dimmer. You can find out more about this scheme here.
If you went into your office, turned on the light, and then sat down at your desk and turned on the desk lamp, then you can turn off the overhead light without getting up from your desk.
In private houses combined with outbuildings, it is also very convenient to install a pass-through switch: before leaving the house in the utility room, turn on the light, and when leaving this room through the door leading to the street, you can turn off the light without returning back to the house. And several such switches can be installed for one light source.
Types of switches for home (domestic use)
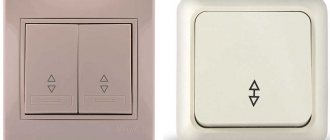
The various types of switches used in everyday life must be convenient, safe, and have an attractive design. They differ from each other in types and types. Depending on the installation method, the switch can be built-in or installed externally. Nowadays, a rotary key is most often used as controls; such switches are common in Europe.
Types of switches for the home
In the USA they prefer to use lever-type switches (toggle switches), apparently not wanting to break away from tradition. But this is now, but in the old days, when Thomas Edison just made his invention, rotary switches were used. They were known throughout the world in the first half of the 20th century and switched up to several circuits in 3–4 positions (batch switch). Package switches are still used in many old utility panels.
To turn on the lamp, use a single-key switch; for chandeliers, use a two-key or even three-key switch. For rooms such as the toilet and bathroom, use a double light switch. Let us add that in our age of advanced technology, many switches with additional functions have appeared. These are the functions:
- Illuminated switch for night time
- switch with shutdown timer.
- Switches with brightness control.
If everything is clear with the first type of function, then the second is used to save light in small rooms (closets, bathrooms) where people enter for a short time and forget to turn off the lights. And the third can be used together with those lamps that support the dimmer function (dimmer). Sometimes they are included in the kit, since this type of device has not yet been standardized.
Unusual types of switches
A light switch with a motion sensor is another way to save electricity and is very convenient. The light turns on if the infrared sensor detects human movement within the sensor's field of view. Repeated motion may turn off the lights, or a timer may do so after motion has been detected. A switch with a motion sensor does not require any action from a person; his presence is sufficient.
There is one so-called smart switch, this is a clap switch. The way it reacts to noise, it can turn on involuntarily. Inside it there is a microphone, which is also an amplifier and a microprocessor device in order to recognize the nature of the sound. It may not work the first time, as it stores the sound from the user in memory for later comparison.
And there are such things
The floor switch is made in the form of a button with a locking mechanism. It can be turned on by pressing your foot with little force, and is designed in such a way that the weight of your foot will not damage it.
The ceiling switch is also a button with a lock, to which the force is transmitted from a lever with a cord attached to it. The mechanics are hidden behind a decorative cover. To turn it on or off, you need to lightly pull the cord.
Comments:
I use this circuit on my stairs to turn off the lights when you walk along them. Very comfortably. Thank you for the article.
As for me, pass-through switches have outlived their usefulness. A motion sensor is very inexpensive, and its installation is much simpler, so the technology is outdated
Vyacheslav, just imagine, you installed a pass-through switch in the bedroom to turn off the overhead light after you went to bed. What will you replace it with? Motion sensor? So that at night, when you turn around, you have illumination throughout your bedroom?
In corridors and stairwells, the pass-through switch can easily be replaced with a motion sensor, but in other cases it’s unlikely. In fairness, it is worth noting that there are actually not that many such cases.
I wouldn't use Lezard - it's an unreliable Chinese knock off. But connecting it is a whole story of songs and dances with a tambourine. In the end you will change it to Legrand or ABB anyway
For the first time today I encountered Lezard's 2-key passed pass. After 2.5 hours I still haven’t connected it. Everything works without a switch. Not with them.
The most important thing in China, everything is through…. In paired pass-through switches, the switching diagram on the reverse side does not correspond to reality. Common pin 2 works with pins 1 and 4, 5 with pins 3 and 6. Pin numbering from the specified switching diagram
Anatoly! Thanks a lot! I racked my brains assembling switches. Well done Chinese...as usual)
And if you use a dialer, then you can solve any puzzle from the Chinese.
I also recently encountered the connection of a double pass-through, plus two intermediate switches (cross) lezard! ... I’ll tell you it was still those dances with a tambourine, because: the diagram on the switch itself does not correspond to reality
The diagram found on the Internet (precisely Lezard) is not entirely correct, that is, they work, but inserting two intermediate (crossover) switches into the middle did not work due to several wires being mixed up, and so only after checking all the contacts it became clear how and where to connect what and why it didn’t work before: we take two three-core cables (core color: F, S, K) in the distribution box, cut both “W” wires and connect one pair together and connect to it a phase that will go to one of the switches and connect We connect them to the middle contacts “2 and 5”, connect the other two “F” wires in the distribution box separately, connect them to one and the second lamp, and connect the other ends to the second switch to contacts “2 and 5”, respectively! Next, it is very important to connect the pair “c” and “k” from one cable to the contacts: “1 and 4” and “1 and 4” and the other pair “c” and “k” to the contacts: “3 and 6” and “3 and 6" (so that contacts: "3 and 1" are "k" and contacts "4 and 6" are "c" and so the connection on the back of the switch looks like this: bottom: 1-k, 2-g, 3-k, top: 4-s, 5-g, 6-s (important: 3 and 6 common cable and 4-1 common cable) now everything works and you can connect two intermediate (cross) switches (between pass-through) by pre-installing cable (between the pass-throughs) in a loop (in transit, not cut.) in the undercut and like this: we take it, we strip the wire and we see three wires: g, s, k
“g” is left uncut, but “c” and “k” are cut and connected to the intermediate (cross) switch to the contacts: “1-4” - “c” and “3-6” - “k”, where contacts are 1 -3 (“s-k”) is the input, and 4-6 (“s-k”) is the output. We do the same with the second cable and the second intermediate (cross) switch. ...with this sawn-off shotgun I was able to install two double pass-throughs and four intermediate (cross) Lezard ones.
Leave a comment Cancel reply
Fuel-free generator - a way to make money on illiteracy
Pros and cons of vertical wind generators, their types and features
Windmill for a private home - a toy or a real alternative
Power bank with solar battery - calculation for illiteracy
How to choose a solar panel - overview of important parameters
source
Installation of pass-through and cross switches
The best option for developing an electrical circuit and installing it is during the construction of a house or during its major renovation. It is necessary to take into account all rooms in which it may be necessary to independently turn on and off lighting from 3 remote points. These are long corridors, basements with several entrances and exits, flights of stairs. Yard buildings and street lighting should also be taken into account.
For those who are planning to install lighting themselves, but do not have the skills, experts advise first assembling a temporary lighting circuit by connecting 2 pass-through switches with short wires and connecting a light bulb. You should remember which contacts the wires were connected to. After making sure that the circuit is assembled correctly, the switches need to be disconnected.
Sequencing
Lighting installation is carried out in the following order:
- Lay and secure a two-core wire to connect pass-through switches.
- Leave a small loop where the crossover switch is installed, but do not cut the wire.
- Install the switches in their permanent place.
- Connect the ends of two-wire, neutral or phase wires to the pass-through switches.
- Make sure that the lighting can be independently controlled from 2 points.
- Disconnect the circuit from the power supply.
- At the location where the cross-switch is installed, cut the two-core cable and install a cross-switch in the gap.
- Connect the circuit to the power supply.
- Make sure that the lighting can be independently controlled from 3 points.
For interior work, any two-core insulated wire, the cross-section of which corresponds to the expected load, is suitable. For street lighting, double insulated wire is used.
Practice has shown that it is cheaper and more practical to control lighting in long corridors, on flights of stairs, and in basements using walk-through and crossover switches.
The remodeling process is accessible to everyone!
From the outside, a pass-through switch is the same as a regular one; it can have one, two or more keys. Moreover, a regular switch can be converted into a walk-through one. The difference between a regular and a pass-through switch depends only on the “filling”, i.e. connection diagrams. It is necessary to switch current from one circuit to another, so it is more correct to call it a switch. Most often, a single-key switch is used in everyday life. Large rooms with multiple light sources require a switch with multiple keys.
The pass-through switch should have three contacts - instead of two, as in a conventional one. A three-core wire must be laid between the switches, which can be hidden in the wall, but for this it must be grooved, or external wiring must be used.
Switches are always connected so that the phase always goes to the switch, and not to the lamp. The phase always goes into the circuit break, and the zero is always connected to the light source.
Through the electrical junction box, wire 0 goes to the lamp, phase goes to the switch - to the input, two wires go to the output - the jumper closes the circuit alternately, with one or the other cable. These two wires go to another switch, and one cable comes out of it to the lamp. Current is transferred from one line to another.
You can make a device for automatic lighting control yourself. For example, there are several ways to build
DIY photo relay circuits
. A simple one - using a KT315B type transistor, and a more complex one - using a Q6004LT (quad).
Ultrasonic sensors and motion detectors are widely used for the same purposes. The latter of them can also be assembled independently at home.
To remake an ordinary switch at a walk-through, you need two switches from the same company and necessarily the same size: one-key and two-key.
You need to buy a two-key switch whose terminals can be swapped so that the two circuits close/open independently of each other.
Thus, in one position one circuit will be turned on, in another - another.
For remodeling, single-key switches for open wiring are most often used. Since it is difficult to find a pass-through switch for external wiring.
Place one key on the front panel (of the same size as the two-key one) instead of two, and the pass-through switch is ready!
How to turn a simple switch into a pass-through switch
To convert, you will need two switches - one-key and two-key. It is better if they are from the same manufacturer and the same size. The essence of the modification is the addition of one more contact to a two-key ordinary switch. First you need to make sure that the design allows you to swap the terminals.
On the ceramic base there is a group of common, private and rocker contacts. The electrical part is removed, one of the moving contacts is turned 180°. One area from the total group is cut off. The resulting mechanism is assembled and its operation is checked.
The device is closed with a single lid. You can leave double keys by gluing them together. Thus, one circuit is activated in one position. By switching the key, another one will be connected.
What is the difference?
The functional difference between a conventional light switch and a walk-through switch is the lighting control capabilities. A simple switch, after pressing a key (or keys), opens or closes the phase circuit going to the lighting device. The pass-through switch not only opens (or closes) the phase circuit, but also simultaneously closes (or opens) the second phase circuit, connecting the second pass-through switch of the circuit to operation.
It is important to understand the terminology. A pass-through switch is often called a switch. It has three contacts and is used to control lighting from two places, as well as from three places, occupying extreme positions 1 and 3.
There are also pass-through switches (crossover switches or double pass-through switches) that have six contacts and are used to control lighting from three locations at location 2, between switch positions 1 and 3.
The design difference between a simple switch and a pass-through switch (switch) is in the number of contacts for connection. A simple single-key switch has two of them. In a simple two-key switch there are four of them by design, but two of them are closed. There should be three of them in the pass-through switch, but there is only one key.
key switch diagrams
As we can see, according to theory, the two-key switch is structurally closest to a pass-through switch. Three contacts work here and there, and this will help us make a switch out of a switch.
Related articles: Dimmer connection diagrams in an apartment