Kinds
There are several types of waterproofing, each of which is used depending on the climate in the room, floor covering (existing and proposed), number of floors:
Painting room
It consists of applying several layers of bitumen or polymer varnish to the surface. Most often used for wooden coverings. Pros: availability of materials, low material costs, speed of implementation. Disadvantages include fragility; on average, such protection lasts for 5–6 years.
Cast
One of the most reliable methods. This involves continuous pouring of a solution with water-permeable properties or mastic.
There are two methods: hot asphalt or asphalt-polymer (materials must be heated before application), and cold (ready-made solutions are used). The basis for cast waterproofing is a concrete floor.
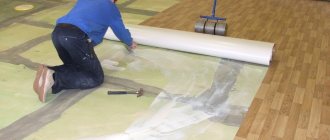
Pasting
Rolled, sheet bitumen or polymer materials are glued in layers onto the primed base. It is applied at a temperature not lower than 10° C. As in the previous case, there are hot and cold application techniques, depending on the materials used. For hot laying of sheets, special tools are required to help soften the waterproofing material. To consolidate the result, it is necessary to treat the edges and joints with a special water-repellent putty.
Impregnating
It is based on impregnation of the floor with water-repellent solutions (polymer-bitumen or polymer), they penetrate into the surface and fill the cracks, creating a protective layer.
Zasypnaya
This method uses bulk organic waterproofing agents, which are used to cover the surface enclosed by formwork.
This method is similar in type to cast, but is considered more reliable. The disadvantage of this method is that it is necessary to apply a thick layer.
Plastering
Several layers of cement mortar with polymer additives are applied to the floor surface. The duration of the protection period depends on the susceptibility to deformation and vibration, the durability and rigidity of the entire structure. Advantage: easy to apply, can be used in many areas. Disadvantage: after application, at least 48 hours must pass before subsequent work.
You can find out about existing brands of cement and their characteristics here.
More details about the types of waterproofing coatings and their application in the video:
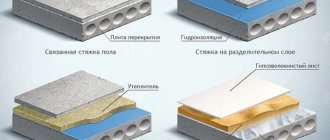
Basement floor protection
Scheme of installing a floor on the ground with waterproofing
Waterproofing a concrete floor on the ground in the basement of a bathhouse is necessary, regardless of whether the basement premises will be used. Insulation with mineral wool can be skipped, but all surfaces in contact with the ground must be treated with water-repellent films or mastics. This rule also applies to the floors of the first floor. If the basement is low, you need to waterproof the lower - external and upper - internal sides of the room.
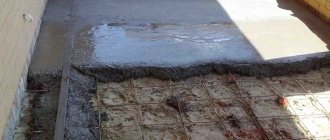
Between the floor and the ground, a bedding is made, consisting of several compacted layers. The lower layer is compacted clay. A layer of sand is laid on top - up to 10 cm thick, and coarse crushed stone is poured on top of it - in fractions of 30 mm. The subfloor is made: it is laid on a plastic film, which serves to save cement laitance. If necessary, insulation is carried out with mineral wool.
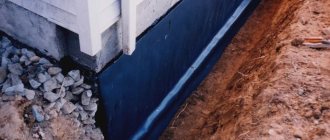
Waterproofing a concrete floor in a basement or bathhouse built on a foundation is carried out as follows. To protect the structure from moisture coming from the outside, the walls of the foundation and basement after completion of their construction are coated with mastic or covered with bitumen films. If the foundation is made of blocks, the gaps between them are filled with viscous polymer or bitumen compounds. Inside, in the basement, the walls are coated with impregnating compounds or covered with bitumen sheets.
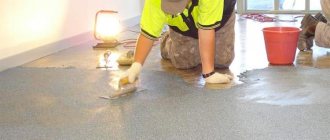
Mastics are designed for hot and cold application. In both cases, the manufacturer's instructions are followed when preparing and preparing them for use. Before waterproofing, the floors in the bathhouse are cleaned of dust, leveled and strengthened. If molten mastic is to be applied, the surface is thoroughly dried. In the case of using polymer coating and impregnating compositions, the floors are pre-moistened with water. To ensure deep penetration of the water-repellent mixture into concrete, it is usually necessary to consume up to 5 liters of liquid per 1 m2.
Waterproofing garage floors
Waterproofing the subfloor in a bathhouse basement should be done using roofing felt - in two or three layers. For gluing roll materials, bitumen mixtures are used as a base. Fusing of bitumen sheets is carried out using a gas burner: gradually, as the roll unwinds, a section of the bottom layer is heated to the required temperature and pressed against the floor surface.
Waterproofing under concrete floor
There are two reasons why waterproofing is carried out before pouring the concrete base:
- preventing the penetration of steam and moisture from the lower floors or from the basement;
- protection of floor slabs from leaks in rooms with high humidity.
It is especially important to carry out waterproofing in front of the concrete screed when building a private house without a basement: moisture rising from the ground can be highly acidic or alkaline, and upon contact with concrete can lead to its rapid destruction.
How to make a screed yourself, read the article Concrete floor screed with your own hands.
If you need to make a screed on a heated floor, read this article.
Waterproofing under a concrete floor can be done in several ways:
- In a house without a basement, a gravel-sand cushion is used: gravel is poured and compacted onto the base, and sand is poured onto it. This method will protect against rising moisture, but will not prevent vapor from penetrating the surface. To protect against them, film waterproofing is used.
- Film protection can be used both in a private house and in an apartment on an existing subfloor. It protects the screed from moisture that passes through the floor slabs, and the slabs themselves from water flowing through them. (Information about the types and markings of floor slabs, as well as how to calculate the load on a slab, can be found in this article).
- Also, before concreting the floor, coating waterproofing can be used, if there is a base.
Protecting a wooden floor from moisture is a simple operation
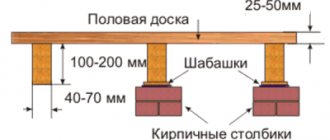
First, build support posts under the joists. They can be made from concrete, which is poured into formwork made of boards, or (which is easier and faster in time) from bricks. After installing the supports, treat them on all sides with coating waterproofing, and lay roofing felt on top. Such protection can protect logs in areas where they are adjacent to constructed concrete or brick pillars.
Now we begin to arrange the rough wooden base. It makes the most sense to make it from moisture-resistant plywood. Sheets of this material must be attached to the joists on the underside using small nails or self-tapping screws. If you have free time, you can also build a regular subfloor - a plank floor. In many respects it looks preferable to a plywood base. But the costs (both money and effort) for its arrangement will be large.
Ruberoid for waterproofing
Waterproofing a wooden floor is carried out according to the following algorithm:
- Place a diffusion membrane or waterproof film (polyethylene) on boards or plywood. Lay individual strips of waterproofing on top of each other with a 12–15 cm overlap, and then use tape to seal all joints.
- Install a heat insulator.
- Install a rough base on the joists.
- Lay down another layer of film. At the same time, you run its edges 20 centimeters onto the walls.
On the concrete floor
It is carried out before moving on to the final finishing of the floor: covering with tiles, self-leveling flooring or other finishing materials.
You can learn how to lay tiles correctly from this article.
Any of the previously mentioned types of waterproofing, except backfill, can be used. Provides for complete preliminary cleaning and leveling of the surface, applying a primer to it, after which the insulation begins.
When using bitumen or polymer materials as a waterproofing agent, after application they are treated with quartz sand. This will help improve adhesion with adhesives on which the finishing material will be applied.
Quartz sand is applied to the last layer that has not yet dried. Excess sand is removed after complete drying. Finishing begins no earlier than a day later; when processing in several layers, at least 2 to 3 days should pass.
Required materials and tools
Materials are selected depending on the method of waterproofing, for example, polymer or ordinary roofing felt. In addition to them you will need:
- sand;
- gravel;
- geotextiles;
- damper tape;
- insulation;
- mastic;
- primer.
Full information about the types of gravel, its fractions and density can be found here.
Tools you may need:
- primer roller;
- brushes for spreading mastic;
- drill with an attachment for kneading mixtures;
- gloves;
- tools for cutting roll and film materials;
- vacuum cleaner for cleaning the surface.
Laying out a wooden floor
Waterproofing of this type requires special actions and conditions. The laying of a wooden covering is based on logs, which must, in turn, be located on special support pillars. First of all, pillars should be erected. They can be made using bricks or concrete mixture poured into vertical formwork. It is recommended to use concrete, as it is less susceptible to moisture and its destruction takes much longer than brick.
As soon as the concrete dries, it is necessary to cover the pillars with a special coating waterproofing. This material is very easy to apply and does not require additional tools such as a gas torch. You will need a brush and time to dry the layers. The material will perfectly protect the monolith from moisture and destruction. The joint between the pillar and the joist should be laid with rolled material of your choice. It can be roofing felt or glassine; many recommend the good old roofing felt.
Having made a layer, you no longer have to worry about the rapid penetration of moisture and further rotting of the logs. The logs themselves should be impregnated with water-repellent materials. Waterproofing of joists is necessary.
Having completed laying the logs, you should begin installing the rough covering. Again, it is worth deciding in advance on the type of rough coating. Depending on this, the type of waterproofing materials will be selected. The rough coating can be made using moisture-resistant plywood or ordinary boards.
If moisture-resistant plywood is selected, the following materials will be required:
- Thick polyethylene film.
- Film waterproofing.
- Insulation.
Before applying moisture-resistant plywood, you should lay a thick plastic film on the base. Then plywood is laid, the rough covering is covered with a vapor-permeable membrane or plastic film. Do not forget that the film should be laid with an overlap. The joints are treated with special construction tape. Insulation is applied to the membrane layer.
If you decide to make a rough covering from ordinary boards, you will need the following materials:
- Thick polyethylene film.
- Film waterproofing.
- Insulation.
- Foamed polyethylene.
The principle of layering is the same as in the case of moisture-resistant plywood. The only difference is that film waterproofing is laid on top of the boards, plus foamed polyethylene on top. This will serve as additional protection.
By observing the order of layers of coating, the house will be protected from further accumulation of moisture and subsequent destruction. Proper installation of wooden flooring is a guarantee of warmth and dryness in a private home.
Preparatory work
Before starting the main work, you need to prepare the surface:
- if necessary, remove the old coating;
- using a vacuum cleaner, clean the floor from small debris and dust;
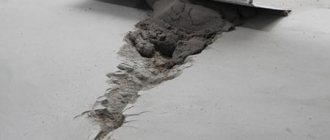
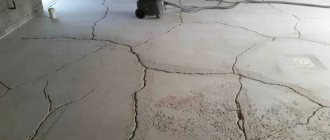
- seal cracks, cracks, and irregularities;
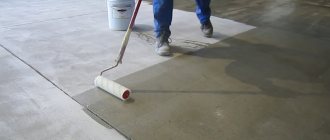
- prime the surface to improve adhesion of materials to the floor;
- preparation of materials: roll insulators require pre-heating before use; they are brought into the room for a while.
If there is a need, it is necessary to level the floor. Read how to do this in the article Leveling a concrete floor with your own hands.
Do-it-yourself floor waterproofing. Step-by-step instruction
Waterproofing under a concrete floor in a private house starts from scratch and goes through several stages:
- The soil base is leveled and a layer of fertile soil is removed.
- A layer of gravel is evenly distributed on the prepared base, the fractions of which should not exceed 5 cm. Compaction and leveling are carried out. The thickness of the resulting layer should not be less than 20 cm, and if groundwater is close, 50 cm.
- Sand is poured onto the gravel (layer from 10 to 40 cm), which is soaked in water and compacted.
- The sand layer is covered with geotextile, the strips of which are adhered using a construction hair dryer. Geotextiles are needed as a shock absorber, preventing floor layers made of other materials from damage.
- Next, insulation is applied. It is recommended to use penoplex or expanded polystyrene. You should not use foam plastic for these purposes; its strength is not enough for the expected load, it will quickly collapse.
- The resulting base is checked for evenness, joints are processed, potholes are closed (filled with sand or cement-based mortar), the surface is cleaned of dust, and a primer is applied.
- A damper tape is laid along the perimeter of the room at the junction of the floor and walls. Its function is to compensate for the expansion of the floor screed that occurs under the influence of temperature changes. “Seat” the tape on glue or dowels.
- After the treated areas have dried, roll waterproofing is applied. The strips are laid evenly on the floor with an overlap on the adjacent walls, to a height of approximately 15 cm. The width of the strips overlapping each other is 10 cm. Number of layers: roofing felt - at least 2, polymer coatings - one is enough. If roofing felt is used for insulation, it is attached to the base using bitumen mastic. The weld coatings are fixed to the base using a torch. Polymer adhesion is made using a hair dryer.
- After the roll insulation has adhered to the base, they begin to reinforce and fill the floor with concrete mortar, after which has hardened, the protruding edges of the insulation and damper tape are trimmed.
How to mix concrete mortar yourself, read the article Concrete: how to make it yourself.
Required Tools
Crushed stone Cement Plywood Roofing felt Protective film Sand Adhesive tape (scotch tape) Primer Gravel Bituminous mastic Show all
Floor waterproofing in private housing construction is a real necessity. If such an operation is not performed, over time the foundation of the home and its entire structure as a whole will begin to experience the negative influence of soil water.
- 2 Waterproofing the floor base on the ground
- 3 We protect concrete structures - two effective options
- 4 Protecting a wooden floor from moisture is a simple operation
- 5 How to protect kitchen floors?
Advice from professionals
When carrying out insulation work using the roll method, you should adhere to the following tips:
- To ensure maximum water resistance, all joints are carefully treated with mastic so that even the smallest cracks are not left.
- For additional protection, the top layer is coated with mastic and sprinkled with quartz sand.
- In order to save money, you should not reduce the overlap of the strips, this can reduce the insulating properties, ideally if it is more than 10 cm.
The process of waterproofing premises is not the easiest, and some methods, due to the use of special devices, are not at all accessible to a self-taught builder. But, following the implementation technology and the recommendations indicated on the packaging of the materials used, this task is quite feasible even for a person knowledgeable in construction.
Learn more about laying rolled waterproofing material in the video: