Waterproofing of foundations can be horizontal or vertical. The horizontal one insulates the foundation from the walls so that moisture does not penetrate into the wall blocks by capillary.
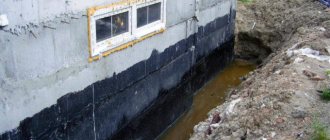
Vertical foundation waterproofing serves as a barrier that protects the reinforced concrete foundation from the influence of groundwater. The lack of waterproofing reduces the service life of the foundation, since over time, water enters the concrete and freezes at subzero temperatures.
As a result, the concrete begins to gradually deteriorate, forming microcracks that become larger over time. The solution to this is waterproofing; you will learn about its methods in this article below.
Now regarding specifically aerated concrete. You may be interested in the issue of waterproofing the upper part of the foundation, on which the first row of aerated concrete blocks will be laid; see brief instructions below.
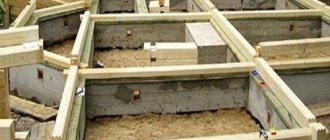
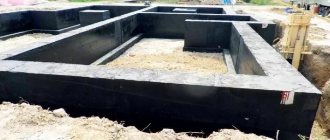
Waterproofing the upper part of the strip foundation
To begin with, we check the horizontal level of the foundation with a level; if the horizontal curve is more than 30 mm, we level it with a strong mortar (M200 - M300). If the horizontal level is level, we proceed to waterproofing.
- We clean and dust the foundation, it must be dry.
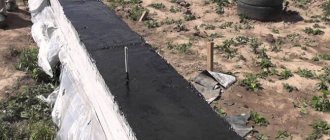
- Next, apply bitumen mastic (for example, TechnoNIKOL) along the perimeter of the tape;
- We take rolls of special roofing material and, pressing, roll them out onto the tape;
- The roofing felt overlaps must be at least 150 mm.
- Next, the first row of aerated concrete is laid on the mortar, but that’s another topic.
Internal waterproofing technology
To ensure optimal internal waterproofing of walls, several finishing methods are used, including:
GKL plasterboard sheets are attached directly to the profile using self-tapping screws. The method is good for everyone, but there is one obvious drawback, namely, due to the thickness of the profile, the free space in the room is reduced.
The frameless method involves mounting the sheet directly on the wall. To fix the finishing material, special adhesive solutions are used, such as Perflix. If you use the frameless method, the volume of the room remains the same and does not undergo any special changes.
Important: Plasterboard sheets, as well as foam blocks, are not resistant to excess moisture. Therefore, it is necessary to lay a layer of vapor barrier membrane under the gypsum board.
Laying drywall is an excellent solution not only for waterproofing, but also simply for leveling walls. As a result, by choosing this method of interior finishing, you can do without traditional plastering.
In order to simplify the task, the foam block masonry can be plastered along the beacons. Beacons are metal guides that are mounted on the wall at a distance of about a meter from each other.
The beacons are arranged vertically, and as a result, by throwing a mixture between them, the resulting layer can be smoothed using a long rule. The basic mixture is made in the proportion of 1 part M300 cement to 3 parts well-sifted river sand. The mixture should be stirred with the addition of water until smooth with the consistency of thick sour cream.
The main difficulty of plastering on beacons is laying the guides. This is done using a water level. First, two planks are fixed at the edges of the wall.
It is important to make sure that they are installed strictly perpendicular to the horizon line. A cord is stretched along the outer guides, along which intermediate beacons are mounted.
After the gaps between the beacons are filled and leveled, a plaster float is taken and the final leveling is performed. A fiberglass mesh with a mesh size of no more than 5 mm is attached to the leveled plaster and covered with a thin layer of a mixture for finishing plastering of the “Rotband” type. After this, final grinding of the surface is performed.
Important. Each layer of plaster, before laying the next layer, must dry thoroughly until the dark spots completely disappear.
In both cases, the distance from the rough surface of the wall to the finishing surface will be about 3-5 cm. In other words, this method will not be the best solution for small rooms.
Before installing the sheathing, a vapor barrier membrane is glued or attached to the wall. A profile or beam is laid directly on the membrane in increments of no more than half a meter.
The slabs are cut and fixed in such a way that the joints are located on the beam or profile, and do not hang. In order to achieve an optimal result, before installation in the slabs it is necessary to drill holes so that the head of the screw is flush with the surface of the installed slab.
All joints must be filled with acrylic putty. For subsequent painting or wallpapering, the slabs are coated with a primer.
Waterproofing the foundation from groundwater
Preparatory procedures
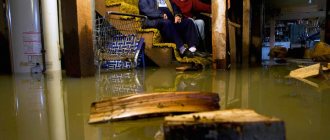
Poor quality waterproofing or its absence can cause flooding of the building and rapid destruction of the structure, therefore, protecting aerated concrete walls from moisture must be approached responsibly and with due professionalism.
First of all, the surfaces of the walls should be cleaned of any dirt and mortar residues, then all roughness and physical defects should be eliminated.
Using a special grater, the profiles of the tongues that protrude from the wall are carefully cleaned. Immediately before work, the surfaces must be absolutely clean.
Making a fillet
To transition from the foundation to the aerated concrete walls, a fillet is used - a curved break of a concave type. A kind of slope is made using a trowel, or you can use a regular glass bottle. It is along this slope that moisture will flow.
Surface primer
The next stage of work is priming the surface. In good weather conditions, you can start waterproofing within a few hours, but if the weather is cold and especially rainy, then it is better to postpone the work to another day.
The optimal temperature for the priming procedure should be no lower than 2° C.
Why waterproof foam blocks?
The cellular structure of foam blocks is hygroscopic. The material absorbs moisture and allows it to pass through, which invariably leads to its destruction. Experts recommend waterproofing foam blocks even with closed cells, since only in this way can the desired protection of the entire building be ensured.
This approach will prevent moisture from penetrating into the premises and spreading. In addition, it will eliminate the possibility of the appearance of fungus and mold, damage to finishing materials and destruction of structures.
IMS-CONSTRUCT specialists recommend following simple rules when working with foam concrete blocks:
- Do not use them for arranging partitions and walls, one side of which will be constantly exposed to moisture: bathtubs, showers, swimming pools, kitchens, bathrooms;
- Using them for arranging basement walls, foundations and external walls - carry out waterproofing work;
- Provide protection for walls made of this material from exposure to low temperatures;
- Ensure that the blocks are transported correctly so that they are not damaged;
- Do not leave newly erected foam block walls unprotected for a long time;
- Eliminate the possibility of the walls drying out, which will cause microcracks to form.
Putty work
One- or two-component bitumen putty (mastic) is used. The first type is applied in a single layer with a thickness of 5 mm. In the case of two-component putty, the situation is more complicated, since it dries extremely quickly, especially at high air temperatures.
Due to this feature, there is no need to prepare too much putty material. To prevent hardening from happening too quickly, you can, for example, reduce the amount of hardener.
First, the bitumen solution is thoroughly mixed with the hardener. Then a thin initial layer is applied (thickness no more than 2 mm), onto which fiberglass is glued (overlap size is approximately 1 cm). When the first layer is completely dry, you can apply the second, and such a thickness that the fiberglass used for reinforcement is invisible.
Whatever type of putty is used, you need to carefully treat the areas around the fillet and pipes. Builders who have repeatedly dealt with waterproofing advise wrapping pipes with narrow fiberglass strips and applying a layer of putty on top.
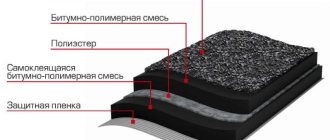
Waterproofing films Ondutis
Ondutis waterproofing films are excellent for waterproofing baths. Today they are presented in a wide range, among which you can choose the following types:
Ondutis RS is a reinforced waterproofing film. It is used in insulated and non-insulated pitched roofs with a metal coating as under-roof waterproofing to protect the attic space from precipitation and roof condensation. It is characterized by a wide temperature range - from −40 to +80 degrees. Vapor permeability is ≤10 g/m2 (24 h), water resistance is ≥1000 mm water column.
Ondutis D (RV) film is a gray fabric that has a special protective layer and the addition of a UV stabilizer, which allows it to withstand UV radiation for a long time.
A typical area of application is under-roof waterproofing in insulated or non-insulated pitched roofs with a metal coating. Protects against condensation and air, reduces the thermal effect on the roofing during the heating season and reduces the risk of icicles and ice. Can be used as a temporary roof for 1.5 months. Can be used in a wide temperature range of −40, +80 °C. Weather resistance is 2 months.
Ondutis RVM is an under-roof waterproofing that has a special anti-condensation layer for insulated and non-insulated metal pitched roofs. Serves as protection against condensation and moisture formed on the inner surface of the metal. In summer, the material reflects the heat that comes from the roof and reduces the temperature under the roof. This film perfectly retains moisture penetrating from the room under the roof and prevents the insulation from getting wet. Can be used as a heat-reflecting vapor barrier for insulated floors and walls in buildings with occasional heating.
Required Tools
- To clean surfaces, use a spatula, metal and soft brushes.
- Cleaning of tongues is carried out using a grinding float.
- A wide brush will be needed to apply the primer.
- A construction mixer or a regular drill with an appropriate attachment is needed to thoroughly mix the solution.
- To apply the putty you will need a spatula and a trowel.
- The trowel is also convenient for pressing fiberglass.
- A hammer drill will come in handy when working with two-component putty.
Waterproofing foam blocks: water - come on, goodbye
Moisture is one of the main natural enemies of foam concrete.
One of the most significant disadvantages of cellular concrete - and foam concrete in particular, is the increased water absorption of the surface layer, which leads to the development of destructive processes in the material, and sometimes a complete loss of both mechanical properties and consumer qualities.
Thus, high-quality waterproofing of foam blocks is the key to the durability of the object and the absence of unnecessary problems for its owner. What are the basic principles of waterproofing work, what tools and means are involved in working with hydrophobic surfaces - this is what our story is about today.
Waterproofing fabric (membrane)
After puttying, you can begin the most important procedure - gluing the canvas or membrane. When cutting on a marking machine, the blade should be stretched without the slightest distortion. Also, when choosing a size, you need to remember the fillet and the protruding part of the foundation.
Pieces of waterproofing fabric are glued overlapping. The approximate size of the latter is approximately 50-100 mm. As with putty, special care is required to insulate areas around pipes. To glue the canvas in these areas, it is divided into squares, in each of which a cutout is made in the middle. The diameter of the cutouts should be slightly smaller (about 2 mm) than the diameter of the pipe.
After completing the waterproofing process, it is necessary to re-check all joints without exception, so that there is not a single crack left through which water can leak.
Price:
from 750 per sq.m.
Foam block is one of the types of concrete, the production of which uses cement, sand, water and a foaming agent. This material is considered one of the most popular in the construction market due to its excellent strength characteristics and affordable price. However, this barrel of honey also has its own fly in the ointment, which lies in the need to waterproof the foam blocks.
It is best to take this nuance into account at the construction stage, since the lack of waterproofing under the foam blocks or its poor performance will certainly require correction.
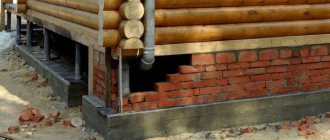
How to insulate a basement
Typically, houses made of foam blocks are built with basements in which boiler equipment, personal workshops, and rooms for storing food supplies grown in the beds of one’s own plot of land are located. Then waterproofing is installed only from the outside. In this case, the foundation is more thoroughly coated with bitumen mastics in order to completely eliminate even capillary penetration of moisture into the basement.
Significant remark
If you simply throw roofing felt on the foundation, you can assume that it is not there at all. Absolutely doesn't work.
Waterproofing foam blocks: water - come on, goodbye
- home
- Production
- Certificates
- GOST standards
- How to find us
Sale
- Foam blocks
- High density foam blocks
- Gas blocks
- High density gas blocks
- Delivery
Working hours:
from 9:00 to 20:00
Production
- Our production
- Our production
- About company
- How to find us
- company's news
Documentation
- Certificates
- GOST standards
- Test reports
Helpful information
- All about building a house from blocks
- Benefits of blocks
- About the cost of blocks
- Winter Garden
- Site Map
Site search
You need to know that structures made of foam concrete blocks need special protection from the harmful effects of humidity. Often the blind area is forgotten or remembered too late, when precipitation has already damaged the foundation of the building. It is incorrect to consider the blind area as an element of home decoration. Its main function is to prevent precipitation from falling on the foundation: rain, snow.
Attention: when constructing a new structure, the material of which is foam blocks, the blind area must be completed before the onset of winter frosts. Otherwise, water will fall on the foundation and, shrinking when freezing, will begin to destroy it. But the foundation of a structure made of foam concrete blocks without a blind area is exposed to no less danger during seasonal downpours, rains and in the spring under the harmful influence of melted snow. The main function of the blind area is not the design completion of a new house, but the protection of its foundation from destruction under the influence of precipitation. Along the perimeter of the entire structure, freezing of the soil along the width of the blind area is significantly reduced. Frozen soil will not compress the foundation and expose it to the risk of destruction.
Fourth stage. Blind area
This cycle of work combines aesthetic and waterproofing aspects.
We are talking about building a good blind area around the perimeter of the house. It should protrude outward no more than 0.7 meters.
The blind area is made of durable concrete, since during operation it will be subject to the force of rain, snow, melt water runoff from the roof, and so on. The thickness of the blind area must be calculated, but not less than 0.1 meters.
Laying the first row of aerated concrete on a strip foundation
If you already have a strip foundation, laying the first row of aerated concrete is greatly simplified, since you will be placing the blocks on a more or less flat surface. First, we determine the highest angle on the foundation (we check the correctness of its position on all sides using a laser level). This is where you should start laying blocks.
Next, we prepare the solution, take a carriage with a dispenser and begin laying the blocks. First, waterproofing (you can use ordinary roofing felt). After the first block is laid, we lay three more blocks on each of the corners. Our task is to align the blocks in height so that they are on the same level.
After this, you need to pull the cord between the blocks: it will allow you to control the evenness of the masonry. For additional quality control, you can also perform a diagonal comparison. To do this, take a tape measure and measure the distance between diagonally opposite corners; it must match.
The laying of the first row of aerated concrete blocks is carried out with the alignment of each block along vertical and horizontal planes. For leveling we use a rubber mallet (a metal hammer can crack the block). So, gradually leveling block by block and guided by the cord, we lay each side.
Usually, at the end of laying a row, the need for an additional element arises. Then we measure out the “piece” we need, mark it with a pencil and saw off the required element using a saw. All stacked blocks must have the same height . To do this, the surface of the blocks is processed with a plane and a sanding board; Remove block pieces and dust from the surface immediately. After this work is completed, we wait 2-4 hours: the solution should harden, and then construction can continue.
The laying of the first row of aerated concrete has been completed, but preparatory work for the next row has not yet been completed. Now you need to reinforce the first row: this will prevent the formation of cracks. We take a wall chaser and make grooves at a distance of 60 mm from the edges of the block and then run the wall chaser along the entire length of the masonry. We make arc grooves at the corners; in the future, reinforcement of the same shape will be laid there. The thickness of the groove should be slightly greater than the thickness of the reinforcement.
Laying the first row of aerated concrete
As you can see, everything is quite simple. Consistent laying of aerated concrete blocks is important - the first row is the most important element. A brief installation technology looks like this:
Level the surface of the strip foundation. If it is smooth, remove dust, coat it with mastic and lay roofing material.
Using a tape measure and a laser level, we find the upper corner and lay the first block; We lay blocks on it in the corners.
We stretch the cord between the blocks and begin laying with the blocks aligned vertically and horizontally.
We wait for the solution to harden, after which we perform reinforcement.
Lay the next row of blocks.
Priming the surface of a wall made of aerated concrete blocks
Next, you should prime the surface in order to improve the waterproofing properties. You can use a ready-made primer, purchasing it at any hardware store. The modern choice of priming agents is represented by a wide selection and no special questions should arise. Depending on the construction budget and external average annual weather factors, one or another primer is selected. Apply the primer with a wide brush, carefully covering the entire surface. If the ambient temperature is less than 2 degrees Celsius, then it is better to suspend priming work and wait for a more favorable one.
Waterproofing foundations for aerated concrete, varieties
Waterproofing of foundations can be horizontal or vertical. The horizontal one insulates the foundation from the walls so that moisture does not penetrate into the wall blocks by capillary.
Vertical foundation waterproofing serves as a barrier that protects the reinforced concrete foundation from the influence of groundwater. The lack of waterproofing reduces the service life of the foundation, since over time, water enters the concrete and freezes at subzero temperatures.
As a result, the concrete begins to gradually deteriorate, forming microcracks that become larger over time. The solution to this is waterproofing; you will learn about its methods in this article below.
Now regarding specifically aerated concrete. You may be interested in the issue of waterproofing the upper part of the foundation, on which the first row of aerated concrete blocks will be laid; see brief instructions below.