We repair the charging cable (simple, fast, cheap and reliable)
Many owners of computer equipment (especially one brand) are faced with the fact that the charging wire begins to fall apart.
This happens with both phone and laptop cables. An unpleasant story, especially considering how much money they are asking for this equipment and a new charger. What they don’t do in such cases: wrap it with electrical tape, insert a spring from a handle, install heat shrink, etc. All of these methods are not ideal.
Enough introduction, let's get down to business. This problem is solved with FUM tape (I don’t know what it’s called correctly). This is a white tape that is used to wrap the threaded connections of pipes to prevent leaks.
All you need to do is wrap this tape around the place where the wire broke and just below and above this place. A small layer is enough.
So that the epithets from the title of the post do not sound like the nonsense of a marketer, I will give the facts:
* simple - you don’t need any skills, you just reel it in and that’s it; * quickly - will take a maximum of a minute; * cheap - a roll of tape costs about 40₽, and it is enough to wrap a lot of wires. It can be bought at any hardware or plumbing store; * reliable - the tape is thin, very flexible and holds without glue, so over time it does not come off and the edge does not begin to peel off and collect dust (but if this does happen, then it is enough to unwind the tape a little, cut off this edge and rewind it). And the best part is that the wire stops falling apart further, as happens when you use electrical tape: about 2 years ago I wrapped my FUM with tape, and since then it has not fallen apart anymore (below is my photo).
Plus, the color of the tape matches the color of the wire, so the repaired wire looks normal.
Source
Thermal tube instead of tape
Using tape is not entirely kosher. Therefore, I propose to improve the technology a little, again without a soldering iron.
You will have to buy a heat-shrinkable tube, also known as thermal casing, at an electronics store or hardware store. This is such a clever tube that can shrink in diameter by at least half when heated. This miracle costs about $0.1 - $0.5 per meter.
Popular articles Decorations for a wedding car
We will need two thermal tubes with different diameters: 1-2 mm for the first and 4-5 mm for the second.
We put pieces of thin thermal tube on our twists. We cut the pieces with one and a half margin.
Now you need to heat the thermo tube. Usually I did this with a soldering iron, but we agreed that I didn’t have one, and the story was about how to fix headphones without a soldering iron, so I had to get out.
The method turned out to be quite effective and the thermo-tubes shrank. You can also use any other heater or put them in boiling water like Easter eggs. In principle, people can do it with a regular hairdryer.
While the thermotube is still hot, you can further flatten it with your fingers, then it will slightly stick together inside.
This thermo-tube must subsequently be put on the joint and also compressed with the heat of the lamp. In general, you can squeeze lighters on fire, but you can accidentally set fire to excess.
I used a piece 8-10 cm long. To strengthen the structure, the end of the thermal tube was put directly on the elastic band of the connector.
If the wire from the charger breaks, you can save it: 5 effective ways
The sad truth is that our phone cables break at the most inopportune times. Repairing or replacing them with a new one can be expensive. Also, most replacement chargers are different from the original ones, so it's better to try to fix a cable that's still working than to buy a cheap Chinese knockoff.
Often the cables we use every day are subject to significant stress. They can be twisted, stretched or broken (yes, the cable can break). If the charger begins to fail and the protective material wears out, it can still be repaired and restored in a variety of ways.
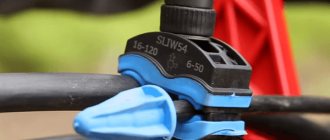
Special cable protectors
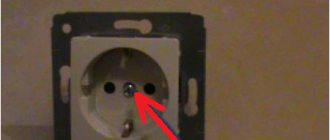
An effective and durable solution to problems with damaged charger cables is the use of so-called cable inserts. Unfortunately, this solution is quite expensive; a high-quality tip can cost up to 500 rubles. Cable protectors are designed in such a way that the most delicate part of the cable does not break and is carefully insulated.
Remember that if there is a short circuit, the cable is smoking or there is a distinct burning smell coming from it, then it must be replaced. The repair methods described above are suitable for cases where the insulation is damaged, but if problems are noted with the plug or the wiring melts, then using such a cable becomes simply unsafe.
Source
Repairing broken wires in headphones
Each of us has once encountered such an unpleasant problem as broken headphones. Most often, it is telephone headphones that fail. This is due to the constant deformation of the thin connecting wire, which is twisted and rewound every time the device is put into a pocket or bag. Frequent kinks can cause the core of the wire to break, and then one or both headphones stop producing sound. Let's look at how to fix your favorite headphones if their wire is broken.
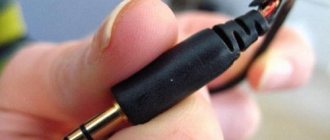
Cut off the headphone jack
Usually, headphone wires break right at the exit from the connector. To be sure to cut off the broken part, cut it 2-3 or 5 cm above the connector. It is possible even higher - it’s up to your taste.
The connector itself is of no value to us, so it goes in the trash.
Finding the break point
To repair a headset with a broken wire, the owner needs to stock up on suitable tools and the determination to see the job through. Having discovered a breakdown, the first thing you need to do is find out in which of the wires the gap has formed . In this case, specialists resort to a multimeter, tester or voltmeter.
Checking for wire breaks is carried out as follows.
- Make two small cuts in the insulating material: one near the plug and the other near the speaker.
- If you carefully examine the core of the cable, you will notice a transparent protective layer. It must be carefully removed, being careful not to damage the wire itself.
- To establish a wire break or continuity, select one of the devices described above. When working with a multimeter, you need to place the black and red sensors in the slits. The squeak you hear will signal the integrity of the copper core.
- Make another cut a short distance from the original one and use the sensors again. Repeat the procedure until the device stops beeping. Remember that you need to cut the insulation very carefully.
- Once you have located the break, gradually narrow your search until you reach an area two centimeters long.
There are times when the device does not stop sending signals - this means that the problem lies not in the cable, but in the speakers themselves.
How to solder a plug to headphones - DIY headphone repair | Audio Geek
Why buy new headphones if in 9 cases out of 10 the headphones do not work due to a break in the wire near the plug. How to repair headphones with your own hands, or more precisely how to solder a plug to the headphones, is discussed in detail in today’s article.
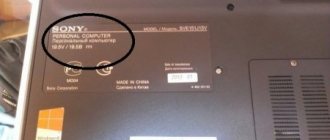
To show how to solder headphones to a plug, we have prepared visual photographs of the repair of two Sony headphones. These are models XBA-1 and XBA-H1. In both cases, the headphones do not work precisely because of the broken wire.
The first headphones are purely reinforcement, the second are a hybrid of reinforcement with a dynamic emitter, but this does not matter. Today, all headphones are equipped with a 3.5 mm plug (jack or jack 3.5mm) and repair of the plugs of both headphones will be shown in parallel
How to disassemble the headphone plug
To repair headphones, the first step is to disassemble their plug. The vast majority of headphones have a rubber shell on the connector that can be carefully removed. It is more convenient to do this with a thick needle or awl:
We insert the needle shallowly at first, and gradually moving in a circle, we go deeper with the needle to the full depth of the connector. After this, you can pull off the rubber covering.
The second headphones (XBA-H1) had a detachable connector.
As you can see from the picture, the next step is to expose the plastic-filled contacts of the plug. I cut it carefully to demonstrate what was originally there. Usually I cut everything together with the wires
Cleaning the plug contacts:
You need to unsolder all the wires on the connector. Even if you cut them off or they are torn off, there will still be pieces of wires in the tin droplets on the contacts, which can then bridge the contacts. In any case, the tin droplets on the contacts need to be refreshed by melting them with a soldering iron dipped in rosin and pulling out excess pieces of wiring from them.
We're done with the connector for now, now let's prepare the wire. Often the wire dies at the exit from the connector, so we cut it 2-3 or even 5 cm above the connector. Then, using a sharp knife or scalpel, we cut the wire braid in a circle 1-1.5 cm from the end and remove the coating, exposing the wires.
Tinning the wires before soldering the headphones
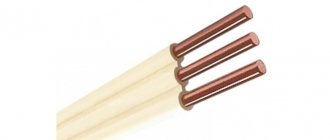
Please note that the first headphones have 3 wires inside, and the second ones have 4. Each wire is a mixture of twisted nylon threads and copper wires coated with varnish
Each wire is a mixture of twisted nylon threads and copper wires coated with varnish.
Before soldering, the wiring must be tinned, i.e. cover with a layer of tin. First, we twist the wires, because Surely its end was swung. Then we place its tip on the rosin and press it with a heated soldering iron, lightly dipping it into the melting rosin.
After this, we place the edge of the wire on a matchbox and, pressing it with a soldering iron with a drop of tin, we turn the entire headphone cord. In this case, the wire should twist and be evenly covered with tin.
It is enough to tin the very tip. But no one forbids tinning more, and then cutting off the excess, leaving 2-3 mm covered with tin.
That's it, the tedious but important preparatory part is over. Now the more interesting task is to solder the wire to the connector
First, let's find out what and where.
Where to solder headphone wires
I think the letters L and R are familiar to everyone and the fact that they indicate the left (Left) and right (Right) channels too. But what is GND?
It's simple - it's GrouND, or in our language - land. You've probably heard that a light bulb can only light when current flows into it through one wire, and current flows out of it through the other. And what is called this thing is a closed circuit.
So here it is the same - the earphone will sing if one of its wires is soldered to L or R, and the second to ground (GND).
So we simply have no other choice but to solder the left earphone to L and GND, and the right one to R and GND.
If you find it difficult to determine which channel is which, solder the ground, plug the headphones into your player or phone and use the tinned wire to poke the contacts of the plug. look where it will play)
How to solder headphone wires
This is the most convenient option) I highly recommend not holding it with your fingers - you can easily get burned. During the soldering process, we try not to touch the connector with a soldering iron for more than 3 seconds, otherwise the plastic separating the contacts in the connector may melt and there will be a short circuit and the repair of the plug will fail (((
Fill the headphone plug with glue
When all the wiring is soldered, all that remains is to fill the connector with polyethylene hot-melt adhesive (1) and, until the glue hardens, insert it into the rubber shell (2).
It is advisable to fill the entire volume of the headphone jack, so first pour glue into the jack, and then make a drop of liquid on the connector contacts. After inserting the plug into the shell, remove the excess glue that has been squeezed out with your fingers.
Now there are another 5-10 seconds to give the connector the desired position (3). Keep it this way until the glue hardens completely. And then use a sharp knife to cut off the last remnants (4).
How to repair a broken wire
If the study shows that the cable is still broken, you will have to connect it. This procedure is carried out in several stages.
- At the very beginning you will have to take care of the insulating material. The insulation and transparent protective layer must be completely removed from the headphone wires. Special pliers or a stationery knife will help make the work much easier. As a last resort, you can use scissors, but this risks cutting the wire. You need to strip only one and a half centimeters of wire, and after that you just make a cut.
- Please note that headphones with a microphone consist of wires connected to each other. Two wires, one of which conducts the signal and the other is ground, are located nearby. A fracture can occur in one of them, or it can affect both.
- Let's move on to the next step and cut off part of the wire. The cut must be made in such a way as to divide the headphones exactly in half; it is important not to split the wire, but rather to bite it. To avoid exposing the cable to electrical damage, it must be shortened to the same length on both sides.
- It can be considered lucky if only one wire breaks. In this situation, you can do without cutting and extending the cable. With the same result, this saves a lot of time.
- Twist the wires so that they form a secure connection.
- Using a soldering iron, apply a layer of solder to securely fix the twisted area.
- As a final step, heat the heat shrink tubing to form the desired shape. Experts recommend using a hairdryer or similar device.
Lots of wires
After cutting off the headphone jack, remove the insulation from the wire. We do everything the same as with the AUX cable. But there is a small catch.
There are clearly more wires in the headset than three - there are five of them. Two wires are for the microphone, and three for the headphones. That's what we need.
A frayed gold wire (ground) was wound over a thin white wire - a microphone one. We twist it into a separate wire and clean all the wiring from the varnish.
Now we are faced with the impossible task of twisting the necessary wires together. It's really simple! Three AUX wires need to be screwed to three headphone wires.
In my case, it turned out that the colors of the wires matched. What if not?