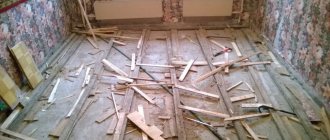
Wooden beam in concrete
Good afternoon, forum members. I am faced with the task of making a pine railing (100x100 pine beams) like a fence-type fence on the veranda, which is an integral part of the house.
But given that in several places it was not planned to erect brick columns, I will have to embed the support columns directly into the reinforced concrete slab, having previously hollowed out the corresponding holes for them. But I am tormented by vague doubts about the durability of wood, immersed in concrete and exposed to direct atmospheric influences, such as rain, sun, snow and wind (in general, everything that is possible in our southern latitudes). As for the external treatment, I have already decided it will be one layer of soil and two or three layers of Belinka. But the actual question is how to treat the lower part of the pillars, which will be walled up in concrete, in order to prolong their long-lasting life. 2MankoPavel We boil drying oil in a barrel, immerse the beam and soak it. All. Now you can put it in damp soil.
Mikhalych wrote: We boil drying oil in a barrel, immerse the beam and soak it. All. Now you can put it in damp soil.
One of the options. Transformer oil can also be used in a similar way. But in our area they are reinforced concrete. Power line poles are replaced with wooden ones. The latter are simply dug into the ground (and not attached to reinforced concrete stepsons). The pillars are treated with XM-11. In special conditions, of course, and not by simple spraying. But nonetheless.
Mikhalych wrote: We boil drying oil in a barrel, immerse the beam and soak it. All. Now you can put it in damp soil.
Can you give me some technological details?
e-babay wrote: Transformer oil can also be used in a similar way.
The mining will go to the pillars; wrap the end in roofing felt when pouring.
MankoPavel wrote: I will have to embed the support columns directly into the reinforced concrete slab
Why is it so difficult? It is enough to embed mortgages. type of rod, pipe, etc. Nothing is eternal. If you are going to hammer concrete, then this is stupidity; any treatment with drying oil, etc. will come out of the concrete and collect dirt, and the wood will dry out and dangle. But what if you want to beautifully, neatly lay tiles on concrete? Will you be cutting tiles to look like wood? You need to drill under the stud, “plant a post” and isolate the wood from the concrete with a gasket, for example a sheet of metal, or make a support from professional. pipes 100*100 with a height of 100-150mm. Although if you carefully drill a hole with a diamond drill. D80-100, then theoretically, why not?
In principle, I also had the same thoughts, embed an ordinary round pipe D 50 into concrete, and drill a hole of the same diameter with a depth of 150 mm in a wooden post with a feather, screw it all together with a couple of bolts and I’ll probably be happy, but I’m still confused by the reliability of such constructions with the possible support of an adult weighing 80 kg or more (we do not take into account the wife whose weight ranges up to 47
) As for cutting out ceramic tiles around the pillars, this is not a problem because the pillars are supposed to be placed only at the outer corners of the veranda, and for this you will only need to cut out a square corner from the tile.
MankoPavel wrote: but it still confuses the reliability of such a structure when it is possible to support an adult weighing 80 kg or more
A single post will certainly look unreliable, but it will also be connected by railings. The problem of rigidity is solved constructively. It is necessary that the railing does not end obliquely with the post. It is advisable to install the pillar in a corner. Or make a support scarf. The simplest option is an M12 rod pin at least through the post with a tightening from above.
To simplify the discussion of the issue, I am posting a fencing project
You need to fasten not the outer posts, but the entire lower beam. In this case, it would be nice to provide spacers that would raise it above the floor by at least a couple of cm. This will keep the timber dry.
Of course, the lower beam will be raised a few centimes from the floor to drain rainwater
So fasten it to the concrete with anchors and you don’t need to hammer anything.
Or maybe the embedded parts can be made from 4 corners protruding above the concrete? Or plates? At least it will be possible to rise from the concrete and moisture and anchor securely. But if the goal is to hide the metal completely, then a pipe is preferable.
mmda, I wouldn’t really like protruding metal
As for tying the mortgage, that’s correct. In addition to impregnation with xm-11 (as far as I understand, this is waste from the electrolytic sludge of galvanizing sites) can be impregnated with copper sulfate. After impregnation, be sure to dry or oil it so that the impregnation does not wash out. Another reliable way is to immerse the entire area of the log in a “cushion” of a mixture of freshly slaked lime and sand, this is exactly what was done at my dacha.
So, punch the beam through with a 300-gauge nail, and drill a hole in the concrete under the nail end. And install it, either on epoxy or on cement with liquid glass.
Then it’s better to attach the entire lower beam to regular anchors or to these as a last resort:
DSP007 wrote: In addition to impregnation with xm-11 (as far as I understand, this is waste from the electrolytic sludge of galvanizing sites) you can impregnate it with copper sulfate.
For reference: XM-11 is copper sulfate + sodium (or potassium) dichromate in a 1:1 ratio. Non-washable antiseptic.
serezhiki wrote: Or maybe the embedded parts can be made from 4 corners protruding above the concrete? Or plates? At least it will be possible to rise from the concrete and moisture and anchor securely. But if the goal is to hide the metal completely, then a pipe is preferable
No need to wall up the corner. You need to fill one (.) plate along the width of the column. The plane of the plate is perpendicular to the wall. Only needed for the rightmost column. Saw the post from below to the height of the plate, put it on the plate and tighten it to it with screws, self-tapping screws, etc.
The meaning of the idea: it won’t swing left and right (along the wall). But in the “to the wall-from the wall” plane, a steel plate will not work. At the same time, unlike the corner, it is easy to hide inside the post, but unlike the pins, it works better for bending in this plane.
The remaining elements do not bend in relation to concrete; it is enough to simply pull them to the concrete with anchors or anything else, without using walled up wood. The problem is only with the far right column and only with rigidity in one plane
Waterproofing a wooden floor
Wooden flooring, especially in a private home, has been and remains the most traditional. This is explained simply - a naturally warm material with a beautiful textured pattern and various shades can fit into an interior decorated in any style. But for such a floor to serve for a long time, it will not be enough to simply nail the boards to the joists, especially if it is installed above the ground and not on a prepared base.
Waterproofing a wooden floor
Waterproofing a wooden floor is one of the main stages of its arrangement, since untreated wood absorbs moisture well and swells, and then, when dry, becomes deformed. In addition, moisture for most types of wood is the beginning of decay or rotting, followed by decomposition. Therefore, the wooden parts themselves must be well processed and reliably protected from possible penetration of high humidity from the ground.
There are several types of waterproofing work, which depend on the method of constructing the wooden floor. Having familiarized yourself with the possible technologies, you can choose the one that is most suitable for each specific case.
Impregnations for wood
One of the most ancient and very effective means of protecting wood from moisture is its impregnation with certain compounds.
Today, there are many impregnations on sale made on different chemical bases. They are applied to wooden parts before they are used for flooring. All impregnations are designed to protect wood for a long time not only from exposure to humidity, but also from biological damage (microorganisms, insects, rodents, etc.) Moreover, such treatment is necessary not only for wooden floor elements, but also for walls or ceilings.
High-quality impregnation itself becomes a reliable barrier to water
There are complex impregnations, as well as those aimed at a specific area of protection:
— antiseptics, which are designed to protect against the penetration of insects and microorganisms into wood;
- fire retardants - these impregnations will protect wooden coverings from fires;
— solutions aimed at preserving wood from moisture;
-. Compositions that combine several protective functions simultaneously.
Impregnation, which protects against moisture, penetrates deeply into the structure of the wood and becomes a kind of waterproofing for each individual wooden element. It is easy to apply, absorbs well and does not wash out for a long time. The composition dries within two to three hours, then, if desired? You can apply another layer. A very important advantage of such waterproofing is that the material does not lose its ability to “breathe”. Such compounds impregnate not only wooden floor boards, but also the joists on which they are laid.
Such solutions are especially necessary for rooms with high humidity, such as a bathroom, steam room or other sauna rooms.
Waterproofing the floor on the ground
No matter how dry the soil under the floor being installed is, waterproofing should be carried out in any case. It can be constructed using different materials. But first, it is necessary to prepare a base consisting of several layers for waterproofing.
- The first and very important layer is well-compacted soil, which can be compacted manually or using special tamping equipment.
- The next step is adding sand, which in itself is a good waterproofing agent. On dense soils, a 10 cm layer of sand is sufficient, but if the soil has heaving structures that are prone to freezing, and therefore to absorbing moisture, then the height of the bedding increases to 20 cm.
- Next, a ten-centimeter layer of crushed stone of large or medium fraction is poured and also compacted. These layers are designed to prevent moisture from penetrating to higher layers if you plan to make a screed, and block access to floor beams and joists. In addition, they strengthen the base and make the floors more reliable.
If the groundwater is deep enough, no higher than two meters from the surface, then crushed stone can be replaced with expanded clay, which, in addition to waterproofing, will also serve as a heat insulator.
These three layers are necessary when choosing any waterproofing and installation method for a wooden floor. Subsequent work is carried out depending on what result is planned to be obtained in the end - the wooden floor will be laid immediately, or the concrete covering will be laid first.
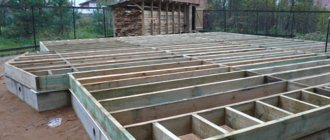
Wooden floor on pillars
- Inside the base, over the entire area over which the wooden floor will be installed, holes are dug at a distance of one to one and a half meters, into which a sand-crushed stone cushion is placed and waterproofing made of polyethylene film is laid to the entire depth with its exit to the ground surface by 20-30 cm .
- Next, brick columns are laid out, which, after the mortar has dried, are treated with waterproofing mastic.
- Sheets of roofing material are laid on the entire surface of the underground, which are hermetically sealed together with bitumen mastic. The roofing material is raised onto the plinth walls by 15-20 cm and also glued with bitumen. The corners are sealed carefully - it is better not to cut the material, but to fold it into folds. The roofing material should form a kind of sealed container at the bottom of the underground.
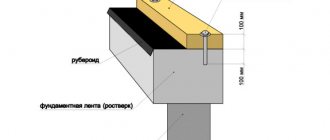
- The columns are coated with bitumen on top and pieces of roofing felt are laid on them, preferably in several layers.
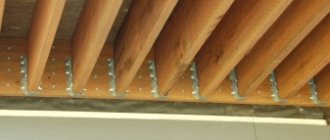
- Thick floor beams treated with a penetrating waterproofing agent are installed on the posts. They are secured to the supports using metal fasteners.
- Logs are mounted on the beams with a certain pitch. A cranial block is attached to the bottom of each joist, which will become the basis for the subfloor.
Approximate diagram of a thermally and waterproofed wooden floor with a ventilated subfloor
- The subfloor is laid out from boards of low quality, but if cracks form between them, it is better to seal them with clay diluted to medium thickness. This material is also a good waterproofer. If you plan to lay thermal insulation material, for example, mineral wool, in the cells of the subfloor, then it will be completely safe from moisture.
This is what the finished subfloor looks like
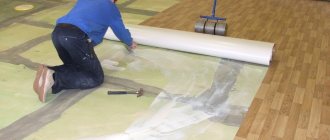
- Next, the subfloor is covered with plastic film or roofing felt. The strips must be laid with an overlap, with an overlap of at least 100 - 150 mm. The joints must be sealed with surfacing or special tape.
- Insulation is laid (if provided for in the construction plan.). A vapor barrier film is spread on top of the insulation and secured to the joists.
Before the final installation of the floorboards, a vapor barrier film should be laid underneath them
- Next, a wooden floor is laid on the logs, the boards for which must be treated in advance with complex compounds.
- Thus, the floor received a triple line of protection from soil moisture - waterproofing the surface of the ground itself, the subfloor, and a water vapor barrier membrane directly under the plank covering.
Waterproofing a wooden floor on a concrete base
If a wooden floor is placed on a concrete screed, then first of all the base under it must be waterproofed. In conditions when moisture begins to destroy concrete from below, it will soon reach its surface and the wooden elements of the floor.
Installation of a concrete floor begins with the same two layers - sand and gravel, laid and compacted onto the ground.
Next, you can do it in two different ways
1. Waterproofed screed in one layer
- Sheets of roofing felt are laid on the compacted surface with an overlap of 100 - 150 mm over the walls of the plinth. Sometimes, with very wet soil, it makes sense to lay roofing material in two layers, along and across the covered area.
The area of the future floor, completely covered with a waterproofing layer of roofing felt
- Sheets of waterproofing material are fastened together with bitumen mastic, heating it with a gas burner - this ensures perfect tightness. The corners are sealed with special care.
- Insulation - expanded clay - is poured onto the surface of the waterproofing, or high-density extruded polystyrene foam is laid out.
- Waterproofing material is again spread over the thermal insulation layer; in this case, dense polyethylene film can be used as it. This will not only be an additional line of protection from moisture from below, but will also prevent the concrete solution from being absorbed into the insulation and spreading through the cracks.
- The film is also lifted onto the walls, and a damper tape is glued over it or thin foam plastic is laid, which will serve as a good compensator when the concrete screed expands.
- Next comes a reinforcing metal mesh with cells measuring 50 × 50 mm. The reinforcement belt should be installed carefully so as not to damage the integrity of the waterproofing film. The reinforcement will evenly distribute the mechanical load on the insulation layer and give the required rigidity to the floor.
Waterproofing film, reinforcement, beacons - everything is ready for pouring the screed
- Beacons are installed on this entire structure at the zero level, which are fixed with concrete mortar.
- When the beacon system is ready, a finishing screed is laid and leveled. It is left until fully matured, and starting from the second day, it is moistened with water every day, which gives the concrete additional strength.
2. Waterproofed screed, poured in two stages
- A polyethylene film with a thickness of at least 200 microns is spread over the compacted layers of sand and gravel, which is placed on the walls of the plinth to the height of the future screed. The sheets are glued together with waterproof tape, and the corners are also sealed hermetically. It is very important that the waterproofing is a single space without damage.
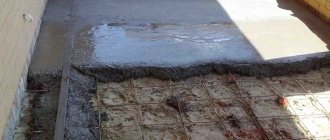
- A rough rough screed consisting of cement and gravel mixture is laid on the waterproofing. Its thickness should be from 40 to 70 mm. This layer does not need to be leveled to perfection, since it will be leveled on top with a finishing screed. Thus, it does not require a beacon system - only a few reference marks are needed for rough alignment.
First, the rough screed does not need perfect alignment
- After the concrete has hardened, it is necessary to lay another layer of roofing felt waterproofing. The overlaps between its sheets are also sealed hermetically.
- Next comes the insulation - an expanded clay layer, the thickness of which can be from 100 to 150 mm.
- A reinforcing mesh with cells of about 100 × 100 mm is laid on the leveled and maximally compacted expanded clay.
- The zero level of the future finishing screed is determined. Beacons are placed on top of the reinforcing belt - guides, which are fixed with concrete mortar.
- Then the screed itself is poured - this layer must be perfectly leveled. Hardening will take place within three to four weeks, depending on the thickness of the layer and the characteristics of the component composition of the concrete solution. To ensure the strength of the coating, the hardening screed is initially sprayed with water daily.
For greater clarity, the structure of the overall “pie” with thermal and waterproofing of the floor
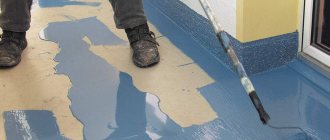
With any approach to installing the screed - in one or two layers, when it is completely ready, the surface must be additionally treated with impregnating, strengthening and waterproofing compounds, which are applied to the floor and walls to a height of up to 20 cm. For this, penetrating, coating, plaster or painting compositions that will create a sufficiently strong and reliable film on the surface that does not allow moisture to penetrate into the premises. More details about possible waterproofing methods are described in the corresponding article on our website.
Next comes the installation of the wooden floor on a reliably waterproofed base:
- To do this, the floors are marked, and logs are installed according to the markings, securely fastening them to the concrete base.
- Then, insulation (expanded polystyrene or mineral wool) is laid between the joists and along the perimeter along the walls. However, if the screed has received reliable insulation, then the space between the concrete and the wooden covering may not need additional thermal insulation - it all depends on the region and the design features of the house.
- From above, the entire resulting lattice is covered with a vapor barrier material (plastic film), which is stapled. fixed on joists.
- And finally, a covering of floorboards pre-treated with moisture-repellent impregnation is installed. The resulting floor can be further protected from water by covering it with varnish or wax.
One more note. Sometimes they plan to pour a self-leveling compound on a wooden floor, for example, for further laying ceramic tiles. It is clear that you cannot do without reliable waterproofing here:
Video: installing a self-leveling floor on a wooden base
A brief acquaintance with the waterproofing device for floors may lead to the mistaken opinion that this is not at all difficult to do. However, installing an insulated screed or waterproofing on purely wooden floors is a rather labor-intensive process that requires a lot of time and effort. Be that as it may, you cannot do without this element in the floor design. Ignoring reliable waterproofing can result in the fact that the work on installing floors will be done absolutely in vain, and in a few years you will have to replace not only the wooden covering, but also the concrete screed that has been saturated with moisture. Even if the concrete base retains its strength and integrity, if moisture gets between it and the walls in the rooms, mold will begin to appear, wet spots on the interior decoration, and an unpleasant smell of dampness is inevitable.
The conclusion is clear - waterproofing is always a necessary step when installing any type of floor, but for wooden floors its importance cannot be overestimated.
Causes of wood rotting in the ground
The first reason is an excess of oxygen and water. Most often, wooden posts rot where it protrudes from the ground, since this is the place that is enriched with both oxygen and water. If you take the part of the column that is underground, then there is a lot of water, but there is no oxygen, and if you take the part that is on the surface, then the situation is absolutely the opposite: a minimum of water and a maximum of oxygen. Based on this, it is important to protect the exit point of the pillar, since it is this point that is exposed to rot.
The second reason is the incorrect burying of the post, which, as a rule, summer residents do not pay attention to.
The fact is that if you immerse a log the way it grew, then in this case it will absorb water and mineral salts, which again leads to rotting. To avoid this, you need to immerse the pole with the opposite end, then the suction process will not occur. The third reason is improper processing of the wood.
Often it is lubricated with bitumen, which is pre-melted and then wrapped with roofing felt. This cannot be done, since such treatment, although it does not promote the penetration of moisture, does not release it either, which leads to the formation of the tree’s own “capital” of moisture. The fourth and final reason is that the wood is not treated at all. This happens when it is planned to erect only temporary buildings. But, as practice shows, temporary buildings gradually become permanent, and it is not the processing of wood that bears fruit.
So, having considered the reasons, we move on to the procedures themselves, which will ensure the durability of the wooden building. These include:
- Choose your wood carefully. It should be completely healthy, well dried and not show the first signs of rot. If you have chosen logs, then you need to thoroughly sand their surface and then let them weather a little. It will be simply ideal if the logs dry under a canopy for about a year.
- Treat that part of the wood that will subsequently be in the ground, as well as 40 centimeters above this area, with a seven percent solution of sulfate (copper or iron). It is best to leave the wood in this solution for a day or two.
- Place a tin lid on the top of the post to protect the wood from precipitation.
- The diameter of the hole into which it is planned to immerse the log must be made twice as large relative to the diameter of the log. And before placing it, pour a little crushed stone at the bottom of the hole, and after it is immersed, fill the hole not with earth, but with the same crushed stone.
- After installing the pole, it should be painted. The fact is that paint provides protection from moisture, which increases the service life of the wood. In cases where you do not want to paint, make sure to use well-dried logs.
- Another way to combat rot is to use scraps of metal pipes, which are first placed in the hole, and the posts themselves are inserted into them.
Concrete floor in a wooden house
The most common way to install a concrete floor in a wooden house is to pour it over the ground, but with the obligatory condition that the ground must be dry.
Construction of a concrete floor on the ground
Stage 1 – preparation
Preparatory work includes the following steps:
- Using a level, determine the main indicators and calculate the excavation work.
- To prevent soil subsidence and cracking of the concrete floor in the future, the soil is carefully compacted using special devices.
- A well-compacted sand cushion is placed over the ground. The backfill will be denser if you pour material that exceeds the required volume by 25%, moisten it and compact it thoroughly using a roller or vibrator.
- An expanded clay or gravel layer is laid on the sand.
Petrol single-pass vibrating plate Masalta MS 125-4
Stage 2 - waterproofing
At the next stage, it is necessary to waterproof the base so that it does not absorb moisture from the concrete screed, and it will also protect the floor from ground moisture. For this purpose, roll materials based on bitumen are used. You can use thick plastic film.
The waterproofing material is laid overlapping, extending it 20 cm onto the wall, and then the joints are taped
It is important that the material is homogeneous, without damage
An alternative method is the coating method, when mastic waterproofing is applied at the stage of pouring the subfloor.
Dense polyethylene as a waterproofing layer
Stage 3 - pouring the subfloor
The subfloor or technological floor serves as the basis for the hydro- and vapor barrier layer. For its production, concrete of class B7.5 - B10 and crushed stone of size 50-20 are used. There are no strict rules for pouring the rough layer, the main thing is that its thickness is about 50 mm, and the difference does not exceed 4 mm.
Stage 4 – vapor barrier and insulation
A vapor barrier material in the form of inexpensive membranes made of fiberglass or polyester is laid on top of the subfloor. PVC membranes are a durable material that is not afraid of rotting. Insulation is laid over the vapor barrier - this can increase the energy efficiency of a living space by 20%. The following materials can be used as insulation:
- Mineral wool, the density of which does not exceed 120 kg/m3. To prevent it from accumulating cotton wool, it is insulated with polyethylene.
- Where the floor is subject to heavy loads, it is recommended to use extruded polystyrene foam, which deforms when compressed and then returns to its original state.
- When using polystyrene foam, it is covered with polyethylene on all sides to give strength.
Types of insulation
Stage 5 – final screed
At the final stage, the final screed is performed, which will become the basis for the decorative flooring. It can be monolithic or dry. In the first case, pouring a solution with a coarse filler in the form of crushed stone, stones, small pebbles or a cement-sand composition (quartz sand) is carried out along the beacons. Begin pouring the screed from the far corner of the room, leveling the solution using the rule. Complete drying of the screed occurs after 30 days.
Monolithic screed
An alternative is a dry screed based on fiberboard, plywood and asbestos-cement sheets, gypsum boards. The technology is simple and fast:
- Line with plastic film.
- A technological gap of 1 cm is left along the walls, into which soundproofing material is placed.
- Sand backfill is 5 cm thick.
- The sheet material is laid in two layers and securely fixed to each other using self-tapping screws or construction adhesive.
- Perform puttying and sanding of joints.
Dry screed
Concrete and wood
Throughout human history, wood has been the main material for housing construction. Wood is an affordable material that has a lot of excellent qualities, but there are also negative ones. VELOX technology means warm concrete houses in a wooden jacket. Technology of monolithic construction in permanent formwork. Humanity has been using this technology since 1956. And in about 40 countries around the world it is successfully used for the accelerated construction of insulated, earthquake-resistant housing. In Russia, VELOX technology has been used since 1997, becoming most widespread in the Leningrad region, and not surprisingly, today it is in Leningrad. In the region, there are three factories producing basic structural materials for this technology, chip-cement boards, fastening elements and trigonal reinforcement frames. Fighting for comfort and warmth and having withstood the tests of the harsh Siberian climate, construction using VELOX technology is also widespread in the north of the Tyumen region. There is an opinion that it is not at all necessary to use such energy-saving technologies in the south, but do not forget that the technology is called energy-saving because it saves energy all year round in winter for heating, and in summer for air conditioning. Although “Velox” translates as fast, and the technology allows you to build quickly, the main advantage is still energy saving. When using housing built using VELOX technology, savings are at least 40%, or even more. The thermal resistance of a VELOX external wall with a thickness of only 320 mm corresponds to a brick wall with a thickness of 2.45 meters. High heat transfer resistance allows for a 40% reduction in building heating costs. The location of the insulation in the outer layer of the wall in VELOX technology protects the concrete core from the penetration of cold. The concrete core is constantly at a positive temperature and serves as a heat accumulator.
The main structural material of the VELOX building system is a chip-cement board, 90% consisting of coniferous wood chips, 8.5% liquid glass and 1.5% cement. The chip-cement board 100% preserves all the good qualities of wood and 100% eliminates the negative qualities of wood. The result: environmentally friendly material that meets the highest European standards, moisture-resistant, does not burn, is not susceptible to fungus and rot, and is not subject to aging processes. Houses built using VELOX technology in Austria back in 1957 are still in use and do not require major repairs. PSBS-25 grade 25 polystyrene foam, used as external insulation, is glued to a chip-cement board of permanent formwork. After pouring the concrete, polystyrene foam ends up between the concrete and the chip-cement slab of the external formwork. Expanded polystyrene has a standard service life of no more than 25 years when opened. When tested closed from external influences, the service life of polystyrene foam could not be determined. This gave reason to assume that the thermal insulation properties will be maintained for the entire service life of the building. Internal formwork, consisting of wood chips, is involved in establishing the microclimate of the premises, just like wood. The dew point is located in the insulation outside the axes of the load-bearing walls, the wall is always warm, which meets the highest comfort requirements, and also provides additional protection for load-bearing concrete structures from atmospheric changes and severe frosts, which doubles the standard service life of the building.
Insulation under wooden structures
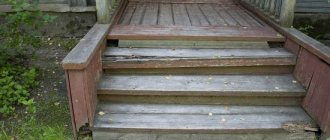
A fairly broad area is the use of materials for waterproofing the base of wooden structures. Waterproofing a wooden floor is far from the only sector. This also includes roofing work, protecting a terrace or balcony, as well as waterproofing the foundation of a wooden bathhouse or wooden house.
Important: all the materials described above can be successfully used not only for processing wood directly, but also as a protective coating under it.
Option for arranging a wooden floor.
Briefly about materials for the base
- When you need reliable and durable waterproofing under wooden flooring in an apartment, experts recommend paying attention to the installation of a self-leveling polymer screed. Its price is, of course, substantial, but after spending once, you will forget about the problem for at least fifty years.
Pouring polymer coating.
- An interesting option for arranging floors in wooden buildings is backfill waterproofing. A 5 cm layer of so-called bentonites is simply poured into the space under the subfloor. They are produced in the form of powders of different consistencies, but when they get into a humid environment, bentonites turn into a dense gel that does not allow water to pass through and provides additional thermal insulation.
Types of bentonites.
- But pasted types of insulation are deservedly considered the leader in this area. The most famous material here is roofing felt. Although now, as a rule, it is used only for reasons of economy. At the moment, there are a lot of polymer and bitumen roll-type coatings, the parameters of which are several times higher than the performance characteristics of roofing material.
- For waterproofing in the roofing sector, ordinary technical or reinforced polyethylene is often used. It is quite durable, plus the instructions for its installation are not difficult even for amateurs. But waterproofing for a flat wooden roof with insulation requires the use of special vapor-waterproofing membranes. Because condensation forms under the polyethylene.
Some subtleties of arrangement
As for painting and coating, everything is simple, take a brush or spatula and apply the composition. Filling a polymer self-leveling screed with your own hands also does not cause problems. The main thing there is to place it correctly; gravity will do the rest for you. The installation of pasted roll materials is considered the most difficult.
Cold installation method.
Depending on the type of material, installation can be done cold or hot. The cold method is definitely easier. Here it is enough to lubricate the surface with mastic and overlap the covering. Along the edge of such a strip there is an adhesive tape that securely holds the membrane together.
The hot method, although labor-intensive, is considered more reliable and versatile. Here the base is also lubricated with mastic, after which the roll is gradually rolled out. In this case, the edge of the roll needs to be heated with a gas burner, as in the photo. Thus, the coating seems to be fused together and reliably welded to the base.
Warming up the roll.
With the hot processing method, the coating can be applied to both wood and concrete bases. Most experts say that this is how waterproofing of a wooden floor on a terrace or balcony, as well as in all wet rooms such as a bathhouse, bathroom or kitchen, should be done.
Characteristics of weld-surfaced roll coating.
Important: waterproofing the foundation of a wooden bathhouse or house is also done using rolled materials. The root crowns of the structure should not be in direct contact with the concrete. It doesn’t matter what you impregnate the wood with, with constant contact with the concrete monolith it will last for a couple of years.
PVC membrane.
For low strip or column foundations, when pouring which high-quality waterproof concrete was used, it is enough to cover the upper part of the structure with 3 - 4 layers of roofing felt. In buildings with a high base or basement, it is advisable to install lateral waterproofing of the foundation. And hot roll protection or liquid rubber fits perfectly here.
Contact between wood and concrete.
The video in this article has additional information on the topic.