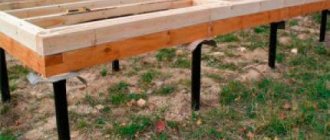
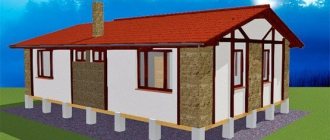
Features of ebb tides on the foundation
The ebb is a narrow metal or plastic visor that is placed over a protruding plane. Located with a slight slope from the facade. One edge is attached to the facade wall, the second is vertically bent down.
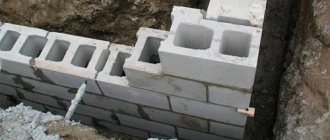
1. Low tide. 2. Foundation or plinth. 3. Foam. 4. Sealant. 5. Wall.
Elegant tides can decorate the facade, but their intended purpose is not decorative. The base is usually built from concrete, and concrete is a porous material. The penetration of water into the pores has disastrous consequences:
- when freezing and thawing, the base may crack;
- corrosion of reinforcement leads to a loss of strength and a decrease in the bearing capacity of the foundation;
- mold and mildew form on the surface;
- Water penetrates through capillaries into the façade walls and through them into the house. Load-bearing structures are destroyed and finishing materials deteriorate. A painful microclimate is created in the rooms.
The left photo shows the destruction of the foundation lining as a result of incorrect installation of the ebb tide. On the right - all the rules for installing low tide on the foundation have been followed.
Materials for making ebb tides:
- galvanized iron;
- galvanized or stainless steel;
- aluminum;
- copper;
- metal with polymer coating. The color range is different;
- plastic, PVC.
The drip strips can be made to match the façade, plinth or in a contrasting color.
The traditional option is unpainted castings made of aluminum or stainless steel.
Stainless steel façade ebbs
This copper accessory looks respectable.
Copper façade ebbs
Occasionally there are castings made of concrete, but they are heavy and inconvenient to install. Steel ones with a polymer film are popular: they are inexpensive, aesthetically pleasing, durable (the film protects the metal from corrosion), and come in different colors.
Steel façade flashings with polymer film
The maximum length of one ebb strip is 5 meters, the width depends on the width of the protrusion. Flashings can be purchased ready-made, but more often they are made to order: this makes it easier to take into account all the architectural features of the house. It is also easy to make ebb tides with your own hands.
Guide on how to make foundation sills
The foundation, being the basis of the building, carries a heavy load. In addition, additional load occurs during precipitation in winter and summer. In winter and especially during rains, moisture is absorbed into the walls of the building itself, as well as into the foundation, the upper layers of the foundation are saturated with moisture, and in the cold season all the moisture freezes.
As a result, in addition to the appearance of additional load, cracks appear on the foundation, the plaster begins to fall off, that is, deformation occurs not only of the foundation, but also of the entire building. In order to avoid such consequences, flashings are installed on the base of the building. Read an overview of the characteristics and features of the foundation blind area on this page.
The picture shows the castings for the foundation
Specifications
The installation of ebb tides is necessary to eliminate the destruction of the foundation and reduce the load on it. Today on the construction market there is a wide variety of flashings offered; their main differences are the material from which they are made, the shape and the manufacturer. In any case, they perform the same function and have similar characteristics:
- practicality;
- strength;
- non-degradability;
- protection;
- resistance to natural precipitation and other atmospheric conditions;
- resistance to direct sunlight;
- durability;
- ability to withstand large temperature changes;
- ease of installation;
- noiselessness (plastic);
- availability.
Experts say that foundation flashings are one of the main components of the basement and the entire building. Thanks to the presence of ebbs on the base, the foundation will be reliably protected, including from deformation.
In addition, ebb tides play a decorative role, thanks to the large selection on the construction market; ebb tides can be selected according to color and texture, and you can also paint them yourself in the desired color.
Read an overview of the types and methods of laying a foundation.
Kinds
- Flashings for the foundation plinth reliably protect the foundation from precipitation and from water flowing from the walls getting into the foundation seams.
Otherwise, moisture penetrates into the foundation material and expands at low temperatures, which leads to the destruction of the top layer of the foundation and damage to its integrity.
- Low tides on the foundation of a wooden house. The foundation of a wooden house must first of all be protected by waterproofing. Most often, professionals make flashings for the foundation of a wooden house themselves from a galvanized sheet of the required size and an edged board, which is pre-coated with an antiseptic.
- Flashings for the foundation plinth at the corners play a very important role in the installation of the entire flashing. They perform a protective function not only from precipitation, but also protect residents from bruises, wounds and cuts. Many people ignore the presence of such a danger, but, in fact, installing a safe low tide is mandatory. In addition, a safe low tide angle adds completeness to the entire structure and building. You can read the instructions on how to dismantle the foundation here.
Drain installed on the base of the building
How to do it?
Installation of ebbs on the foundation is carried out at the connection point between the grillage and the main wall of the structure. As mentioned above, ebb tides protect the base of the building from precipitation.
If the flashing is installed by professionals, then in addition to protecting the foundation, the canopy will be able to protect the free part of the grillage, provided that the seam between the base and the wall is properly sealed.
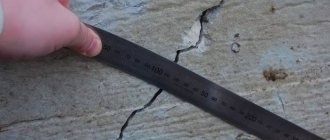
Read the guide on how to repair a crack in your foundation.
Low tides can not only be purchased, but can also be made independently:
- to begin with, the distance between the load-bearing wall of the building and the edge of the protruding part of the foundation is measured, 4 - 5 centimeters are added to this value, which are necessary for the manufacture of stiffeners;
- then all measurements are transferred to a galvanized steel sheet and strip blanks are produced;
- on the workpiece it is necessary to take into account the places for the stiffeners; for this, a longitudinal line is applied at a distance of about 2 - 2.5 centimeters from the edges;
- then, along the drawn bend line, the stiffeners are bent up and down. It is most convenient to work with a workbench and pliers; for calibration you will need a wooden block;
- the result is a canopy, which is applied to the main wall of the structure with the upper stiffening rib.
Making casting for the foundation
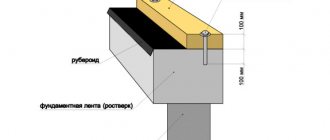
The flashings are installed upon completion of the plinth cladding before the façade cladding. Horizontal markings are made with a water level. The dimensions of the foundation ebbs are determined using a tapping cord. Next, you need to cut blanks of the required width from a metal sheet plus a bend on both sides.
The width of the working shelf is usually 40-50 cm, about 5 centimeters more than the width of the ledge itself. The width of the vertical shelves is 2 cm.
At the bottom, an additional bend of 1 cm is made towards the wall, horizontally.
To drain water from the facade, the angle of the canopy should be 15 degrees:
- Check with a level that the protrusion plane is horizontal.
- A slope is made on the ledge using cement-sand mortar.
- Waiting for it to harden.
- The edges of the metal parts are bent in opposite directions at an angle of 105 degrees.
- Place it on the ledge and adjust the bend so that the edge fits tightly to the wall at the top and falls vertically down at the bottom.
Next, check the integrity of the facade wall. Chips and cracks in concrete are filled with sealants, putty or plaster. Further:
1. Make mounting holes in the upper flange of the low tide at the same level in increments of 30-40 centimeters.
2. Place the canopy against the wall.
3. Make holes in the façade with a drill or hammer drill and secure the ebb with dowels.
4. Upon completion of installation, the gaps between the wall and the sill are filled with sealant.
Sometimes the planks are not placed directly on the wall, but on pre-installed guides. In this case, fastening is carried out to the guides with self-tapping screws.
Installation of flashings on pre-installed guides
In any case, the overlap of adjacent planks should be at least 3 centimeters. The seam is coated with frost-resistant sealant.
Joining of two low tide strips
There is a nuance in installing flashings on the foundation of a wooden house: a groove is selected in the facade wall and the edge of the canopy is inserted into it, installing a wooden board underneath for rigidity.
If the facade is ventilated, the ebb is attached directly to the wooden frame with self-tapping screws. In this case, the top edge will overlap the siding panel.
Installation of ebb and flow on a foundation with a ventilated facade
When installing plastic moldings, you need to be careful: if you hit them with a hammer, the material may collapse. When you need to bend a workpiece, place a rubber or felt pad under it.
If the ledge is wide, it is recommended to attach the planks to brackets, otherwise they will flap in the wind.
Low tides on the log house. How to install a basement flashing step by step?
In order to properly fix the ebb on the base, you need to know several important points.
First: The ebb is attached to a ready-made plinth (that is, the finishing of the plinth is completely completed, it is smooth and does not require additional leveling with mortar).
Second. The flashings are attached to the base, before finishing the façade of the building.
Third: The ebb should be five centimeters wider than the base, no less, a little more is possible.
4) The corners of the ebbs are cut out from the same material (please note that there are ready-made corners for ebbs,
this is if you don’t want to mess with them).
5) The overlap of one ebb sheet on another should be three. three and a half centimeters.
We will need a tool.
Silicone sealant and a “gun” for it.
Metal scissors (I am writing about galvanized ebb, but if the ebb is plastic, then metal scissors will not be useful).
Hammer drill (if you have to drill concrete walls, or brick, if the house is made of timber, then you can just use a hammerless drill.
Naturally, the walls to which we will attach the ebb are cleaned of dust and dirt
They begin to attach the ebbs from the corners of the plinth; while waiting to begin, measure the plinth along the length of one wall (by the way, the scraps can be useful on the next wall; if you take the correct measurements, you can cut the ebb taking into account the use of the scraps).
Some purchased (not homemade) moldings have ready-made holes for dowels with screws (if not, we mark and drill them).
All that remains is to mark and drill, then insert the dowel into the wall and remove the flashing; before final installation, apply waterproof sealant to the flashing and to the wall, then tighten the screw and remove the excess sealant.
In the end, I will say that I described the fastening of ebbs to the wall, if there is a sheathing on the facade of the building for finishing, then we attach the ebbs directly to it, sealing with silicone is carried out during the installation of the finishing material on the facade of the building.
By the way! It will be interesting to know: Customs regulations in the Republic of Belarus with an act of acceptance of ditches and pits for foundations
the moderator chose this answer as the best
As I understand it, the construction of the house is already coming to an end, the main thing is that the foundation and wall have already been erected and it will not be possible to put a plinth under the wall. Then you need to do the following:
We select the width of the ebb for the base; to do this, use a tape measure to measure the distance from the place where the ebb is supposed to be attached to the wall and to the edge of the foundation. We add 2-3 centimeters to this distance and look for an ebb of at least the specified size.
Install the ebb on the wall using dowel-nails if the wall is brick or made of blocks, or screws if the wall is wooden, but do not screw them tightly, but only tighten them.
Coat the joint between the flashing and the wall with sealant or silicone and tighten the screws until they stop, pressing the flashing to the wall, immediately remove excess sealant.
How to make a corner at low tide?
Some difficulty comes from processing the corners of the house: the joints must be airtight and look neat.
The ready-made set of PVC flashings already includes the corresponding additional elements. This is a solid cast corner; after installing it, all you have to do is seal the joints with the walls and straight sections.
The corners of metal castings can be processed in different ways:
- cut the edges at 45 degrees and lay with an overlap at the joint;
- close the joint with a separately cut rectangular strip and secure it with screws;
The joint of the ebb corner with a separately cut rectangular strip
- cut both abutting ebbs at 45 degrees with allowances and connect them with a standing seam.
Connecting the corner of two ebbs with a standing seam
When processing an internal corner, you can simply place one of the joining planks under the other and secure it with screws or make an overlay.
How to install a drip sill on a foundation base with your own hands
Most often, the thickness of the foundation is taken to be greater than the thickness of the enclosing structures. This is necessary to ensure load-bearing capacity. Water may be retained at the junction of the plinth and the wall, which will lead to damage to the structure. To prevent this, flashings are installed to protect the foundation base. Any building material cannot withstand constant exposure to moisture and subzero temperatures, therefore, in order to preserve the foundation for many years, it is necessary to install flashings.
Product selection
When choosing elements for your home when installing it yourself, you need to pay attention to the following criteria:
Dimensions are selected depending on the width of the protruding part of the base. In addition to their functional purpose, the installation of elements has a decorative function; if you make the ebb too protruding, the façade of the house will not look very good. The optimal overhang of the metal strip is taken to be 50 mm. The size range offers products with a width from 50 to 400 mm, which allows installation for any protrusion of the plinth.
Production
Parapets are made in two types: metal and concrete.
Metal ones are made of aluminum, copper and galvanized metal. Today, polyester is more often used - galvanized sheet with a special coating. It is produced in rolls and sheets. Polyester sheets come in two sizes: 3000x1250 or 2500x1250 mm.
By the way! It will be interesting to know: What to do if you forgot to install waterproofing between the foundation and the plinth
The use of flashings to protect the base of the fence
Products are produced as follows:
Basic parameters diagram
This is how all parts are made from sheet polyester.
To make concrete parapets, you need special concrete: 1/2 part cement and sand, 1/4 small crushed stone of the total mass, additive, water, dye.
Fiber fiber is used as an additive to prevent the product from cracking.
Popular types of fence products
Making concrete parapets step by step:
- Mix concrete. If necessary, add dye.
- The prepared form is placed on a vibrating table.
- Concrete is poured into it.
- Vibrated and left to harden.
- Take the workpiece out of the mold.
Concrete flashings are recommended to be installed no earlier than three days after concreting.
Variety of elements for a concrete fence
How to install flashings on the foundation of a wooden house
To protect the protruding base of a wooden house, it is necessary to install a flashing on the foundation to protect the concrete structure from destruction. Problems usually do not arise for buildings made of SIP panels and “frameworks” - the top shelf is attached to the sheathing and covered with a ventilated facade. In log houses, it is necessary to ensure the tightness of the junction points and to outline the cutouts of the outer corners.
Flashings for the base of a wooden house foundation
To protect the protruding base of a wooden house, it is necessary to install a flashing on the foundation to protect the concrete structure from destruction. Problems usually do not arise for buildings made of SIP panels and “frameworks” - the top shelf is attached to the sheathing and covered with a ventilated facade. In log houses, it is necessary to ensure the tightness of the junction points and to outline the cutouts of the outer corners.
- 1 Materials for drip molding and installation diagrams
- 2 Do-it-yourself installation of ebb and flow 2.1 Design of corners
- 2.2 Outside corner
- 2.3 Internal corner
- 2.4 Straight sections
Materials for casting and installation diagrams
Due to the fact that the minimum width of monolithic foundations is often greater than the thickness of the wall materials used in wooden house construction, the base of the house protrudes outward. To protect its upper edge from getting wet and destroyed, ebbs made of different materials are used:
- steel – galvanized, coated with polymers or laminated;
- polymers – plastic additional elements.
Concrete, clinker, copper and aluminum castings for wooden cottages are rarely used, since they sharply increase the construction budget. They are more difficult to adjust at the junctions with the crowns of the log house, and the cut deviation and installation time increase.
The main installation schemes for ebb tides are:
- concrete, clinker - making an inclined plane with a mortar on the upper surface of the plinth, laying the elements on a cement-sand mortar or a special mortar with moisture-proof properties;
- copper, vinyl, steel, aluminum – fixing the top shelf to the wall, ventilation façade frame, adjusting internal and external corners, fastening elements together with rebates, screws or overlapping rivets
Important! Manufacturers produce corner elements for vinyl moldings. From companies that sell steel castings, they can be ordered according to the developer’s dimensions. Concrete and clinker products are cut locally using an angle grinder with diamond equipment.
The ebb shape looks like this:
The width of the average working shelf varies between 50 – 400 mm. Products made from sheet materials can be ordered in a specific or standard size. When choosing vinyl additional elements, the possibilities are somewhat reduced - you will have to choose from the manufacturer’s ready-made range.
Necessary materials for the construction of a low tide
Typically, in wooden houses, the width of the foundation is greater than the walls, so the base is a protruding structure. In order to protect the surface of the base from getting wet and destroyed, special ebbs are constructed. The work can be done from various materials, from galvanized steel of a laminated type or polymer, that is, plastic elements.
Copper, concrete or aluminum castings are very rarely used in wooden houses, since their cost is higher. The materials are also difficult to install and difficult to attach to the frame.
The ebbs can be made of vinyl, copper, steel, plastic or aluminum; they are fixed to the frame of the ventilation facade or simply to the wall, while the corners are adjusted on the inside and outside. Self-tapping screws, folds or rivets can be used as fasteners.
For vinyl drips, special corner elements are sold; when using steel, they must be ordered separately. The width of the ebb can reach 400 millimeters; the system made of sheet material can be standard or made to individual sizes. Vinyl systems are not typically made to order.
Installation of ebb tides
There is no single standard for the design of ebb and flow elements on the foundation, so ebb and flow can be installed using various methods. However, it is recommended to first protect the wall joints and the joints of the corners of the log house from moisture, then mount the planks on straight sections of the house’s base.
Decoration of corners
In houses made of SIP panels, built using frame, panel or half-timbered technology according to budget projects, only external corners are usually present. In log houses, internal corners are added when the corners are cut into a bowl or claw. In the latter case, a separate tape can be poured for these elements; the corners can lie close to the base or hang over it.
Therefore, the width and slope of the base of the house, the convenience of placing the plank, cutting waste, and the productivity of work to protect the foundation change.
Outside corner
If PVC base moldings are used, the technology for cutting the planks for making corners is greatly simplified.
Installation diagram for vinyl drip panels.
It is enough to cut out the lower and upper parts, install the additional element at the place of use, and treat the seams with sealant and silicone.
It is more difficult to work with metal bases, so other technologies are used:
- cutting out the upper part of the plank - the upper and middle flanges are cut, on one side along the marking of a 90 degree angle, on the other with an overlap of 1 - 2 cm;
- joining a corner element - the strip is bent at the place of the cut, the allowance is moved inwards, the metal is fastened with screws or rivets along the corner.
Do-it-yourself ebb installation
There is no single standard for the design of ebb and flow elements on the foundation, so ebb and flow can be installed using various methods. However, it is recommended to first protect the wall joints and the joints of the corners of the log house from moisture, then mount the planks on straight sections of the house’s base.
Decoration of corners
In houses made of SIP panels, built using frame, panel or half-timbered technology according to budget projects, only external corners are usually present. In log houses, internal corners are added when the corners are cut into a bowl or claw. In the latter case, a separate tape can be poured for these elements; the corners can lie close to the base or hang over it.
Therefore, the width and slope of the base of the house, the convenience of placing the plank, cutting waste, and the productivity of work to protect the foundation change.
Outside corner
If PVC base moldings are used, the technology for cutting the planks for making corners is greatly simplified.
Installation diagram for vinyl drip panels.
It is enough to cut out the lower and upper parts, install the additional element at the place of use, and treat the seams with sealant and silicone.
It is more difficult to work with metal bases, so other technologies are used:
- cutting out the upper part of the plank - the upper and middle flanges are cut, on one side along the marking of a 90 degree angle, on the other with an overlap of 1 - 2 cm;
- joining a corner element - the strip is bent at the place of the cut, the allowance is moved inwards, the metal is fastened with screws or rivets along the corner.
A seam connection is considered more reliable; in this case, 1 cm is left on both sides of the corner, 2 cm on the other side, respectively. The complexity of seam joints lies in the need for a home craftsman to have some skills in tin work and to use a special tool.
Instead, you can join the corner with a small gap, close it with a wide strip on top, attaching it to opposite sides along the seam with rivets or self-tapping screws.
External corners at the junction of the internal walls of a log house with a claw cut can be designed in the following way.
Important! The foundation of the house must be protected by ebbs along the entire perimeter, including the porch, decorative elements of the facades (bay windows, pilasters).
Internal corner
When independently fastening the ebb of a house's base in the internal corners, the technology is much simpler. In this case, it is fashionable to run one plank under the other, slightly bending the wide shelf, covering the cracks with sealant.
Important! If the basement part of the foundation is poured at a single horizontal level, and the crowns of the adjacent walls of the log house are shifted vertically by half a tree, the ebbs can be placed at different angles or at different levels.
Straight sections
After decorating and protecting the external and internal junctions of the walls, the sills are attached to straight sections. The maximum rigidity of the casting strips is ensured by fastening them with special brackets:
The technology for installing house basement flashings on a wooden building is as follows:
- horizontal marking - the line is usually made with a special painting tool (painted thread) before installing the corner elements;
- fastening of drip strips - brackets are screwed onto the wall or uprights of the frame of the ventilated facade, the lower stiffening ribs of the drip panels are put on them, then the counter shelf is fixed to the sheathing or crowns of the building with self-tapping screws.
After which, the stiffeners should be additionally bent around the brackets using pliers. There is a technology for installing flashings on a foundation without clamps:
- along the line marked at the initial stage, angle grinder cuts are created in the crowns of the frame with wood-cutting equipment or a hand-held circular saw, while a slope parallel to the middle flange of the ebb is required;
- wooden blocks are laid out on the upper edge of the plinth, the upper side of which is cut at the required angle, they are secured with dowels into the plinth;
- planks without a curved upper shelf are inserted into the cut, pre-filled with acrylic or silicone sealant, and attached in the middle with self-tapping screws to the support bars.
Simple Arithmetic
To eliminate the one-sided interpretation of the purpose of basement ebbs, it is necessary to clarify: installing ebbs in a wooden house has two goals -
- protection of the crown molding from dampness;
- protecting the base from getting wet.
The low tide protects the base and foundation of the house from moisture.
The weak point of a wooden house is the first row of logs or beams that are laid on the base. This row is called the frame crown, and it is most susceptible to dampness, since all the water from the wall rolls down and lingers on the base ledge. This is a feature of wooden house construction in which the strip foundation is laid wider than the walls.
Of course, the upper part of the foundation is waterproofed, and a lining is laid in the first row (a board 20 cm wide and 4-5 cm thick must be opened with an antiseptic), however, for reliability, a drain board is installed in the log houses.
It is very important to carry out preparatory operations on the construction of the base before installing the drain board. These operations include:
- leveling the top of the plinth with cement mortar;
- laying roofing felt in two layers;
- installation of a lining along the entire perimeter of the top of the foundation;
- fastening a block with a beveled edge.
To fasten the drain board when installing a log frame, a groove is selected from the outside of the second log of the crown into which it is inserted with one edge. The second edge rests on a beveled block attached to the base.
A bit of materials science
In addition to the drain board, metal and plastic flashings are used in wooden houses.
Metal products for water drainage are steel, aluminum and copper. Of the steel ones, the most in demand are galvanized castings and those coated with a polymer film. Their performance characteristics are higher, and they also have different colors.
Plastic products are good for everyone and there are even special elements for corner joints. They are inferior to metal ones in terms of strength, but win in price.
Proceed with installation
Since there are fewer and fewer supporters of installing a drain board, an alternative is to install drip panels from other materials.
Installing metal and plastic ebbs on the foundation base of a wooden house is practically no different. You can begin installing the drip linings after erecting the walls, removing the scaffolding and finishing the base, but it is better to do this at the final stage. Moreover, such an operation can be done with your own hands.
- The first thing you need to start with is to measure the perimeter of the house in order to know the length of the ebbs that you need to purchase or make yourself. To the resulting figure you need to add 10% of the length for trimming corners and overlap when joining.
- Now you need to decide on the width of the ebb. Considering that the fastening is carried out at an angle (about 15 degrees), you need to apply a ruler from the wall to the edge of the plinth. Mark the application point with a marker. The width is calculated taking into account 2-3 cm of overhang.
- If the ebb shelf width is up to 7 cm, it can be mounted without a backing. If the width is greater, then the ebb should rest on some kind of base (for rigidity). This is done by installing a lath along the edge of the base or longitudinal bars, applying cement mortar or polyurethane foam.
- Along the height of the marked point, a line is drawn along the entire perimeter using an even strip (rule) or beaten with a cord.
- Installation is carried out first from one corner of the building, then the second, then a straight section, then the third corner, etc.
- The connection at the corner is made from two ebbs, cut at 45 degrees, and the edge of the second ebb is cut with an allowance of 1.5 cm for fastening with rivets. Straight sections are overlapped with a margin of 3 cm.
- Sealant is applied to the upper shelf of the ebb, and the ebb is screwed to the wall with self-tapping screws, preferably roofing screws with a rubber gasket.
- If you choose the option of making ebbs with your own hands, then the upper shelf does not bend, and the ebb is inserted into a groove cut into the wall using a hand-held circular saw. Fastening is carried out to a rail mounted on the plinth.
The groove made must be treated with an antiseptic.
Watch the low tide installation video:
What is low tide and what are its functions?
Since the foundation performs a load-bearing function, it is often wider than the walls. Therefore, the base forms a protrusion relative to the walls. Melting snow or rain moisture can accumulate on the top of the foundation and gradually penetrate deeper, eroding the structure of the base of the building. In addition, when freezing, water that gets inside the base expands, also having a destructive effect.
To prevent such processes, a bar is installed on the ledge, the width of which can be from 5 to 40 cm. It is mounted on the base at a slope, which allows water to drain. This is the low tide.
In addition to being protective, such a canopy performs a decorative function, participating in the design of the facade of the building. It is made from various materials in various colors.
Note! The color of the tint can not only match the tone of the facade or base, but also be contrasting. If you choose the right palette, this option will decorate your home.
Types of tides
The building materials market is diverse. This also applies to the strips for protecting the base. The most common are base visors made of plastic and sheet steel. However, there are options made of concrete, ceramics, aluminum, copper and even wood. Let's consider each option in more detail.
Metal casts
The group of metal base insulation includes steel, aluminum and copper strips. All of them have three elements as standard:
- bend fixed to the wall;
- a shelf, which is the widest part and is mounted at an angle so that moisture is not retained;
- frontal bend to drain water from the foundation.
The most common representatives of both the metal group and ebbs in general are products made from steel sheets, the thickness of which is 0.5 mm.
Among the steel strips, you can choose a shimmer that suits the cost and color. More affordable models are made of galvanized steel sheet. More expensive products have a polymer coating, which can not only be of different colors, but also imitate wood, stone or other materials. In addition, it increases the wear resistance of the steel strip.
Steel castings are durable, strong and temperature resistant. You can also make them yourself from galvanized steel sheet. This option will require a lot of time and is sometimes not as attractive as a factory option, but it will help save your budget.
The protective properties of aluminum basement waterproofing are similar to those of steel. However, aluminum slats better withstand negative external influences and also weigh less, which makes installation easier and reduces the load on the foundation. But such visors are somewhat more expensive.
The most expensive are copper base sills. They allow you not only to protect the foundation from external influences for a long time, but also give the house a noble appearance. This is especially true for models with patina.
Practical PVC
Plastic strips are more attractive in price compared to metal castings. They also have other positive characteristics:
- variety of colors;
- imitation of various materials;
- waterproof;
- light weight, facilitating installation and not increasing the load on the foundation;
- durability;
- ease of installation;
- strength.
These strips are especially suitable for homes with vinyl siding.
Note! When choosing plastic canopies to protect the base of the foundation, do not try to buy cheap models, which most often cannot withstand low temperatures and burst. This will lead to the need to replace a collapsed element or ebb along the entire perimeter of the house.
Clinker tiles for basement waterproofing
Clinker tiles are a product of pressing and firing highly plastic clay.
This material is increasingly used for exterior decoration of buildings because it has many advantages:
- weak hygroscopicity;
- high resistance to frost and temperature changes;
- wear resistance;
- light weight that does not increase the load on the foundation;
- long service life.
The tiles can be of various colors, glazed or have a matte surface. Finishing with such material improves the appearance of the facade of the house, giving it status. Clinker waterproofing is laid on a stone, brick or concrete base using a special adhesive composition.
Note! Tile adhesive for installing clinker sills must be water- and frost-resistant and suitable for outdoor use.
However, such tile waterproofing has three disadvantages:
- high price;
- the complexity of the layout, requiring experience in similar work;
- the need to pre-level the surface of the base.
Concrete waterproofing
Monumental concrete has also found its use for protecting the base. Beautiful concrete basement flashings will not only protect the foundation of the house from various external influences for a long time and reliably, but will give the building a noble appearance. This waterproofing is used for buildings with brick or stone finishing. Concrete products may vary in shape and color.
They are made from concrete grades M 400, M 450 or M 500 with the addition of granite chips and plasticizing additives. This composition determines the durability, strength of the product, its resistance to frost, water, and temperature changes.
The disadvantages of a concrete canopy on the base are high price and weight. The installation of such products must be taken into account at the design stage and carried out on a reinforced foundation.
Wooden cast
For wooden houses and/or buildings decorated with wood, wooden plinth flashings are suitable. They are often made from scrap lumber. At the same time, the type of wood must be able to withstand moisture well. Such an example is larch. But wooden ebbs are rarely installed, since there are other materials that imitate wood.
Low tide prices
How to make a casting on the foundation of a wooden house. Purpose and types of tides
Why do you need flashings for the base?
Due to the fact that the load on the base is quite large, it is made a little thicker than other walls. Water can accumulate on the protrusion that forms on top of the base. Because of this, the plaster, and then the base and foundation itself, get wet and gradually deteriorate. Penetrating into the walls, water washes away the binding components of the materials. If the wet foundation then freezes, cracks and other deformations may appear in it.
That is why the installation of protective elements in the upper part of the plinth is a mandatory stage of construction.
note
Water and snow will roll down the inclined “shelf” without destroying the base material of the house.
Ebb tides can be constructed from almost any available material. Various types of plastic, steel, copper and aluminum are suitable for this.
If you choose steel, make sure it is stainless or galvanized. Steel castings are also often produced with an additional protective coating.
A layer of zinc or a special dye can protect the surface from external damage and rust.
- Metal flashings for plinths are most popular due to their performance characteristics. Thanks to the protective layer of polymers, they are resistant to any type of precipitation and will protect the building even in severe bad weather. In addition, they are distinguished by their low price and the ability to order according to individual measurements. They can be left unpainted or use paint that matches the facade of the house.
- The main advantage of plastic elements is easy installation. They are also lightweight, so you can install them yourself. You don't need to have any construction skills to do this. Plastic is very strong, silent, durable and can resist fading in the sun.
The choice of ebb for the base of a wooden house requires special care. Due to the fact that wood needs enhanced protection, it is better to decide in favor of metal ebbs.
In some cases, you can opt for wooden parts treated with water-repellent solutions. But it must be taken into account that they will require constant monitoring and periodic processing.
Otherwise, the ebb tides will quickly lose their protective properties and will no longer protect the material of the foundation plinth.
Some installation details
As with any work, when installing basement waterproofing it is worth considering some nuances.
- It is better to install the drip sill before work on the cladding of the house begins. Otherwise, after installing the waterproofing, you will have to carry out repairs to the facade finishing.
These few points will allow you to achieve better results when arranging basement waterproofing.
Prices for metal scissors
Installation of ebb tides
Metal and plastic ebbs are the most common because they are quite easy to install. They are attached directly to the facade of the building or to the installed sheathing before facing.
Let's look at the installation using steel products as an example. If you use ready-made sills, then first you need to calculate how many slats you will need. This is easy to do if you know the perimeter of the house. The resulting sum of side lengths must be increased by 5%, since the planks overlap each other. Now you can easily calculate the number of flashings, given that the length of a standard steel strip for waterproofing a basement is 2 m.
If you decide to make your own ebb molding from a galvanized sheet, you can do this using the method described below.
- Measure the distance from the wall to the outer edge of the protruding part of the foundation and add 50 mm to the resulting value for the upper and lower bends.
- Cut the sheets into strips of the resulting width.
- On the resulting workpieces, mark the line for bends at a distance of 25 mm from the edges.
- Make an upper and lower bend. To calibrate the angles, use a metal corner or block. The bend is made using a mallet.
Note! At the edges, it is also recommended to bend the metal inward. This will add rigidity to the structure.
Video - How to make an edge on a tin cast without a sheet bender
To install basement waterproofing, in addition to the ebb tides themselves, you will need:
- metal scissors;
- construction square;
- level;
- clamps or pliers for bending or unbending drip elements;
- screwdriver;
- self-tapping screws;
- pencil.
Prices for popular models of screwdrivers
Note! Sometimes an angle grinder is used to make cuts, which is not entirely true and can lead to an inaccurate result. To reduce this negative effect of working with such a tool, it is better to saw the panels without removing the protective film.
An important element that should not be forgotten when installing basement waterproofing is the corners. You can purchase ready-made corner elements, or make them yourself during the installation process, following the diagram.
Sources:
https://www.vogorodah.ru/kak-sdelat-otlivy-na-fundament/ https://postroifundament.ru/ustanovka-otlivov-na-tsokol-derevyannogo-doma.html https://gidfundament.ru/rabota /otlivy-dlya-cokolya-derevyannogo-doma.html https://fundamentaya.ru/cokol/otdelka/ustanovka_otlivov_na_cokol_doma.html https://remont-book.com/otlivy-dlya-cokolya-fundamenta/