How to lay the first crown of timber on the foundation after installing waterproofing
How smooth the future structure will be depends on many factors. What is important is the clarity of the initial marking of the axes, the correctness of the foundation, ensuring the horizontal level of the upper cut of the plinth or grillage, as well as other, no less significant aspects of the construction process. The list depends on the design features of the object, which, in turn, determine what exactly you should pay attention to. For example, for a log house, the decisive stage of work is the careful laying of the first crown on the foundation. It requires a careful and deliberate approach, compliance with technology and regulatory requirements.
How to properly lay a log frame on a foundation
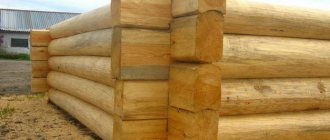
The condition of a wooden house is assessed by the three lower crowns of the frame: if the wood is different in color, we can say with confidence that the house was not built correctly. Upon closer examination, a black mold coating will be found on the surface of the timber. The cause of these problems must be sought in the mistakes made during the construction of a wooden house. Professionals believe: only a correctly laid crown molding will ensure a long and trouble-free “life” of the building, and the owners will have comfortable living conditions.
Wood for timber
The lower part of the cottage is constantly in contact with moisture. It gets affected by precipitation and is affected by dew. Therefore, it is required that the timber laid first be resistant to water. The best option is for it to be made from larch. Wood of this species can withstand prolonged contact with water, and mold does not appear on it or rot.
Experts advise making not just one crown from larch, but at least the first three. This will protect the walls of the house and prevent them from premature destruction from dampness.
Not everyone can afford to purchase larch building materials. Timber made from this wood is expensive. To reduce costs, you can choose lumber from other softwood species. A spruce or pine beam is suitable for the first crown of the house. It will cost future owners of a wooden cottage cheaper.
When choosing timber, you need to look at its quality. The first crown must be made of high quality lumber. There should be no knots or cavities on it. It is important that the timber is dense; it must support the weight of the house frame.
Insulation of a house made of timber
House insulation is carried out using jute fabric, usually 4-6 mm thick. For houses made of laminated veneer lumber, jute is usually used only for winding around the neck of the cup (in corner joints). The jute is wrapped around the neck one and a half times twice and secured with a construction stapler.
Jute is a natural material and has the inconvenient property of absorbing moisture from the environment, so it is important that the jute does not stick out or get wet.
Insulation of a house made of timber from the outside
Wooden houses made of profiled and laminated timber have a distinctive feature: they do not require additional insulation. A wall thickness of 180-240 mm is sufficient for the Ural climatic conditions. After the walls are erected, the timber only needs to be protected with special compounds that slow down the aging of the wood and give the house an elegant look.
Roof in a house made of timber
After erecting the walls of the future house, it is worth thinking about the roof. Basic requirements for the roof of a house made of timber:
- aesthetic compliance with the overall architectural solution; the possibility of access for roof repairs must be taken into account; resistance to temperature changes; the weight and overall structure of the roof must be proportionate to the load-bearing supports of the building.
As a rule, lightweight materials are chosen for roofing: metal tiles, corrugated sheets, seam roofing, composite tiles.
After the house has a roof, you can begin interior finishing work. The floor is laid, windows and doors and fittings are installed.
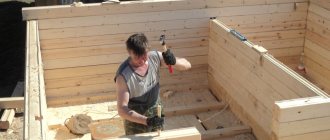
The laying of the very first crown of a house made of timber must be done very thoroughly and with a mathematical approach so that the walls of the house stand exactly at 90 degrees. Correctly laying the first crown of timber on the foundation is not such a difficult task if you do everything thoroughly and prepare well for this event. And if you want to build a house from timber that will serve you for many years, take this stage of construction very seriously.
Fastening the first crown
Points of view regarding attaching the first crown to the foundation differ greatly.
Some believe that it is imperative that the crown be firmly attached to the foundation surface, while other builders and experts argue that this is not necessary. Building a house from laminated veneer lumber or any other type has a lot of weight, so they believe that it will stand well and firmly without the use of anchors and additional fastening. In such a situation, docking without a lock is used. When this is done in the future, you can replace any timber without dismantling the corners of the building. In the corners, simple staples or metal plates are used for connection. When building a house with your own hands, each person will independently choose whether he will attach the crown to the foundation or not.
Attaching the timber to the strip base
To attach the first crown of a timber house to a strip foundation, you must adhere to the following procedure:
- Purchase elements for fastening to the foundation, preferably with a reserve;
- Check the level of surface level using a hydraulic level. If the unevenness exceeds 1 cm, then it is worth eliminating it with a solution. If the unevenness is less than 1 cm, then you can put planks under the beam;
- Select the docking method: into a bowl or into a paw. Both options are strong and reliable. On the Internet you can watch videos of how professionals assemble them;
- In the beams prepared for laying to the foundation, you need to drill holes slightly smaller than the anchor studs that will be concreted into the upper part of the foundation;
- The corners of the first crown must be connected with dowels or nails;
- After this, you need to check each corner using a level. If any irregularities are found, you need to remove them with a plane.
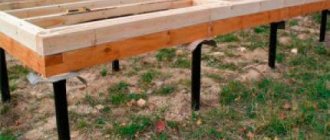
Mounting on a pile-screw foundation
Strapping is a mandatory and necessary installation element if there is a screw foundation.
This is all due to the fact that piles represent a point support, so some places will have more load than others. So, first you should make sure that all the piles are correctly installed on the foundation. If there are some deviations, then it is necessary to eliminate the irregularities by cutting out the timber in the required places. In the corners of the lower crown you need to place anchors filled with mortar. On the outside, the corners must be covered with aluminum corners. After this, in order for all sections of the timber to be joined, you need to make cuts on them. The first needs to be done from the bottom side, the second from the top.
How to lay a crown beam on a foundation
The strapping is cut using the half-tree method, the connection in the corners is made “in the paw”. This method of laying corner joints is the most reliable and can withstand multidirectional loads. The laying of corners and the connection of beams in subsequent crowns can be done in any way.
When laying the tying crown on a strip foundation, you may encounter unevenness on the base, reaching 10-15 mm. Such irregularities are eliminated by increasing the thickness of the mastic layer of waterproofing. The best solution for laying the first crown of timber on the foundation is an even and horizontal grillage.
Attaching a crown made of timber to a plinth is done in various ways:
- In strip foundations and concrete grillages, anchors with a diameter of 12-16 mm are poured every 1.5-2.0 m; the crown is attached to the strip base with an anchor bolt with a nut;
- Square plates are welded onto metal piles, the grillage and frame row of timber are fastened to the plate with a through bolted connection, the nut is located in the lower part of the fastening.
Holes are drilled for the fasteners with a margin of 3-4 mm, and flax tow is stuffed into the gap.
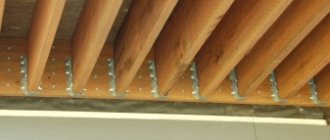
The next crowns of the log house are attached to dowels, the dowels are installed vertically with tension in specially drilled holes, the edges of the dowels are recessed and do not protrude above the surface.
Professionals recommend paying attention to the leveling of the casing; when setting the horizon, the height is adjusted with wooden wedges between the plinth and the first beam, and the resulting voids are sealed. The operation is performed using a building level. After leveling is completed, the nuts on the anchor fastening are tightened and fixed.
Features of the insulation process
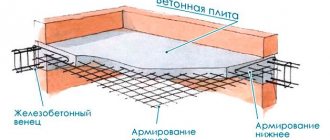
Scheme of waterproofing the foundation from above under the timber.
Before proceeding with the installation of the first crown, insulation must be carried out, for which two layers of waterproofing material should be laid, between which a lining board should be placed.
The insulation includes two layers of rolled roofing felt and glass insulation. All materials are laid in such a way that their edges protrude 25 cm beyond the foundation. At the corners the insulation is overlapped.
Before the insulation is laid between the crown and the base, you need to check the surface of the foundation, which should be perfectly flat, without drops. To do this, use a hydraulic level, which is more accurate than a regular one. Differences of no more than 1 cm relative to the entire foundation plane are allowed. Strong differences are removed by laying roofing material or leveling with cement mortar.
An equally important point is to seal the gap between the foundation and the lower crown of the beam.
The most common method is to add cement mortar under a layer of waterproofing material. Carrying out work may be complicated due to the difficulty of accessing the desired location. In some cases, the gap is simply sealed with pieces of wood of a certain thickness. Wooden wedges or boards are attached between the roofing felt and the lower beam, which are driven tightly in until the gap is completely eliminated. There can be an unlimited number of such inserts in both length and width.
Scheme of laying timber on the foundation.
The most common method of sealing cracks lately is to foam them with construction foam, which is sold in cans. It will be better to carry out such work in damp weather, when the material sets very well.
A day after foaming, excess material is cut off with a sharp knife. Subsequently, the area between the lower crown and the base is covered with metal ebbs or a decorative strip. This is necessary in order to protect the foam from exposure to direct sunlight, under the influence of which it will collapse literally in one season. In addition, a reliable barrier is created for the accumulation of moisture, which will lead to rotting of the wood.
Corner beam connection
Currently, more than a dozen different schemes for constructing locks in corners exist and are actively used. All of them are divided into two large groups:
- Connection with timber residue;
- Docking without leaving a residue or, in other words, leaving the end sections outside the walls.
We invite you to familiarize yourself with how to treat a log bathhouse outside and inside, how to cover logs, processing, what they process, photos and videos
The simplest connection options can be made with your own hands. At the same time, the strength of the corner connection in all cases is sufficient for the timber box to remain stable. More complex insertion options are used to increase the rigidity of corners or reduce heat loss through cracks.
Angle with remainder
In this case, two adjacent beams of one crown are sawed into the lock not at the ends, but at some distance from the edge. The result is a corner with two protruding vertical rows of ends. It is generally accepted that this type of angle ensures minimal heat loss due to the large length of the cut line.
Among the most popular schemes, two variants of the angle can be noted - “half a tree” and its more advanced version - “ohryap”. Other schemes and methods of connecting beams do not have any special advantages, except that the rigidity of the connection increases. They are used for tall buildings made of timber, material thickness less than 100 mm.
If you build a log house from timber with your own hands, then it is best to choose the “half-tree” scheme for the corners. You can make a lock in the following way:
- On the laid beam, an indent equal to the thickness of the material is measured from the end;
- Using the template, a rectangular groove is cut at ½ the height of the beam on the joining parts of the crown;
- Seal the lower element of the lock with a sealant and assemble the connection.
Of course, the quality and speed of manufacturing lock parts depends on the availability of skills and experience. Beginners often have to trim the surfaces of the future joint with a chisel, but high qualifications are not required to assemble the corner.
Joining “in the okhryap” differs only in that two grooves are made with a thickness of 1/3 of the vertical size of the beam; otherwise, this method is not much different from the previous connection.
A castle with a remainder has high rigidity, so it is used to build various types of turrets and superstructures when, according to the designer, it is necessary to emphasize the “wooden” style of the building.
Angle without remainder
If the design of a building made of timber requires that the box look absolutely “clean”, without protruding parts, then in such a situation methods of connecting the crowns along the end surface are used.
The most well-known schemes for making “clean” corners:
- “Half-tree” option without external ending;
- Keyed connection;
- A lock with a molar or tooth.
The first option differs from corners with the remainder in the profile of the connected surfaces. If in the latter case a rectangular cut is made, then in a “clean” angle the joint surfaces have a wedge shape.
The simplest scheme involves joining the end to the side surface of an adjacent beam. To limit the movement of the crown in the horizontal direction, grooves are cut out on the connected sections and embedded key elements are installed. As a result, the joint turns out to be quite simple and, most importantly, movable. Any roll or uneven settlement will not affect the strength of the corner.
The warmest option is a connection with a spike. A tenon or tooth is cut out from the inside of one of the beams, and a tenon is made in the adjacent element. After laying the seal and settling the crown, the corner turns into an almost windproof connection. Locks without residue are most often closed with overlays made of half-inch boards.
Preparing the foundation for the casing
A layer of roll waterproofing on a bitumen basis is applied to the basement - upper surface of the strip foundation. The material is laid in 2-3 layers and filled with bitumen mastic. A thermal insulation layer is laid on the hardened waterproofing. Jute tape or construction felt is used as a heat insulator. It is best to place the waterproofing material on a dry base and carry out the work in dry weather. Before installation, it is recommended to dry the surface of the plinth with a gas burner.
When installing a pile foundation, the places where the grillage is laid on the racks are subject to waterproofing. The secrets and tricks of experienced craftsmen include the use of backing boards to minimize the consequences of seasonal movements of the structure. A hardwood board 40-50 mm thick is laid on the waterproofing layer. The bottom and side parts of the board are treated with bitumen mastic, and a heat-insulating lining is laid on top of the board.
Tools and materials used for applying waterproofing:
- Ruberoid or rolled bitumen-polymer membrane;
- Bitumen-latex mastics for hot and cold use with antiseptic and herbicide additives;
- Gas-burner;
- A brush with metal bristles, a corrugated metal spatula, a construction knife.
Pile foundation
If your house has this type of foundation, then for installation it is necessary to tie it. This is because the piles do not provide uniform support and the pressure may be greater in some areas.
Make sure the piles are positioned correctly in the base. Eliminate deviations by sawing out the timber in the right places. Place the anchors at the corners of the lower rim of the beams and fill them with mortar. Using aluminum corners, reinforce the outside of the corners. Then carefully cut the beams to ensure their reliable joining. Fill the joints with jute. This method is preferred by most novice builders, as it is very convenient, and the building is given additional strength due to the first crown. In addition, there are a lot of master classes on the Internet in which experts share the secrets of this installation method.
Workflow Description
In order for you to understand this topic as best as possible, we will talk about all the important points in as much detail as possible. You must follow all the recommendations, then the result of the work will be excellent.
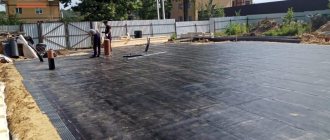
Base waterproofing
As you know, wood tends to absorb moisture, and if the elements are located near the ground, then this process is much more intense.
To prevent the penetration of moisture from concrete, a number of preparatory measures should be carried out:
- First of all, you need to level the base; if there are unevenness and differences on it, then they should be eliminated with a solution. Try to ensure that the surface is smooth, without any flaws;
- Next, the upper end is treated with bitumen mastic, which reliably plugs all small voids; it is best to choose options that, after drying, create an elastic coating; they do not crack over time and provide reliable protection over a long period of time;
Do not skimp on mastic, the surface must be treated with high quality
- Next, one layer of roofing material is glued to the mastic and carefully pressed along the entire perimeter. After this, it is necessary to apply another layer of coating and roofing felt. Such a pie is guaranteed to protect the box at home from dampness for at least several decades.
This waterproofing is excellent for timber buildings