Briefly about gables
Often this part of the facade of a building in private houses has the shape of an isosceles triangle, but sometimes the vertex of the triangle can be shifted towards one of the walls, and in some attic structures the pediment can be polygonal.
What are gables made of?
The pediment can have different shapes.
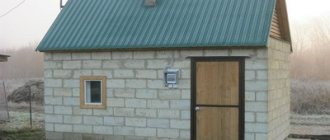
Basically, such structures differ in the material from which the walls are made. Thus, a house built from blocks is most often equipped with the same pediment. This solution is much simpler, both in terms of construction technology and design;
In block houses, it is easier to lay out the upper part from the same blocks.
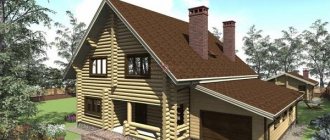
The so-called chopped gables are installed in houses made of rounded logs or timber. Arranging a gable wall from rounded logs is considered the highest level of skill among professionals. It’s a little easier with timber, but in any case, you shouldn’t tackle it without preparation;
Arrangement of a log facade is considered the most difficult.
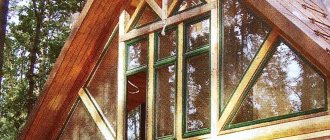
The most affordable option for installation is the arrangement of a frame structure
Here it doesn’t matter at all what the house is built from, just a frame is assembled at the ends of the rafter system, after which it is sewn up and finished with any material you like, usually boards or siding
The frame structure can be mounted on any building.
A block and wooden pediment made of timber or logs is installed before the rafter system is erected, and the frame structure is constructed after the rafters are installed.
Simple design calculation
The pediment parts are mostly made in the form of triangles; accordingly, all formulas relating to this figure are applicable to them. It all starts with determining the height of the roof at the ridge. Once you decide how high your roof will be, calculating the area is not difficult.
The height of the roof at the ridge is considered one of the reference parameters.
Gables with sloping roofs are calculated in a similar way, only here you will have to divide the facade plane into sectors and calculate the necessary parameters for each sector separately.
Complex structures are divided into sectors and calculations are carried out separately for each sector.
When drawing up a project and performing calculations, there is one very important nuance. In one-story buildings, the height of the pediment should be related to the height of the wall in a ratio of 1:1. Typically, the height of the wall with a plinth is about 3.5 m. This is enough for arranging a residential attic space.
If you make the roof too high, it will dominate the first floor and visually put pressure on it. A small attic of up to 2 m will create the impression of a house rooted in the ground, which will also not add attractiveness to the building.
The optimal ratio of floor to gable height is 1:1.
Pediment masonry
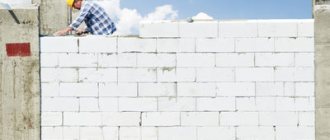
To know how to lay out a pediment from a foam block, carefully study the sequence of work:
- First, the end walls of the object are marked. If the gable part is planned in the form of an equilateral triangle, then the middle is determined using a simple measurement. When an asymmetrical roof is built, the projection point is shifted to either side by the required distance. In the established places, slats are attached, the upper edges of which determine the height of the ridge element.
- Laces are attached to the top of the slats, indicating the sides of the triangle. This is how a “template” is formed according to which the masonry will be carried out. By the way, to organize natural lighting in the attic space, you should provide space for window openings. It immediately becomes clear how many rows need to be laid out completely before the time comes to construct the opening section. Having laid the first rows, the middle is determined, from which the required distance is set aside in both directions.
- The work continues, the reference point is taken along the stretched cords, and the places for installing window blocks are taken into account. Due to the fact that the lace is placed along the edges, it will determine not only the pitched angle, but also the shifts of the blocks at the edges of the masonry row, which at first will outwardly resemble steps.
- Window openings can be at your discretion - rectangular or with beveled edges parallel to the upper edge of the roof. To comply with this direction, you will have to cover the openings with boards, the width of which is equal to the thickness of the foam block pediment.
- Blocks are laid on the boards parallel to the slope. There should be two rows covering the openings. The subsequent laying of the opening is carried out in the traditional way - the blocks are laid horizontally. The final stage of gable construction is trimming and laying suitable size block pieces on the side “steps”. To do everything accurately, we place the whole block on one of the steps, mark the cut line and saw off the excess with a hacksaw. Let us remind you that such work does not cause any difficulties.
- From the attic side, it is recommended to support the gable wall with boards while the mortar dries. This measure will prevent the walls from warping and collapsing.
- To make it convenient to lay out the rafter frame, the inclined sections of the pediment are laid out with plates sawn from block material. The masonry is carried out from the lower points to the top using the same mortar. In certain places it is allowed to leave gaps for laying out the ridge and rafter beams.
- If everything is done correctly, then on each side of the house you will get two identical gables, differing in the presence of window openings or their shapes.
- As soon as the masonry is completely dry, you can proceed to installing the roof.
As a template option, you can set the outer rafter pairs and focus on them while working. By the way, the rafters in this case will play the role of additional support for the laid out pediment.
Some people lay brick pillars inside the attic as a reliable support. This measure is good if the pediment is high, and the pillars will look like original columns. True, such a precaution will steal some free space from you, but the stability of the gable walls will be guaranteed.
Step-by-step construction with your own hands
The features of the technology for laying the walls of basements and cellars have common features, especially at the stage of preparatory work, when you need to develop a project, select the type of structure, purchase the necessary consumables and tools, lay the foundation after quality excavation work, and let the foundation settle and purchase fortresses for year.
step-by-step construction consists of such moments
- The installation of waterproofing on the foundation begins; sand or crushed stone can be poured under it for drainage.
- Cement mortar is diluted, and along the marked building perimeter, using a construction cord, the first block of gas blocks is laid from the corners to a mixture thickness of 20 mm.
- Then the blocks can be laid on glue or foam, in a checkerboard pattern, removing excess parts that extend beyond the line with a hacksaw.
- After every 2 layers, gas blocks can be strengthened with reinforcement using steel rods, checking during the installation process the correspondence of the angles between adjacent walls using a level.
- This is how the installation is carried out to the level where the concrete belt will be installed, under the ceiling.
- Then a ventilation system is installed, as well as entrance doors (for an external building, with an entrance from the street) or a hatch made of wood materials, if the entrance is made inside the house.
- They check the operation of the ventilation and perform work with a wall cutter to arrange communications.
- The outside of the walls is coated with liquid bitumen or bitumen mastic. This process is carried out as the masonry progresses. You can also lay a special waterproofing membrane (membrane) before starting work. Then polystyrene foam is applied, which can be used to insulate the walls from the outside.
- If you want an additional insulating layer, you can make a second layer of thermal insulation blocks.
- The ceiling begins with the laying of wooden beams, in the form of a frame or monolithic floor slabs (if the cellar is indoors, or a recessed version of the basement), according to the project. Fasteners are used, as well as cement-sand mortar of the best grade M500. The frame is then covered with waterproofing and roofing material (if the building is external).
- Backfilling of openings in the soil between a wall with waterproofing and insulation is carried out using fine crushed stone, sand or their industrial mixture (PGS).
- The walls from the inside are sanded and plastered with the chosen type of finish, treating them with copper sulfate, lime (especially recommended for cellars) or a special antifungal agent.
Particular attention is paid to the staircase, which can be specially purchased ready-made (wooden, metal) or personally constructed from a monolith, using formwork, reinforcement and pouring concrete mortar. A staircase option can be developed in the project
It is important to create a favorable microclimate for the cellar, since the food in it must be kept fresh. Additional rooms need to be equipped for the basement
For this purpose, partition heat-insulating blocks are used, as well as belts for doorways
It is important to pay attention to the performance of load-bearing walls.
Features of the structure of the roof frame along the gables
The most common technology for constructing a roof frame in low-rise construction is to lay rafters on load-bearing walls that differ in height. Instead of a solid internal wall, a “frame” made of timber can be installed in the middle of the attic. It consists of racks resting on a bed, a ridge girder installed on top and struts that provide structural rigidity.
However, both of these methods significantly reduce the possibilities for planning the attic space, which prudent owners are increasingly seeking to equip as a bedroom, billiard room, etc.
In order not to clutter the future attic with posts, arches and partitions, you can simply use the end walls of the building as supporting structures. They will serve as a support for the ridge run.
Methods for attaching a ridge beam
Purlin - a support beam for the top of the rafters, defining the break of the pitched roof, its ridge edge. It is performed with a horizontally laid log, board or timber. In the case of a frame supported by gables, the purlin is installed using three methods:
- With walling into the gable wall. In this case, niches are formed in the end walls at the height of the purlin installation, into which the edges of the purlin wrapped with waterproofing are placed.
- With a through intersection of the pediment. According to this scheme, through holes are formed in the end walls, through which the edges of the purlin extend beyond the building from the outside.
- With installation on brackets. Almost a folk method, according to which, at the height of the purlin, galvanized brackets are attached to the gables, on which the edges of the purlin are supported. The method is used mainly in the construction of lightweight roofs of country houses.
The first option does not involve sealing the edge of the beam in stone or brickwork. The wall material and wood should not be in direct contact, so as not to cause premature rotting of the rafter system. Therefore, the run is made 2 - 5 cm shorter in length than the size of the span to be covered plus the depth of both recesses.
An oiled or bitumen-impregnated wooden spacer from a scrap board is placed at the bottom of the niche selected in the pediment. The edges of the beam are filed at an angle of about 55 - 60º. In a similar way, the area of the end of the wooden element is increased in order to optimize drying of the wood and air exchange.
Before installing the ridge beam, mandatory treatment with an antiseptic composition is carried out. Then the parts located in the niche are wrapped with rolled waterproofing material. Any suitable water-repellent material, ranging from roofing material to a polymer membrane, is used as a wrapping waterproofing of the edges of the purlin.
In the second option, with the girder crossing the gable walls, preparation for laying and waterproofing of the beam is carried out in a similar way. The advantage of this scheme is that due to the removal of the consoles from the walls, the purlin beam is significantly unloaded.
The force acting on the console outside the house will bend them downward, bulging the central part of the beam upward. The considerable weight of a long wooden element, traditionally directed downwards, will resist this phenomenon. Thanks to the counteraction of two differently directed forces, the ridge girder will not bend in either direction.
Options for rafter structures on gables
The use of gables as supports eliminates the need for numerous structural elements placed within the attic or attic space. There is no need for the construction of very expensive internal load-bearing walls; the number of vertical supports is significantly reduced, and for short spans the number of vertical supports is reduced to zero.
The construction of a three-gable T-shaped roof is most often carried out according to the scheme with the purlins supported on the gable walls, because When performing work in the usual way, the design turns out to be unnecessarily complex. The construction and installation of numerous struts and truss trusses slows down the pace of construction. And when building a roof, it is strictly not recommended to reduce the speed, so as not to “get caught” during the rainy season.
Note that when constructing roofs with spans over 6 m, the structure, simplified by eliminating a number of supporting parts, will still have to be complicated. Ridge beams turn out to be too massive. In addition to the fact that special equipment will be required to lift them to the place of installation and installation, there is a risk of too much deflection in the middle of a heavy run.
The list of standard solutions for covering large spans with purlins supported on gables includes:
- Construction of a load-bearing wall in the box of a house with installation of a support or truss truss on it. The wall is built across the direction of the run.
- Dividing the ridge beam into two parts and installing a support post or building truss under the junction point.
- Installation of jibs supported in gable walls.
If the span does not exceed 7 - 8 m, then to unload the ridge beam it is permissible to use jibs or capitals on the gable walls under the edges of the long element. They will take on part of the load and decorate the interior.
Another effective way to unload a ridge beam that is too long is to install additional purlins that rest on the gable in the same way, but on the side and lower along the roof slope. The implementation of such a method prompts the thought: are rafters now needed in the roof design? After all, the lathing for installing the covering can be attached directly to the purlins.
Perhaps for structures without insulation you can easily do without rafters. In the history of construction there are such solutions, for example, rafterless roofs built on log houses. Their likeness is now being installed over houses with foam concrete or brick gables.
However, in the case of installing an insulated attic roof, some kind of imitation of rafter legs will still have to be installed, because thermal insulation requires the organization of natural ventilation. To do this, it is enough to install a block with side dimensions of 40×50 or 50×50 mm perpendicular to the purlins in increments of 0.7 to 1.2 m. It does not need to resist loads, it should simply form ventilation ducts.
Selection of material for ridge girder
It is clear that the main structural element of the gable roof frame is the ridge girder. It absorbs the main load and transfers it to the gable walls. Therefore, all calculations for the construction of a rafter system of this type are carried out specifically for it.
Suitable for installing a purlin:
- Beam. It is used when spans of up to 6 m are covered. When using longer elements, it is necessary to install additional support posts and struts.
- Log. Timber is purchased based on the design dimensions of the run with a reserve for processing the ends. The logs are not completely cut into two ropes, but only at the points of contact with the gable walls and rafters.
- Glued beam. Suitable for spans over 6 m, because has impressive strength and bending resistance, much greater than that of solid wood beams.
The cross-section of the material is selected by calculation, taking into account the typical wind and snow load values for the region. First, determine the values of bending moments M, expressed in kg×cm. If the purlin is composed of several beams, then the bending moment is found for the most curved part of the composite purlin.
When the result of the calculation of the bending moment becomes known, you can begin to select the cross-section of the material for the purlin device. To do this, either the height or width of the beam is arbitrarily set, and calculations are made using the formulas we provide in the graphical appendices.
The result obtained during the calculations must be checked for the maximum deflection value, which should not exceed 1/200 of the total length of the ridge beam. If the result meets the technical requirements, then a check is made for the maximum internal stress that appears inside the beam during its deflection.
If for both limiting states the “margin” of strength turns out to be quite large, you can reduce the height or width of the block. It is possible that as a result of repeated calculations it will be possible to significantly save on material. If the calculated deflection is greater than the technical limit, then the dimensions of the material for the purlin beam must be increased and calculated until the ideal result is achieved.
If a log is used to construct a ridge beam, then it should be remembered that the load-bearing capacity of wood that has preserved its structure is much higher than that of sawn timber due to the fact that its natural fibers are not damaged. Calculations are then made according to a formula aimed at calculating the characteristics of a solid scaffold.
By using logs to cover large spans, you can visually minimize the deflection using one of the ancient methods used by builders of large-scale log towers. They hewed the logs used to construct the ceiling beams in the form of a rocker, creating a kind of small arch in the middle of the log. The edges were hemmed from above to maintain the overall thickness of the element.
During operation, the rocker-shaped heavy logs bent in the middle and, as a result, turned into impeccably even floor elements. Nowadays, the described technique has also found application. It is used when pouring prestressed concrete beams; just a slight bend is almost unnoticeable, especially if the structure has already stood for several years.
How to calculate gables
Before proceeding with the construction of the pediment, it is necessary to carry out a series of calculations to determine its geometric dimensions that are suitable for the intended rafter system and the functional features of the attic space.
The calculation of the pediment of a gable roof should begin by determining its height - the distance from the ridge to the eaves. This parameter depends on the functionality of the attic space. If this is an ordinary attic for storing household supplies, then the sufficient height of the pediment is 1.4-1.8 m. When installing an attic - at least 2-2.5 m.
The height of the gable affects the overall impression of the roof of the building. If this parameter is too large and exceeds the height of the building from the ground to the attic floor, then the roof visually puts pressure on the walls, creating a suppressive effect. If, on the contrary, the pediment is too low, the building visually appears squat, almost flat. The optimal ratio of the heights of walls and gables approaches the proportion of 1:1.
Knowing the height of the pediment, you can determine the slope of the roof slopes (the angle at the base of the pediment). This calculation is performed using the triangle method.
The pediment of a symmetrical gable roof (the slopes are the same) is an isosceles triangle. The ridge is its peak. The base is the width of the house. The height of the pediment is the median dividing an isosceles triangle into two identical right triangles. One leg of such a triangle is the length of the slope, the second leg is half the width of the house.
The height of an isosceles triangle is calculated by the formula:
H=1/2*L* tan α, where:
- L – the base of the isosceles triangle-pediment or the width of the house;
- α is the angle at the base of the triangle or the slope of the slope.
Therefore, calculating the slope of the slope comes down to calculating:
tan α=2H/L,
after which the required angle is calculated using the Bradis tables.
For example, a roof is being erected on a house whose end wall is 8 m wide. The height of the pediment is 3 m. In this case, the tangent of the angle at the base of the pediment will be equal to: 6/8 = 0.75. And the angle itself is α = 37°.
The area of the pediment is also calculated using the triangle method. The formula used is:
S= L /2*H, where:
- L – the base of the isosceles triangle-pediment or the width of the house;
- H – pediment height.
In the above example, the gable area is calculated as follows: 3*8=24 m2.
After performing the calculations and determining all the most important dimensions of the pediment, you can begin its construction.
Preparatory work and calculations
Experienced craftsmen recommend erecting the pediment first, and then moving on to installing the roof. This will greatly facilitate the process, since the roofing creates certain obstacles during masonry work.
Making a pediment from a foam block with your own hands involves certain calculations. Having decided on the height, finding the total area will not be difficult.
Before starting work, markings are carried out. For this purpose, a rail is strengthened on the wall, the length of which corresponds to the height of the future pediment element. Its upper edge is connected to the corners of the walls with nylon cord. The end result is a triangle, the slatted top of which is considered the pediment apex, and the sides are highlighted with cords. After this, construction work begins.
Note that the construction of a pediment is possible before installing the roof or after carrying out such work.
Gable sections for sloping roof types are determined similarly. You just need to divide the façade plane into sector sections and determine the necessary parameters for each of them separately.
During the preparation of the project and carrying out all the necessary calculations, an important nuance arises. For one-story buildings, the height of the pediment is set in relation to 1 to 1 to the wall. As a rule, the wall with the basement section does not exceed three and a half meters. This value is quite enough to equip the attic space.
Suitable aerated concrete
Based on the types of aerated concrete material, structural blocks are suitable for the construction of basements and cellars as the load-bearing basis of the walls, with thermal insulation for the second, adjacent layer (if you want to make the cellar more comfortable).
You can also use structural and thermal insulation blocks, with the help of which the construction of partitions is carried out, dividing the space of the room.
autoclave complies with all construction technological standards of a number of regulations:
- GOST 25485-89;
- GOST 31357-2007;
- GOST 12852.5-77;
- SN 277-80.
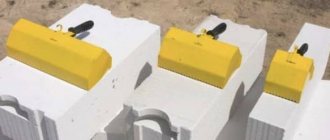
The difference in shape and size of aerated blocks can be seen in the photo below:
The selection of blocks by size depends on the project. Most often, straight blocks or with grooves are used for walls, as well as U-blocks (for a monolithic belt), which have all the necessary quality characteristics (density, strength, durability, thermal conductivity), which are well presented in the table in the photo above and below:
The most commonly used is a rectangular standard block: 600 x 400 x 300 mm, but you must pay attention to the manufacturer, packaging and mandatory labeling of the product. The density indicator D is of particular importance - the higher it is, the stronger and better quality the walls will be.
For the basement structure, structural type aerated concrete marked D500-D1200 is used.
Rules for installing gas blocks
What you need to know in advance:
- Before laying begins, beacons are installed on the foundation and the mooring line is tensioned.
The first along the perimeter of the future walls and a few more along the diagonals to check that there is no difference in height.The maximum permissible height difference between the sides of the foundation is 4 cm. This distance can be adjusted using a cement-concrete mixture.
- Before laying the first row, the surface of the foundation is reliably waterproofed. A rolled material, for example, roofing felt or membrane, is placed on top of it. The joints are treated with bitumen mastic.
- Before starting work, the blocks are leveled in height using a special hacksaw. This is done so that there are no differences between the surfaces of the elements and the seam is formed evenly. After creating a row and hardening the solution, the blocks are sanded again with a plane. This reduces the likelihood of cracks occurring.
- Start laying from the highest corner, then the rest can be adjusted to the height as you go. Geometric parameters are constantly measured and angles are checked.
- The first row is placed exclusively on cement-sand mortar. It does not shrink, is strong and can be used as a pillow when leveling out heights.
- The mixture is kneaded in portions so that it does not have time to harden.
- To apply the solution, use a trowel, which is the same size as the thickness of the wall. A tool with teeth is suitable, which will form an even, thin layer. The height of the teeth is 4-5 mm.
- The second row is placed 4 hours after the first so that the solution has time to harden. Subsequent rows are also laid after at least 4 hours. Thus, we can answer the question of how many rows per day you can lay - about 3-4.
- The blocks must be clean, all external debris must be removed from them and swept. If there are irregularities on the elements, they are rejected and used for cutting.
- If there is a height difference between the blocks, a grater is used. It helps align the elements.
- Reinforcement of aerated blocks begins from the first row and continues along the course of the laying every 3 rows. The procedure is also carried out at window and door openings.
- The connection of load-bearing walls and partitions is carried out by installing flexible connections. The dressing of load-bearing and load-bearing walls is done through the block.
- The masonry is created with rows laid out: each subsequent row is shifted by ½ or ⅓ (but not less than ¼ block). This is done so that the pressure on the walls is distributed evenly.
- The last row is reinforced with an armored belt, which helps to support the weight of the floors.
- After completing the work, it is recommended to wait 10-12 months until the house is completely dry and partially shrinks, then begin finishing. If brick cladding is planned, it is done immediately, connecting the walls with flexible connections. A ventilation gap of about 4 cm is maintained between the masonry.
House gable vibrations
Question:
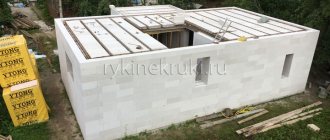
I built a 10x12 two-story house from D500 gas silicate. The width of the walls up to the second floor is 300 mm. Further along the perimeter, he laid muaerlat along the brick belt, nailed it with anchors, laid it with bricks and began to erect a pediment from gas silicate with a wall thickness of 250 mm, punching through each block with 10 mm reinforcement for connection with the lower block. The angle of inclination of the roof was about 45 degrees, and the height of the pediment was about 5 meters. Pediment from the side of a 10 meter wall. For safety, I secured the pediment to the U-shaped wooden structure of the gable roof with through anchors and tightened it with nuts. There is a road not far from the house. When passing loaded trucks, I noticed some vibrations in the gable. Question: What measures are needed to eliminate these fluctuations, or is there no need to do anything at all? The house has been under a roof for two years. And did I go too far with the height of the pediment? I read the SNIP and it says that for a free-standing brick wall the height should be no more than 4 meters (or am I mistaken)? The two gables are not separate, but are connected by the roof structure.
Alexander, Voskresensk.
Answer:
Hello, Alexander from Voskresensk!
Recently, the construction of residential buildings from gas silicate blocks has been increasing in volume. There are many reasons for this, including cost, environmental friendliness, and, perhaps, the most important thing - the lightness of the blocks and the ease of working with them. They prefer not to pay much attention to shortcomings.
To be honest, your house is a bit high. Two floors plus a pediment height of 5 meters are the maximum. While this is acceptable for houses located at a great distance from busy highways and railways, ground vibrations in nearby houses lead to vibration of the walls. Which is fraught with deformations.
Sinful, I myself drove heavy trucks directly through Voskresensk several times and didn’t even get caught by the traffic cops.
The trend of our time is to predict a further increase in road transportation. That is, draw your own conclusions.
I believe that you have in your hands a draft from the relevant organization, signed and certified. This is said as a last resort, if cracks appear in the walls. So that there is someone to present claims with their further satisfaction.
But let's hope it's not all that serious.
All stages of the construction you described using reinforcements in the form of brick belts, anchors and additional fasteners inspire optimism.
However, annual monitoring by external inspection of walls and gables, both inside and outside, will not hurt.
You did not indicate the type of masonry - expensive glue or mortar. Most likely the second, when the surface is often plastered in addition. Then the slightest disturbances from vibration will be immediately noticeable.
Well, if, after all, in ten years there is force majeure, then, as an option, dismantling the gables and replacing them with wooden ones, or with wood plus siding.
(Especially since the design of your rafter system has U-shaped roof elements). It will be cheaper than breaking them now in predicting what is possible and when there will be irreversible deformations.
This is my subjective opinion.
As a distraction. I have seen industrial buildings (extensions to workshop bays) as tall as your house. They had deformation failures. The reason was not the heavy traffic nearby, but the work of thousand-ton presses.
The walls were reinforced from the outside with pillar-columns made of welded channels. Covering them with bricks. It looked quite tolerable. But this is about different options.
In any case - good luck to you!
All questions to Semenych about construction
Semenych (author of materials)
Our site is regularly updated with interesting and unique materials and articles on the topics of lumber, building materials and works, the author's opinion and knowledge of a real coven with more than 15 years of experience are provided. There is a section - funny stories of shabashniks. If you would like to receive information about this, subscribe to our website's newsletter. We guarantee that your address will not be shared with third parties.
Apartment renovation in Moscow and Moscow region
We work with a guarantee! Wide range of repair work.
Professional craftsmen. +7 (905) 797-20-34
luxurycomfort.ru
| Country house | Bath |
| For the dacha | Tool |
| Materials | Tales |
| Foundation | Log houses |
| Roofs | Insulation |
| Walls | Siding |
| Floors | Cellars |
| Attics | Doors windows |
| Stairs | Extensions |
| Wells | Toilets |
| Balconies | Loggias |
| Condensate | Flooding |
| Fences | Kennels |
| Sidewalk | Birdhouse |
| Adobe | Carts |
| Garages | Barn |
| Greenhouses | Bath |
| Swing | Brazier |
| Shower |
| Horizontal bar |
Attic installation: how to make gables from aerated concrete blocks with your own hands?
How to make gables from aerated concrete blocks yourself? Where to begin? What are the nuances and features? What should you pay attention to?
Aerated concrete blocks are a good material from the point of view of heat and sound insulation properties, which are quite capable of constructing a pediment with your own hands. But there are certain nuances here:
- firstly, the specificity of aerated concrete is that it is afraid of exposure to moisture and therefore you will have to protect it from the outside (plaster it, or cover it with siding, clapboard, etc.);
- secondly, this is a fragile material and when constructing a pediment, it is necessary to make a reinforcing belt at the base of the pediment.
The technology for laying aerated concrete blocks is similar to brickwork.
The pediment can be erected first,
What should you pay attention to?
You need to pay attention to the design documentation according to which the structure is being erected. Attic installation: how to make gables from aerated concrete blocks with your own hands?
Attic installation: how to make gables from aerated concrete blocks with your own hands?
If you build “by eye”, then decide for yourself what height of the pediment you need, how to make reinforcement, and so on, including whether an armored belt is needed, or you can do without.
The pediment made of aerated concrete blocks is a continuation of the building wall (end).
Externally, it is an isosceles triangle (as an option).
In order to stay within the framework of this triangle, we attach a rail to the end of the wall at the height of the future attic.
The rail is strictly in the middle of the end wall (we find the middle with a tape measure).
We stretch the cord from the top of the slats to the edges of the wall, that is, the pediment is visually already formed.
Next is the masonry itself within the boundaries of the markings.
Masonry is no different from masonry walls.
It is better to use glue for aerated concrete blocks.
The glue is applied to the surface with a trowel, then grooves are formed with a notched trowel (don’t forget about the ends of the blocks, we also form grooves on them).
Masonry with brick-type ligation (in a run-up).
Lay the block down and press it slightly against the one next to it, you can tap it a little with a mallet.
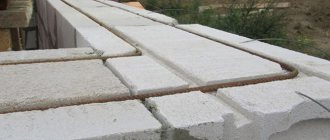
Near the cord (see above about the isosceles triangle), the blocks are cut at an angle, or the masonry is laid in steps; at the end, the voids are filled with cut blocks.
Every three or four rows, we reinforce the masonry; a groove is cut into the block into which the reinforcement is laid (this is when laying with glue, because the thickness of the seam is minimal).
We do not leave the gables unfinished for a long time.
Aerated concrete is a good material for building a house, including for building an attic, but in order to do it you need to be thoroughly familiar with the characteristics of aerated concrete itself, first of all you need to know that this material is quite fragile and absorbs moisture very well. And therefore it must be protected from the external environment.
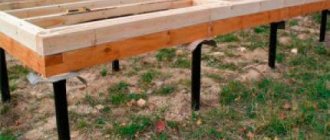
To build gables from aerated concrete, it is necessary to build an armored belt; it will strengthen the entire structure of the rafter system and will hold the attic gable well. Here is an example of how an armored belt is made directly on aerated concrete blocks from wooden formwork, everything is extremely simple:
We make formwork around the entire perimeter, put in reinforcement and fill it with concrete. It is on this armored belt that the pediment is placed. In general, it is not recommended to build a structure made of aerated concrete more than two floors due to its fragility, but when an armored belt is made, it increases its power.
There are no special nuances for the construction of a pediment; it is laid like an ordinary brick; the main thing in the design of such pediments is that it does not need to be made very high in order to avoid overloads on the walls.
And lastly, the entire aerated concrete structure must always be protected with plaster.
How to calculate and arrange a pediment with your own hands for a block house
The pediment is usually called the end part of the roof located between the slopes. I will not say that making a pediment with your own hands is easy, but believe me, such a task is quite within the capabilities of an ordinary home craftsman. Without going into architectural subtleties, we will step by step analyze the technology for constructing the gable roof gable for a house made of aerated concrete, plus I will give a simple calculation of this sector of the roof structure.
The upper part of the facade, “sandwiched” between the planes of the roof slopes, is called the pediment.
In addition to the gable structure with two gables, there is also a multi-gable or three-gable roof, the rafter systems are different, but the technique for arranging the fronts does not change depending on their number.
A three-gable roof at the ends is arranged in the same way as a gable roof.
Creating a Project
The rules for drawing up a garage project allow you to determine the size and nuances of the building, determine the volume and cost of materials. The project can be ordered from specialists or done independently.
Drawing up a drawing yourself requires certain skills. Professional versions of the project will look like this:
Features of the project will depend on:
- number of cars – 1 or 2;
- number of storeys;
- planned communications;
- gate;
- wall thickness;
- shape and size of the roof;
- inspection hole;
- mini workshop;
- bearing load on walls;
- foundation.
The project, in addition to dimensions and design features, must also take into account:
- climatic and landscape conditions;
- nature of the soil;
- location of groundwater;
- proximity to other buildings and communications;
- type of future finishing.
Depending on the soil, a strip or monolithic foundation is developed, which is installed after excavation and backfilling of the sinuses. Each project is individual.
Construction
At the design stage of a private house or cottage, you should decide on the design of the gables and the materials for its construction. There are two approaches
- the upper part of the end wall is made of the same material as the lower one;
- Lighter material (usually wood) is used to install the pediment.
In the first case, the entire wall from the foundation to the roof ridge is assembled from bricks, blocks, logs or timber. In the second, any of the above materials can be used for the lower part of the wall structure, and the upper part will be a timber frame covered with boards.
The second option is preferable for those who are building a house or cottage with their own hands.
. Without professional skills, it is difficult to make strictly isosceles and identical triangular completions of both end walls made of brick, porous concrete blocks or logs. It is much easier to build a frame from lumber and cover it.
Types of garage blocks
The first thing you will have to decide before starting to build a garage is what material you will use. There are quite a lot of durable materials for construction: brick, concrete, iron, wood, foam blocks. Recently, blocks for garage construction have been used most often. This is due to reasonable cost and practicality. But foam blocks are also different, let's look at their features.
Foam concrete garage
Foam concrete is a mixture of cement and foam, which is made using special equipment. Air bubbles are evenly distributed throughout the entire volume of the block and form small cells. The density of foam concrete is different, it varies from 200 to 1200 kg/m³, which indicates the strength and reliability of the material.
There are three main types of foam concrete blocks, based on density:
- D200-500 - such blocks are often used for thermal insulation; they are not very durable, but have low thermal conductivity;
- D500-900 - blocks are used in the construction of residential high-rise buildings, they are highly durable and do not allow heat to escape;
- D900-1200 – high-strength blocks, used in the construction of high-rise buildings.
Cinder block garage
Cinder block is one of the most inexpensive materials for construction. It is made by vibration pressing from ash, sand, crushed stone, gravel or shell rock. The binder in the production of cinder blocks is cement. In addition, a cinder block may have additives that increase its thermal conductivity (for example, expanded clay). The density of such blocks, as a rule, varies from 500 to 2000 kg/m³. Use the hint when calculating the brick consumption for a cinder block garage.
Cinder blocks are divided into two types:
- hollow (12-14 kg);
- full-bodied (15-28 kg).
Garage made of expanded clay concrete blocks
The technology for manufacturing expanded clay concrete blocks is similar to the production of foam concrete, but the composition necessarily contains expanded clay. Thanks to him, expanded clay concrete blocks are light and very porous. Such blocks have good thermal insulation and are almost eternal.
Expanded clay concrete blocks come in three types:
- thermal insulation;
- structural and thermal insulation;
- constructive.
Garage made of aerated concrete blocks
Aerated concrete blocks are made from gypsum, sand and a special gas generator. Their structure is similar to foam concrete, but with much smaller pores. This provides aerated concrete with the correct even shape, dense structure and low weight. In addition, aerated concrete blocks are easy to cut and can be easily given the desired shape. In addition, they have fire-resistant properties.
Aerated concrete buildings are durable and economical. However, they require mandatory reinforcement in order to prevent cracking during shrinkage.
Garage made of gas silicate blocks
Gas silicate blocks are similar to aerated concrete blocks. However, they also have differences. Firstly, the main binding element in gas silicate blocks is lime. Thanks to lime, such blocks, unlike other foam blocks, are white. Secondly, autoclaving technology is necessarily used in production. The density of gas silicate is from 300 to 900 kg/m³. It retains heat well, has a smooth, even surface and is highly fire resistant.
Types of thread
Wood carving differs in its level of complexity. The owner of a country house can choose an option according to his taste and financial capabilities. There are three main types:
- blind or ship's work is performed directly on logs; nowadays it is used extremely rarely, since such work can only be done by a skilled craftsman and is highly valued;
- with the help of sculptural carvings they create individual figures that stand out against the general background, for example, it could be the head of a horse or a figurine of a rooster on the crown of a roof; such work requires special skills and abilities;
- openwork through thread is made with a jigsaw, the blanks are cut out in the workshop, then fixed to the facade; this option is the most common due to its low cost.
By creating a single ensemble, you can combine several carving options. In most cases, plant motifs are used; geometric patterns are no less popular. Experienced carvers can cut out animal figures and create complex, intricate plots.