Textured plaster. Definition
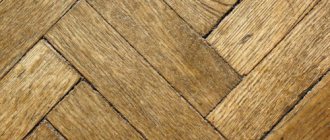
Textured plaster is one of the varieties of decorative wall finishing that you can do yourself, and which is a heterogeneous mass with granules of various sizes, also called plaster grain. Crumbs of various natural materials – marble, granite, quartz or plant fibers – can be used as this grain. It is the presence of granules or fibers that gives the surface where such plaster is present a unique unique look. The wall can take the form of a wooden or stone surface, create the illusion of crocodile or snake skin, and so on. The stone surface is achieved through classic trowel application. Wood, brick or leather can be obtained by using certain tools. The good thing about plaster is that it allows you to create the most bizarre surfaces, bringing the designer’s imagination to life.
Types of textured plaster
In addition to granules, textured plaster contains a binder, which can be:
- mineral;
- acrylic;
- silicate;
- silicone.
Mineral base
The mineral binder is cement. Such compositions are prepared in the form of dry mixtures, which must be diluted with water before application. They are applied to many mineral surfaces and are distinguished by high performance in terms of fire safety and vapor permeability, as a result of which they are used for finishing building facades after insulation. They are also used for interior work.
Acrylic base
The acrylic binder is made on the basis of acrylic resin and is a ready-made water-dispersion mixture. Can also be applied to all types of mineral coatings. In terms of vapor permeability, this type of plaster is somewhat worse than cement-based plaster, but in terms of resistance to external climatic factors it is significantly superior.
Silicate base
Silicate-based plaster is a ready-to-use mixture where “liquid” potassium glass is used as a binder. This composition can be applied to all types of substrates. The disadvantage of this plaster is its low environmental friendliness, as a result of which it is not used in Western European countries. In addition, silicate plasters have a higher price compared to mineral and acrylic plasters, and their color range is limited. Repairing or painting such coatings should be done only with silicate-based materials, which is not always convenient.
Silicone base
The silicone binder is made from resins of the same name, so plaster based on them is the best material for repairing walls and restoring ancient buildings and structures, since it has a long service life. This type of coating has increased properties to repel dirt and dust, high vapor permeability and hydrophobicity.
- When choosing plaster with a silicone binder, you should select primers or putties based on the same base. You also need to know that this type of plaster is the most expensive among all others.
In structure, textured materials are similar to “dough”, or a mixture based on granite/mineral chips, which can very roughly be divided into the most commonly used:
- fur coat;
- bark beetle;
- lamb.
The appearance of the structure is achieved not only by the presence of a certain amount of plaster grain, but also by the tools used and various technologies for applying the composition to the wall.
What is textured plaster?
Plaster is most often produced and sold in the form of a dry powder, which must be diluted with plain water before use. The composition of this material varies in composition and may contain lime, sand, granite or marble chips.
It is on these components that the relief of the surface being coated depends. Often, other ingredients can be found in the plaster that improve its qualities, increasing impact resistance, moisture resistance and the different structure of the surface to be coated.
Special coloring components can be purchased separately from the dry mixture. When the powder is diluted with water and ready for use, the composition is applied to the wall with a brush, spatula or roller.
Read here - Do-it-yourself garage roof - options for how to make a roof and tips for carrying out the work in a review with photos and videos!«>
Plaster of a denser structure is applied to the surface using a tool called a trowel. The use of a material such as decorative plaster in renovation allows you to create different surface reliefs and bring to life the most daring interior design ideas.
Decorative plaster is used both for indoor and outdoor work. Textured relief is in most cases used as a finish, but can also be covered with paint on top.
Textured plaster advantages
The main advantage of this type of finishing can be:
- Fast wall surface treatment.
- The ability to make the desired coating with your own hands.
- Its inability to fade.
- Low cost.
- Mechanical strength.
- Fiber fiber is added to some plasters, which inhibits microcracks up to 3 mm if, for example, the house shrinks.
- Plaster well masks all surface irregularities. It can be colored after it is applied to the wall or during the preparation of the plaster mixture by adding pigment of the desired color.
- Textured paint is cheaper than expensive wallpaper, which has a much shorter service life. It is practically harmless to humans and animals, during fires it does not emit toxic substances, is not flammable, and has a high resistance to mechanical damage comparable to the most durable types of wallpaper. But its main advantage is that when used, various textures are created that imitate the most expensive types of natural materials.
- If you count the cost of drywall (used to level walls for wallpaper), the price of the wallpaper itself, the price of glue and putty, then textured paint will turn out to be completely inexpensive, and possibly less than other coatings. And in addition to this, you need to calculate the time for finishing the walls with plasterboard, puttying, drying time, and wallpapering the walls. The application of textured paint is much faster, and any errors can be corrected immediately, which cannot be done when decorating walls with wallpaper. Decorative plaster in the interior looks modern and very impressive.
And a few words about cleaning.
Plaster cleaning
For textured plaster, color is achieved either by painting the entire base, which increases the cost of the material, or by applying protective wax with the addition of pigment. If, when painting the base, the color is not lost over time and damage, then if the wax is accidentally damaged, you can see the white base through it, and if the wax is not acrylic, but natural, water-based, it can generally be washed off with water. Therefore, when cleaning, you need to be selective in the selection of detergents.
Textured plaster options
Let's consider 2 options for plaster that you can work with.
Dry textured plaster
Dry mineral mixtures require first of all their preparation, which takes time and physical strength. In addition, when preparing a solution from dry material, it is necessary to strictly observe the proportions of water, since an incorrectly selected composition can subsequently manifest itself as low strength, loss of shine and color, and for cement-lime mixtures, also the appearance of white spots (efflorescence).
Preparation of a solution from a dry mixture always involves the correct calculation of the required amount to treat a specific surface. When the calculation is made incorrectly, you need to either additionally prepare a new portion of the solution or throw away the excess. And this entails a waste of time and materials.
To prepare a solution from a dry composition, you will need a container and a drill with a “mixer” attachment. You can read more about this in the article: Technology for preparing mortar from a dry building mixture.
Dry mixtures are usually produced in paper bags with a shelf life of six months. Long-term storage of the cement mixture in such a container leads to the fact that the cement inside the bag sets and a crust is formed, which is no longer good for anything, and this is a loss of material that still costs good money.
Ready-made textured plaster and its advantages
Ready-made acrylic plaster can be stored unopened for up to two years without losing its qualities if the temperature is not lower than +5.
The consumption of cement plaster (a solution obtained from a dry mixture) is 3.8 kg/kW. m, while acrylic (finished) - from 1 to 2.4 kg/kV. m, depending on the grain size.
The time for complete drying of cement-lime plaster (a solution obtained from a dry mixture) reaches 28 days, acrylic (ready-made) dries for 7 days.
The advantages of acrylic plasters can be continued to be listed, but even the above makes the use of ready-made acrylic plasters more attractive. Numerous reviews from builders are also in favor of ready-made acrylic plasters.
Applying textured plaster with your own hands is not a completely trivial job, similar to the usual plastering of walls that we are used to. And we will talk about the process itself below.
However, if you are not confident in your abilities, and at the same time this topic has become interesting to you, and you are seriously thinking about following a fashionable modern trend, then it is better to entrust the decoration of the interior of your house to real professionals and masters of their craft, since working with any type decorative coating requires not only accuracy and experience, but also a design solution.
Materials for work
To create textured or Venetian decorative plaster, you will need the following compositions:
- Putty. Polymer (acrylic, silicone) compositions have good plasticity and are easy to apply, but their cost will be higher than that of conventional gypsum putty.
- Dye. The number of shades is selected depending on the planned result. Textured plaster involves the use of 1–2 colors, Venetian plaster - 3 colors.
USEFUL INFORMATION: Calculation of plaster consumption per square meter
Important! One of the colors is chosen as the main one, the rest are complementary. Before purchasing, it is better to study the palette of shade compatibility.
- Primer. An acrylic composition with deep penetration is suitable.
- Wax for decorative plaster or acrylic varnish.
- Glitter (shine) depending on the desired effect.
- Mother-of-pearl enamel (gold, silver).
The material is purchased depending on the type of decor that you would like to receive.
Textured plaster application technology
Decorating a room with decorative materials requires that a person, if he himself decides to decorate the walls, has artistic taste, an understanding of color and the ability to foresee the desired result of finishing.
The process of covering a wall with textured plaster is similar to applying putty to the surface.
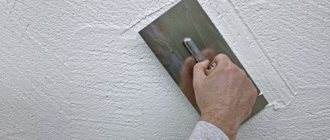
A certain amount of textured mass is applied with a spatula and with the necessary spatula (depending on the selected pattern), with uniform smooth movements from top to bottom, bottom to top or in different directions (depending on the selected pattern), the mass is leveled over the surface. In addition to a spatula, a variety of devices and tools, including your own hand, can be used to create a specific pattern.
To make a room in one color, you must first select the desired color and tone using a small volume of textured mass, and then make the solution in the required quantity (this applies to dry mixtures that are not colored). As for ready-to-use compositions, everything has already been selected by the manufacturer, and your task is to apply the composition to a small section of the wall to see with your own eyes how this or that color or tone will look in the overall interior of the room.
It should also be taken into account that each decorative material has its own drying or setting time from the start of application. Therefore, you need to try to apply the composition to the wall within this period of time and give it the desired texture. Experts advise treating walls in areas of no more than 2-3 square meters.
To obtain a unique interior or facade, different methods of applying texture composition are used and there is no limit to imagination. Everyone can come up with their own design and a way to reproduce it on the surface. However, you should follow the prescribed recommendations of the plaster manufacturer.
DIY technology for applying textured plaster
Having selected the appropriate material, you can begin to design textured walls. Since the freshly applied layer of plaster hardens quickly on the wall, you will need to work at a fast pace, preferably with two people. You will need to apply a thick layer of plaster to the wall and smooth it with a spatula or trowel, and then form the finishing relief using suitable tools. After 10-15 minutes, the textured coating will completely harden, and it will no longer be possible to make any adjustments.
Preparatory work
Before applying textured plaster, you will need to first prepare the surface of the walls. To do this, old wallpaper, peeling whitewash and paint are removed from it, so as to obtain a dense and uniform surface. There is no need for painstaking leveling of the walls - textured plaster will subsequently hide small unevenness and minor surface defects. Next, a deep penetration primer liquid must be applied to the cleaned, dry surface. It is necessary to treat the walls in this way one day before applying textured plaster. The primer composition will fill microcracks in the surface and help avoid the development of mold and mildew under the plaster.
To apply a textured coating to the walls, you may need trowels, plaster trowels, spatulas of various sizes, special rollers, sponges, stamps and other devices for shaping the surface relief. Depending on your desire, you can achieve different results as a result of this wall treatment.
Methods of applying textured coating
There are various ways to decorate textured walls with your own hands:
- with a roller with a pattern applied - this method is easy to implement and allows you to quickly obtain a spectacular textured coating;
- using a special stamp to give relief - you will need to apply a base layer of plaster with a trowel, and then leave impressions with a stamp on the surface in the right places;
- A textured roller for painting walls (the so-called sprayer) will help achieve various original decorating results. To obtain the “torn surface” effect, you will need to apply the plaster using a trowel, and then treat this layer with a texture roller. Alternatively, you can apply the initial layer of material with a roller, and then work it over with light smoothing movements of the spatula.
It is also easy to give textured plaster an original relief using a special comb or a notched trowel, a sponge, or a plastic bag. After experimenting a little on a small area, you can then implement the decoration effects you like on the walls. After the coating has completely dried, you can begin painting the surface.
You can create the effect of textured walls “like a fur coat” using ordinary cement-lime or cement-sand plaster using the spraying method. For this it is convenient to use special devices (compressors). In the absence of such, a brush or broom with a layer of material is used as tools, as well as a stick for tapping them near the surface to be treated and a metal mesh through which the solution is sprayed onto the walls.
How to apply textured plaster
The general production technology is as follows:
- foundation preparation work;
- applying the first layer (sometimes called plaster);
- applying a second texture layer;
- painting the texture (if the selected wall design requires it, or a composition without coloring pigments is used).
The prepared solution for the first (plaster) layer should have such a consistency that it is not too thick, but also does not flow off the vertical surface. And to do this, you need to apply the solution on a separate section of the wall and see how it behaves. If necessary, dilute with water or add dry material.
It should be noted that only one master is allocated per room for applying the texture, since each master has his own signature (style of work) so that the texture is the same on all walls.
If you doubt that you can cope with the technology of applying textured plaster on your own, contact specialists - they will help you. This type of finishing work requires certain skills and craftsmanship.
How to make textured plaster with your own hands - step-by-step instructions
The production technology consists of preparing the base, applying plaster (base) and texture layers, painting and, if necessary, varnishing.
The peculiarity of using textured plaster is that it can be used on walls with minor unevenness and defects (if the convexities/concavities are very “dancing”, then you still have to level them, but not so carefully).
So, let's start creating!
Step 1. Prepare the walls: prime the already plastered surfaces (preferably twice and with deep penetration primer). We are waiting for complete drying. If you plan to create a fragment (panel), then the selected location should be limited with adhesive paper tape, after removing which smooth borders will remain (remove using wet plaster).
Step 2. Apply the base (plaster) layer, you can say the substrate. To do this, we dilute a dry mixture or putty (they are poured into water, and not vice versa), taking into account what kind of pattern we will apply (the thicker it is, the more textured the result will be). To find out how the finished solution behaves, we try to apply it to a separate area (adjust if necessary by diluting with water or adding dry material).
This step will be very simple if you have chosen a ready-made mixture - with a slight movement of your hand, open the bucket with the solution.
Note that the layer can be “two in one”: both base and textured at the same time, that is, the pattern is applied to one layer (this is done when special relief is not required). In general, the rule is this: the more complex the texture is needed, the more layers are required, and the smaller the thickness each should be.
How to apply? It’s a common thing, nothing complicated. There are several application methods.
You can scoop the plaster onto a trowel, spread it onto the wall, and then level it with a wide spatula. Or you can apply it directly with a spatula, performing leveling and smearing movements in different directions, avoiding gaps. It will be easier for novice craftsmen to sketch and pre-level with a trowel, and then finally smooth it with a spatula.
Step 3. Create the actual invoice. We work evenly, preferably with the same amplitude. The pattern depends on the instrument.
If you use special devices such as a boisette or a trowel, you can recreate the texture of wood.
If the result is far from perfect, without any regret we level out the failed textured work with a spatula and start over!
Step 4. Wait for it to dry (about 24 hours), lightly “sand” the sharp corners with sandpaper, brush off the dust, prime and begin painting, coating with a translucent varnish composition (2-3 layers), opening with wax or special impregnations. For painting, use brushes, rollers or mittens.
Facade textured plaster
Textured plaster for finishing facades can have a decorative appearance, called among finishers:
- fur coat;
- bark beetle;
- senator.
Fur coat
Facades finished to look like fur coats can still be seen on houses built 40-50 years ago. Usually these are gray walls, without the presence of any coloring pigment in the solution, and the adjacent surfaces of corners and foundations, finished with smooth plaster. The modern “fur coat” is somewhat different in the presence of color and the very composition of the solutions, which may contain various fillers, both mineral and synthetic.
The finished mixture can be applied to the wall using a special device designed for the production of this particular type of plaster. The solution is prepared on site from dry mixtures or from individual components (white cement, sand, water, coloring pigments), and thoroughly mixed with a construction mixer.
To obtain large grains, the solution must be relatively thick, but such that it can be easily poured into the solution application device. The cement mass is thrown onto the wall from above, preventing sagging. Apply 2-3 layers without waiting for the previous one to dry, so work is carried out in small areas. It is advisable to treat the entire surface of the wall at a time, without a long break. But if this happens, then the edges of the finished “fur coat” need to be covered with plastic film to prevent them from drying out and subsequently cracking in these places.
If there is no such device and the wall area is small, you can apply the solution using a broom, hard brush or brush.
“Fur coat” plaster can be obtained by using ready-made mixtures based on acrylic or other binders, but here there will be a completely different type of coating, only vaguely reminiscent of the traditional “fur coat”. The finished mixtures are applied using a spatula or a textured roller in one layer.
Bark beetle
“Bark beetle” plaster is created due to the presence of marble or granite chips (grains) ranging in size from 0.1 to 4 mm in the solution. The grain size affects the consumption of plaster mass for processing 1 square meter. m. surface. The larger the grain, the more solution will be required.
Each manufacturer writes recommendations for its use on the packaging of their product, and they should be followed if you want to get a high-quality coating.
Before applying bark beetle plaster, the surface must be treated with ordinary cement-sand mortar or special compounds - barite or warm plaster. After this, a solution is prepared.
Water at room temperature is poured into a clean container and the finished dry mixture is gradually added, with continuous stirring, to avoid the formation of lumps. The finished mass should stand in a closed container for 15-20 minutes, after which it is mixed again.
- When applying the decorative layer of bark beetle, the finished solution must be constantly stirred to prevent it from hardening. If this happens, under no circumstances should you add water to the frozen solution, as this can lead to delamination of the plaster mass and deterioration of its properties.
Therefore, the area of the surface to be treated and the amount of solution must be calculated based on your strengths and skills. If it is necessary to take a break from work, the edges of the fresh plaster are covered with masking tape, on top of which a layer of mortar is applied. Afterwards, the layer of plaster can be trimmed and removed, just like the masking tape.
Using a metal spatula or stainless steel float, apply the solution to the wall and level it. In this case, the tool should be in the worker’s hands at an angle of 60 degrees to the wall. The thickness of the applied layer should correspond to the size of the largest grain.
After 30-40 minutes you can begin to form a decorative pattern. To make sure the plaster is ready, you can place your palm on it. If your palm does not stick, then you can safely continue working. A pattern imitating wood eaten away by a bark beetle is obtained using a plastic grater, which is applied flat to the wall and voluntary movements are initiated with it.
As a result, the stone chips make grooves of different directions, widths and depths in the mortar. Depending on the speed of movement of the grater and the direction, you can get a different pattern.
The plaster should dry at a temperature of +5-30 degrees, with air humidity no more than 80%. On facades, the drying time is extended to 48 hours, during which the treated surfaces should not be exposed to sun and rain. To do this, they are covered with plastic film directly over the scaffolding. Painting compounds can be applied after the plaster layer has completely dried. Silicate paints can be applied after 3 days, acrylic paints - after 14 days.
Senator
Senator plaster is a ready-to-use mixture based on acrylic resins with grain sizes of 1-3 mm. The entire coating set consists of two types, one of which is plaster paint with color, the second is the decorative coating itself.
The composition is applied to the surface with a metal spatula, trowel or stainless steel trowel and leveled until no solution remains on the tool. After this, a grater is used to create a pattern, slightly smoothing out the sharp protrusions. Granules of various sizes are randomly distributed over the surface, under the grater, and give the surface a lamb-like appearance.
To ensure that the surface does not have visible joints, the junction of the two treated areas is quickly smoothed with a spatula or trowel, preventing the solution from hardening at the border.
I think now you are convinced that textured plaster with your own hands will truly change the interior of your home, but you need to remember that this is an unusual plaster. This requires specificity, certain work experience and artistic taste.
This is where the article ends. Today we learned what textured plaster is, what types it comes in, what its main advantages are, and how it is cleaned. We considered options for dry mixture and ready-made solution. We learned how to properly apply plaster on walls, and became acquainted with façade plaster such as: fur coat, bark beetle, senator.
Methods for applying textured plaster
Having decided on the choice of texture and color of the plaster, the most important issue is the application of textured plaster. It is extremely difficult to find a specialist who can handle this or that structure or terrain. Many of the workers are capable of taking on the simplest of textured plasters, but they will push you towards them as much as possible, ignoring your desires, presenting you with false arguments about complexity, resistance to mechanics and similar factors. To avoid paying again for expensive material, you should know some nuances, which we will cover in the text below. Surface preparation should never be ignored. Remember the main thing - this is your home, you live there. Study as much as possible the building materials that workers use for finishing and preparing the base of the decor. Avoid direct contact of the decor with gypsum and other hygroscopic materials.
Preparing the surface for applying textured plaster
Depending on the type of textured plaster, the base must be level. Rough unevenness, depending on the type and purpose of the room, must be plastered with gypsum or cement composition. After it has completely dried, the surface is sanded and leveled with putties on a polymer-cement or organic basis. Ready-to-use putties, such as Imperia-pasta, are recommended. Do not forget about priming before applying each of the layers, including decorative ones - removing dust and improving adhesion guarantee 95% of successful adhesion of the decor to the surface. After all the above procedures, you can begin applying textured plaster directly, not forgetting to arm yourself with a special tool.
Necessary tool for applying textured plaster
Regardless of the type of textured plaster you choose, you will need a special tool. It is very different from a regular painting tool. In most cases, you will need a Venetian trowel because it has rounded corners and edges, durable, mirror-polished surgical steel, and a strong, secure handle. Of course, you can sharpen the edges and corners of a regular smoothing iron, but if it still pries the material or leaves scratches, you will have to accept this fact and live with the defective texture, since it was your choice. Saving on a specialized tool leads to unjustified risk.
So, depending on the effect and type of textured plaster, you will need:
- Roller for applying primers, primers, paints, substrates
- Venetian trowel (All textures except the “sand wind” effect)
- Venetian spatula (All textures except the “sandy wind” effect)
- Sea sponge (Moroccan plaster, oriental silk)
- Flat brush (Pearl, Etna, Sandy wind, world map, concrete and others)
- Structural roller (creating a “fur coat”)
- Decorative spatula-brush (“concrete”, “canvas” effect)
- Plastic rectangular trowel (bark beetle plaster)
- Round trowel (wet silk, oriental silk, frosty frost, anegri and others)
- Relief rollers, stamps (crocodile skin, birch bark, rustic, brick, crack effect and others)
- Sponges for matting, glazing and toning