How to make ventilation from a cooler
Alex-man
Are there check valves on hoods? Did you write an application to the Housing Office?
Added after 1 minute
This is not your problem - it is the housing office's problem. Get a commission to inspect non-functional ventilation. If the commission finds fans in their neighbors’ homes, they will insert good caps into them with instructions to dismantle the unauthorized equipment.
You won't achieve anything by simply installing fans - the neighbors will immediately see that their exhaust has become worse and will simply install a more powerful fan.
at temperatures of +20 and above, ventilation basically does not work
if you don’t install a fan of gigantic performance, there will be no harm to the neighbors, especially to the main shaft, the air flows through its own channel (2.5-3m), the main thing is that you or the neighbors do not interfere with the main channel, if the scheme is a channel to the floor - in general no problem, at least install a turbine
usually they start by trying to remove debris from the channel (construction debris, dust, and sometimes dead pigeons), the following is to ensure air flow into the room: a gap under the door, a system for not completely closing plastic windows (complex valves or simple combs) .
If the toad does not choke, it is easier to buy a regular one “for extraction”. it’s somehow more elegant:
Source
Making crafts from improvised means
It takes 15-30 minutes, no more, to make a simple but working table fan. Such a device will cope with its main function - to blow, but from an aesthetic and practical point of view it is still worth complementing it with a beautiful and practical case with a stable stand.
To work you will need: a stripping knife, a USB cable, electrical tape. Optional: a piece of plastic or plywood, thick wire, pliers, soldering iron and glue.
- We remove the cooler from the old power supply, case or central processor.
Exhausting a computer cooler: step-by-step instructions
This type of device is the easiest to manufacture; it can be made in one day, and it will bring a lot of benefits.
- We need to get a computer cooler. This is an electric motor with blades - a mini-fan that cools the inside of the computer. It can be removed from an old car or purchased at a specialized electrical goods store.
- The motor supply voltage is 12 V, and the network is 220, which means you will need a power supply. The power supply from a laptop is ideal. It’s true that the output voltage is a little higher, but this will not harm our device - it will rotate faster. You can also look for power supplies from different devices (game consoles, children's toys), or, as a last resort, buy them.
- Frame. The manufacture of the housing should be approached with special care; the ease of operation will depend on the angles of inclination. There are a lot of examples on the Internet; the easiest way is to make a body from plywood and cover it with fabric. In any case, such little things can be corrected later.
- Safety net. As a protective metal mesh, you can use a standard computer mesh.
- Assembly of the structure. The cooler and mesh are attached to the body with self-tapping screws. When connecting the fan, the main thing is to observe the polarity; if it doesn’t work the first time, then you need to disconnect the device and swap the wires. If the power supply is needed for some other purpose, then you will have to install a connector, and if it is used only for a manicure vacuum cleaner, the wires are soldered to the terminals of the electric motor and insulated. If you wish, you can also install a microswitch on the side panel.
- Garbage collection bag. Take a ready-made bag from shoes or sew it from fabric. The bag is attached to the cooler with elastic bands.
Craft product Modeling design COMPUTER HOOD Waste material
During the construction process, I left a small window between the bathroom and the kitchen, into which an exhaust fan was installed. Without it, without its temporary operation, the air in the bathroom becomes musty: humidity, miasma. However, the fan was so powerful that the wife was frightened by its noise and believed that it was consuming too much electricity. Therefore, it was necessary to turn it on only in her absence. The time has come for my screwdriver to die. True, only to its batteries. I attached a screwdriver to an old car battery and got rid of buying a new device and constantly fiddling with charging; for a year now the screwdriver has been working from the new power supply without recharging. The old screwdriver charger remained abandoned. I began to think about where to adapt it. It produces 12 volts of voltage with very little power. ABOUT! There are coolers (small fans) from old computers that are also lying around idle. They found each other! From this pile of rubbish you will get an excellent hood, almost silent and consuming almost no energy. I removed the old fan (along the way I came up with a new use for it - I’ll do it and describe it). 1 is the plug that supplied it with power (it was turned on by a button near the microwave). I thought that if I ruined the nest, then I need to add a couple more bells and whistles along the way. The main cable was exposed - 2. I carefully cut it and soldered it (I have all the connections soldered, protection against sparking and fire) there was a wire for the tee, which I decided to install in the same corner. Firstly, for a radio with speakers, so that you can take a shower or bath while listening to your favorite radio (I’ll do it and describe it). Secondly, for a waterproof outlet in the bathroom, where I also have to fix something, I need a point (wire 3 in the picture has already been stretched there). Thirdly, you need a socket for a carrying lamp, which is needed during work in this part of the apartment, so as not to pull power to it from afar. Well, you never know what other device will be needed in this corner, I love the stock, it doesn’t rub my pocket. The plank across the window was forced into place in order to secure the decorative trim on the bathroom side with self-tapping screws.
Waterproof socket 1, found in a trash heap 5 years ago, has finally taken its rightful place. Especially so high so that children or teapots do not receive an electric shock. From the decorative overlay I removed the central part - the blinds that did not allow light to pass through. I replaced it with a piece of plexiglass. Now you don’t need to turn on the light in the bathroom for small needs; this is especially convenient at night, when strong light hurts your eyes from sleep. Well, and some savings. And in our kitchen the lamp is still on during the dark hours of the day, so that we don’t have to feel our way there from the rooms along the corridor. At the same time, it will illuminate the bathroom with gentle light. Using two self-tapping screws - 2 - I securely secured the structure to the plank on the other side.
Homemade fan from a computer cooler
Hello, dear visitors of this site, home-made people and those interested in home-made products. Although it’s still spring and not summer, we need to be well prepared for it. It’s like the proverb says: “Prepare the sleigh in summer and the cart in winter.”
If there is no air conditioner or even a household fan at home, and the summer heat does not allow you to live normally or sit at the computer, you can use your ingenuity, imagination and use any available materials, while making a homemade fan according to your style, desire and desire. In this article I will tell you how to make a USB fan with your own hands from an ordinary old computer cooler and other scrap materials. It will take a little time to make a USB fan from a regular cooler, but you can still easily make such an electrical device with your own hands in an hour.
To make a USB fan with an adjustable angle, I needed:
Tools:
1) Pliers, 2) Hot-melt adhesive, 3) Hot-melt gun, 4) Electrical tape, 5) Scissors, 6) Screwdriver, 7) Marker, Tape measure, 9) Utility knife.
Materials:
1) Two bicycle spokes from wheels, 2) An old computer cooler, 3) USB cable.
The first thing we do is start making stands for our fan.
To do this, mark out the dimensions for the bends on paper.
According to the drawing, we mark the marks on the bicycle spoke with a marker. Break off the excess part with pliers.
Using pliers, we begin to unbend the spoke from the bicycle. We do it step by step using photographs.
Take the second knitting needle and bend it in the same way as the first.
You should get two parts like this.
Now you need to glue them together with a glue gun.
We attach the resulting stand to the computer cooler. To do this you will need the screws of the spokes themselves.
Screw them in with a screwdriver.
The fan will be connected via a USB connector to the computer. This makes it possible to use the fan without third-party power sources. To do this, take the USB cable and clean the wires of both the cooler and the cable.
Examples of making a compressor for a smoke generator with your own hands
When assembling a snail fan with your own hands, it is important to choose the right container and main element, since incorrect power or a small volume of a canister or bottle will lead to malfunction and the need to replace parts.
Self-assembly of the compressor - cheap and practical
In any case, the algorithm of actions is similar:
- A hole is made in the bottom of the container where the fan is attached.
- Another hole is made in the lid through which the device is connected to the smoke generator.
At the same time, there are some peculiarities when working with different containers.
From a plastic bottle
It is possible to use bottles for the snail fan from 2 liters, but the optimal volume is 10 liters. It is more convenient to work with such a capacity and has more functionality.
When making a fan with your own hands, you should take care of sealing all connections and strong fastenings, so for work you will need a glue gun, hardware, as well as rubberized gaskets for effective fixation.
From a plastic or metal canister
The use of canisters when making a supercharger with your own hands is complicated by the need to install a device for adjusting the speed. The resistor is connected using a soldering iron to the power supply. Also, to fix stainless steel or polypropylene tubes, it is better to use a gas wrench, which will make the fastenings more reliable.
A self-assembled snail fan will delight lovers of homemade smoked meats with its operating efficiency and smoking quality.
Products prepared using the cold smoking method will delight even gourmets who prefer food from expensive sous vide restaurants. Food from a home smoker will be so juicy, beautiful and healthy that it will not leave anyone indifferent.
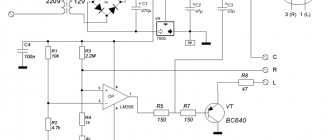
Mini exhaust from a computer cooler
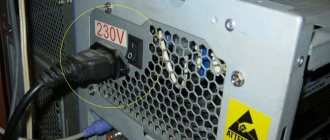
This mini-hood can be used for soldering work, when burning wood, as a hood near an ashtray, etc. To make it, we need a fan cooler (suitable for any size; in this case, let’s look at the example of a mini cooler measuring 60x60 mm), suitable in size cooler, an electrical junction box (preferably square, as it is more resistant to tipping), a power supply with a maximum output voltage of 12 volts (the telephone power supply most often produces 5 volts, from dandies or portable DVD players 9-12 volts; the voltage is indicated on the power supply itself). In this case, I used 9 volts from a broken portable DVD; with it, the cooler will not work at full capacity, since it is designed for 12 volts, but this performance is quite enough. If you want to connect several coolers to one power supply at once, then do not forget about the maximum load for which it is designed (no more than the total load of all coolers, otherwise it will burn out).
First, let's make a hole in the distributor using a wood bit. box. I took a crown slightly smaller than the fan itself.
After this, we strip the ends of the wires of the power supply and cooler (the yellow one is ground, it is not needed) and connect them together in accordance with the color, insulating them with electrical tape.
We check the operation of the cooler and determine the suction side. Using glue, glue the moment cooler to the distributor. box so that the suction side is on the outside. At the distributor boxes most often have three holes for electrical wires. They always have a so-called plug, which can be easily removed with a knife or screwdriver. The bottom two, as you can see in the photo, were useful as legs. On the third, I removed the plug (I first checked the tightness by turning on the cooler and sealed all the gaps in the distribution box housing with tape) and connected an ordinary polymer hose with a diameter of 10 mm that fit perfectly to it, the other end of which led out into the street through the window. Since I often work with a mini-hood on a glazed balcony, the length of the hose was only 1 m. The cooler has enough power. When choosing a cooler and power supply, I advise you to proceed from the future length and diameter of the output hose (there are no exact calculation methods). The larger the cooler size and the output voltage of the power supply, the higher the performance of course. Try to select the smallest possible hose diameter.
Source
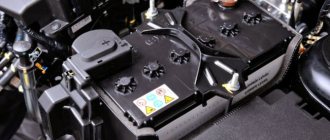
Converting a hard drive cooler into a CPU cooler with your own hands
Introduction
It so happened that when the time came for the next upgrade, I purchased almost all the components anew. And what was left of the existing computer was good old, slightly outdated hardware. And to give it for next to nothing into the predatory hands of buyers... Such a thought seemed blasphemous. And, naturally, there was a desire to build a second computer. For the Internet, photographs, working in Word... But who knows what it can be useful for? Moreover, such a computer does not need outstanding speed results, but it simply must be quiet. And the iron was the following:
- CPU - Barton 2500+
- MB - Asus A7N8
- GP – Radeon 8500
- And the rest is memory, HDD, then this...
I also had two of these things.
Passive cooler for the ZM-NB47J chipset and ZM-2HC2 heatpipe hard drive cooler. This was purchased last summer just to build such a system. I never intended to use the 2HC2 cooler for its intended purpose. It was needed as a source of heat pipes, perhaps a little expensive. But silence requires sacrifice.
Just in case, let me remind you that a heat pipe is a device that has a very high thermal conductivity, many times higher than the thermal conductivity of copper. A lot has been written about heat pipes, and I think there is no need to clutter the article by repeatedly describing the device and the principle of its operation.
By and large, I was only worried about cooling the processor. It was possible to purchase passive cooling for the video card, produced by the same Zalman. There is cooling for the chipset. I also had a power supply with passive cooling.
I made this block from a EuroCase 480W block. An article about this procedure can be found here https://www.overclockers.ru/lab/15862.shtml. This power supply has a slight factory voltage bias towards 5 volts and therefore is not particularly good for my new "war horse". In a new, powerful computer, the processor power circuit is fed from 12 volts. And therefore, the slightly underestimated 12 volts produced by this unit have a bad effect on overclocking, during which the voltage sags even more. And on the Asus A7N8 it’s just the opposite. The processor is powered by 5. And this power supply is perfect.
So, I needed a passive cooler for the processor. Once on the website of a Japanese guy with the supposed nickname Numano, I saw homemade passive coolers on heat pipes similar to those made of 2HC2. Here are some photos taken from this site:
I really liked the devices on this site, and I decided to take these designs as a basis. Its tubes are very similar to the tubes from Zalmanovsky ZM-2HC2. The principle of operation of the cooler is the following - heat from the processor core, which has a small area, is transferred by heat pipes to a large radiator, and is evenly distributed over the entire area of the radiator. The radiator will be cooled by natural air convection. It is extremely difficult to simply install a huge heatsink on the processor, and the speed of heat spread even in copper will not be enough. And it turns out that a small part of the heatsink next to the processor and the processor itself will overheat, while the peripheral areas will remain cold. The speed of heat propagation is not enough. I will arrange the heat pipes in a fan, and they will evenly release heat over the entire area of the radiator.
And I began to disassemble this miracle of science and technology. The tubes were simply inserted into the holes of two aluminum plates and “punched” with some kind of chisel. Having rocked the product a little, I began to remove the tube. At first she didn’t give in, but then she suddenly jumped out. And I hit the wall with my elbow. There was a neat dent in the wall. Having mentioned (badly) Mr. Zalman’s mother, he began to take out the next one, but this time with caution.
After disassembly, I began to try to straighten the tube. This turned out to be surprisingly difficult. The tubes are very hard. I had to make a decent effort. The tube began to unbend with a crunch, and then suddenly broke. I didn't hear any hissing. It seemed that there was no vacuum in the tube. A drop of liquid the size of a match head also flew out of the tube. The liquid did not smell of anything. I didn't taste it. The tube contains a wick made of woven thin brass wires.
I ordered the heat sink from the factory, although I could have made it myself if I wanted. Nothing complicated. Take two copper plates measuring 50 by 50 millimeters. And five millimeters thick. Tighten them with screws and drill four holes with a diameter of 5 millimeters. Drilling more holes, in my opinion, is pointless. The size of the processor core is small and the outer tubes will be of little use.
To transfer heat from the heat pipes to the radiator, I decided to adapt two aluminum plates remaining after disassembly.
Having assembled this design using KPT-8 thermal paste to improve heat transfer, I began to try the product into the case.
I cut out the fasteners for the heat sink to the socket using metal scissors, from a piece of perforated steel left over from the power supply case. To dissipate heat, I used two radiators measuring 150 by 50 by 60 mm. Of course, they are too small to dissipate the heat from the Barton 2500+ at the nominal frequency, much less overclocked. But for testing and for working at a lower frequency they are quite suitable. Moreover, if the experiment is successful, I can buy a larger radiator. In one radio store I saw a radiator almost the size of the side wall of a midtower, but it was also quite expensive. I considered it reckless to buy it for an experiment that ended unknown.
I screwed the radiators through the same irreplaceable KPT-8.
I mount it in the case.
I connect the monitor, keyboard... And with a firm overclocker’s hand I turn on the power.
The operating system booted... after a few minutes the computer froze, after which it beeped and shut down. This is, I’m not afraid of this word, an embarrassment. I had to reboot and look at the processor temperature in the BIOS. And the temperature turned out to be above 80 degrees according to the sub-socket sensor and continued to rise. What a surprise. I had to immediately turn off the computer. When the system unit cooled down, I turned on the computer again and began to observe the increase in processor temperature from the BIOS. In a matter of minutes the temperature rose again to 80 degrees. The heat pipes heated up only a couple of centimeters near the heat sink, and above were absolutely cold. There was a complete feeling that the tubes did not transmit heat at all! How can that be, I checked them. One end of the tube was lowered into a glass of hot water and after a second the other end heated up. Compared with a regular copper tube of the same diameter. The other end didn't heat up at all. The water in the glass cooled faster. What's the matter?
And then I immediately remembered the letter that Mortis recently wrote to me.
Here is a quote from this letter:
«I tried to make a design similar to CoolerMaster’s (in my opinion) - two ordinary radiators connected by fins to each other. First this option (tubes with thermal paste)
Then this (the tubes are sealed with Wood's alloy).
The result in both cases is the same, i.e. The thermal interface seems to have nothing to do with it. What happens is this: only the lower radiator heats up to 50 degrees, then the tubes heat up (but do not transmit anything - the upper radiator is cold) and only when it is no longer possible to hold your finger on the tubes does the upper one begin to heat up. By this time, the processor is already about 90 degrees, of course. If you turn on the fans, the top radiator remains cold.
- In the latest series of these tubes, Zalman could well have changed the fluid; I took mine more than a year ago.
- I could have been let down by soldering or drilling errors.
- Perhaps it matters how deep the tubes go into the radiator, i.e. contact area. The U-shaped ones, which I have on my MTX video card, work at their best - there they go right through the entire base of the radiator. Or just a different refrigerant?
»
The second is the same case. What's the matter anyway? In the tubes? Or is the Japanese a liar? But the tubes outside the cooler work. After analyzing the situation again, I came to the conclusion that Mortis was right after all. The point is the depth of immersion of the tubes into the heat sink. But in order to immerse the tubes deeper into the heat sink, they must be bent. How can you do this if they are so fragile? I thought and wondered, and as a result of such a budgetary decision, showing remarkable perseverance and miracles of willpower, I finally straightened the tubes. Although at the same time I broke another one.
In order not to crush or puncture the tube, I folded the newspaper several times and, very carefully, straightened it through it with pliers. Very slowly, little by little, along the entire bend radius. Now I was able to place the tubes deeper into the copper heat sink.
And I “squeezed” the tubes on both sides with two radiators. Like Numano.
I install the second version of the cooler into the case and, not so arrogantly and arrogantly, and I would even say modestly, turn it on. And immediately into the BIOS.
Just in case, I lower the processor frequency to 1100 MHz. And I look at the processor temperature as if fascinated. After half an hour it stopped at 35 degrees. And it didn’t increase any more. I felt the tubes and made sure they were evenly warm. It's working! Now you can boot Windows and test the resulting cooler. To warm up the processor, out of habit, I turned on 3DMark03. Although perhaps this is not very correct. And I played it for an hour.
The processor temperature (according to the sub-socket sensor, looked in the BIOS) rose to 52 degrees, at room temperature 25. A bit too much, but within normal limits. True, at a lower frequency. But I installed obviously small radiators. And they get pretty warm.
Well, it's time to draw conclusions. The radiators have clearly insufficient surface area. I tried blowing them with a fan - the temperature immediately dropped. By experimenting with blowing, I confirmed the hypothesis that there is not enough surface area. If it were the tubes, the temperature would not change. The purpose of the article and experiments was to confirm the possibility of manufacturing a fanless cooler based on heat pipes from ZM-2HC2 at home. It seems to me that this was a success. And that’s why I didn’t bother with the airflow of the resulting cooler. Now you can leave the product “as is” and use, as mentioned above, a computer for the Internet and working in Word. But you can still go broke, buy a large radiator and use it in nominal mode, or maybe overclock it...
Alexander Udalov aka Clear66 udalov777 (a) rambler.ru 01/03.2005
DIY tags cooler