Types of pits
Before constructing a pit, it is necessary to consider its main types. Today, the criteria by which pits are classified into separate subtypes are known. You should familiarize yourself with them:
- the need for corner fastenings;
- the number of slopes or their absence;
- the presence of inclined walls of a trench or pit.
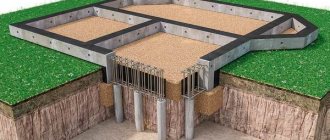
The last factor is determined by the base, which can be slab or strip. If it is planned to build a strip foundation on the site, then the foundation pit will look like a trench located around the perimeter and in those places where there will be load-bearing walls.
If you are planning to build a slab foundation with a basement, then the pit should be located around the perimeter of the house and in the place where the basement will be located. Before starting work, it is necessary to carry out excavation work, they include:
- determination of soil type;
- conducting building analysis;
- performing calculations of pit depth;
- analysis of the climatic state of the region.
The soil type is determined by special expertise. This stage is mandatory, because with its help you can determine the depth of the foundation, which will ensure the reliability and strength of the building during operation. You can also carry out an analysis of the building that will be built on the site. It is necessary to know the weight of the building, as well as the load on the foundation. It is important to provide for the smallest details, right down to the finishing materials of floors, walls and roofing.
Drainage of water from the pit
To lower the groundwater level, you will need to drain the water before digging a pit. Surface water may appear on the site:
- during precipitation;
- from neighboring areas.
To prevent water from appearing on your site from a neighboring territory, you need to equip a high-water tide to intercept it. The drainage size must be at least 0.5 by 0.5 m.
We recommend: Little secrets and nuances when clearing for construction. Cutting down trees on your own property
If there is heavy watering at the construction site, it is necessary to make an open or closed drainage system . The open type is effective if the water depth is reduced by 0.4 m. To do this, it is enough to dig a ditch 0.7 m deep. Sand and gravel should be placed at the bottom of the ditch.
Closed drainage is done with a slope to the side. Perforated pipes are laid at its bottom.
We recommend reading: DIY water well
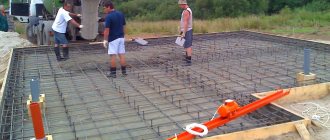
Pit development
Before constructing a pit, it is being excavated. If you plan to do the work yourself, you will need a lot of time, patience and effort. But this will save money. Work should begin with determining the depth of the pit. In order to find out what the volume of the pit will be, you need to use the formula v = n/6 (2a + a1) in + (2a1 + a) in1. The height of the pit is determined by the letter n, while the dimensions of the sides are a and b. The length of the pit along the upper part is a1 and b1. But the slope coefficient is denoted by the letter t.
Once it is possible to determine the volume of the pit, it is necessary to calculate the volume of backfill. To do this, the total volume is subtracted from the volume of the pit. The depth can be determined by the soil, and not by the rough mark. Before excavating the soil, you should determine the depth at which the digging will be carried out. This value is determined by the composition of the soil and the load from the house itself. To determine the pressure of a building on the foundation, use the formula a = f/a (mn/m*m). In this case, the load from the building will be divided by the area of the lower part of the base. Once the dimensions of the pit have been determined, you can begin to dig it.
Digging process
The construction of the pit is carried out according to a certain algorithm. At the first stage, the area is prepared, the top layer is removed from it, and it is necessary to go deeper by about 40 cm. If there is additional moisture, it should be removed from the area.
Special supports in the form of bars will prevent soil from sliding along the walls of the pit when soil is removed to a given depth. This is true for 125 cm. If this value increases to 500 cm, then steps are built in the pit, and their depth is determined by specialists.
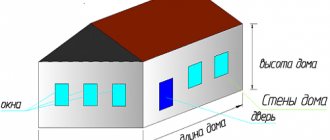
Shape and dimensions of the foundation pit
The shape of the pit directly depends on the foundation of the building.
rectangular pit for a private house a trench under the strip foundation .
A well is made for a columnar foundation using special equipment.
But the width and depth of the pit is determined depending on the location of groundwater and post freezing.
The sole of the base must be immersed 40 cm lower than the freezing depth of the soil. As for groundwater, the pit should be located above it.
When calculating the size of the pit for the foundation, you should adhere to the basic rules: the width and length of the foundation should be 30-40 cm larger than the facade of the building.
The durability and reliability of the building directly depends on the quality of the foundation. Therefore, when laying it, it is necessary to comply with all norms and standards.
We recommend: How to choose the right tires
Experienced specialists should be familiar with the technology of digging a pit. If you do not have experience in this field of construction, be sure to contact a professional. For a high-quality foundation, you will need to hire several experienced specialists. They will take a soil sample and determine its type and characteristics using special expertise .
Attention: it is advisable to conduct a soil examination before purchasing a plot.
And most people make mistakes at this stage. Therefore, in the future they are faced with the need to sell a plot that is not suitable for construction.
After a successful examination of the soil sample, you can begin work:
- First, the top layer of soil on which the vegetation is located is removed. This layer must be removed throughout the entire territory of the future building.
- For the blind area, it is worth capturing one meter on each side.
The height of the plant layer should not exceed 30 cm. But if the height of the fertile layer on the site is less, then the height of the removed layer should be less. There is no point in throwing away this land . It can be placed in the area where you will plant crops.
The next stage will be the development of soil, which will then need to be removed from the site. It is recommended to remove soil immediately and not postpone it until later. Since it will take up a lot of space on the site. To remove soil, you will need to hire special equipment .
As for the pit-digging technology itself, this process can be performed manually or using heavy equipment. Excavation work when digging a pit is divided into the following stages:
- Preparatory process.
- Digging a pit, this process includes:
- calculation of the size and volume of work;
- soil development by hand or with an excavator (excavation and backfilling);
- water drainage;
- finishing the pit manually.
Strip and column foundations can be dug by hand. This will take more time, but will cost much less than renting special equipment. Also, the manual method of digging a foundation pit is used in those areas where it is not possible to organize access for special equipment.
Digging pits with an excavator is carried out quickly and efficiently. If you hire several dump trucks together with an excavator to remove soil, the work will go even faster. Which excavator to choose, tracked or wheeled, depends on the structure of the soil. If you need to dig a deep pit. then its walls may collapse. Therefore, it is necessary to take measures in advance to prevent soil sliding .
Detailed consideration of excavation technology
Construction of a pit is a rather complex process. One person is not enough to accomplish it. Work in the depths of the earth is highly complex, because it is necessary to take measures to prevent the soil from sliding. At the first stage, the fertile soil layer is removed, because it is highly biologically active and cannot act as a load-bearing foundation. From time to time it changes in volume, so it cannot serve as a reliable basis for the foundation of a building.
To remove this layer, it is recommended to use special equipment or ordinary tools. The choice of the final option will depend on material capabilities. The construction of a foundation pit will require excavation of soil over the entire area of the house if the building has a basement. In this case, special equipment is required.
Excavation is carried out gradually, and construction equipment is installed 80 cm from the beginning of the foundation. The soil should be located near the equipment. If the construction of a foundation pit does not provide for a basement, then a strip foundation will be sufficient. Such work is cheaper than those involving the installation of a slab foundation.
Excavation
Excavation work is carried out in several stages.
Firstly, a cut of fertile soil is made and poured into a separate dump for further use when laying out lawns or constructing vegetable beds.
Secondly, a layer of loose continental soil is removed. It is not suitable for subsequent use, therefore, as a rule, it is taken away from the construction site.
The next step is the development of dense layers of earth, which are loaded along the perimeter of the excavation from 2-3 sides. This is a material for backfilling the base of the foundation and the resulting cavities after concreting is completed. Re-check the elevations using a level and a staff.
Afterwards, the bottom is manually cleared of loose soil, compacted using a vibrating plate, and a layer of leveling material is laid, preferably crushed stone.
An important point is the leveling and strengthening of slopes. The need for these measures directly depends on the degree of soil density and the so-called collapse prism. Loams, clayey and loess deposits make it possible to create almost vertical slopes with a steepness of 75–90⁰. But in wet or sandy soils, the angle of inclination can be 45⁰. The walls of the pit are secured using wooden or metal racks, spacers, and boards.
The most suitable time for digging a pit is the first half of summer. During this period, groundwater recedes to depth and will not interfere with work. In rainy regions, you must remember to prepare a pit for collecting precipitation.
Digging Features
Digging a pit is carried out with extreme caution. If the soil consists of gravel and sand, then the minimum backfill should be 100 cm. You will have to go 125 cm deeper if you work with sandy loam soil. Clay and loams require a deepening of 150 cm. Dense soil requires a deeper foundation, which is laid at 2 m.
In order to prevent soil shedding, it is necessary to provide a slope on the walls. If the height of the foundation walls is approximately 150 cm, then the following values must be applied. When work is carried out on sandy soil, the slope should be 60°. With a soil slope of 45°, the ratio will be one to one. Sometimes the development and construction of a pit involves working on soil with a large amount of sandy loam. In this case, the slope reaches 75°, and the ratio will be 1 to 1/4. When you have to work with clay soil or one that has high hardness, the ratio will be 1 to 0 with a slope of 90°.
Before starting pouring, to prevent the soil from sliding, it is necessary to use wooden supports. It's very easy to build them yourself. It is important to consider the process of filling the sinuses. It is important because it is carried out with minimal soil pressure. Backfilling is carried out gradually, while the material is well compacted. The optimal thickness of each layer when backfilling is 20 cm. Soil compaction should be done manually.
The blind area should be made from the beginning of compaction. It is important to take care of the presence of waterproofing of the pit, which is done even before the installation of the formwork begins. For this, roofing felt or asbestos-cement material is usually used.
Recommendations for constructing a pit
The technology for constructing pits may involve deepening the base by 3 m or more. In this case, a special steel fence is installed, its diameter should be 30 cm. When the depth reaches 6 m, a special underground wall is required, its thickness should be 60 cm. When the depth exceeds 7 m, the wall thickness should reach 1 m.
The construction of the bottom of the pit involves its compaction if the soil is soft enough. To do this, fill a cushion of pebbles or crushed stone. The walls will gain additional strength. When the soil has high humidity, workers must ensure there is drainage in the form of a layer of crushed stone. It is also necessary to pay attention to the reliability of slope angles and parts. A support is installed from the initial part of the base of the pit. The struts should be reliably strengthened.
In order to prevent slipping and ensure fixation of the struts, you need to use strapping beams or staples. The construction of trenches and pits, which will be buried more than 5 m, involves carrying out work to protect the walls from crumbling. To do this, brackets are installed, and to secure the structure, a strapping beam is used, secured to the walls with the help of plates and bolts. This also eliminates soil shrinkage.
Anchor ties allow you to fix the pit, which is made during the construction of the foundation of a building with a basement. The anchors must be located at the double height of the slopes. The steepness of the slope is determined by the depth of the foundation and the type of soil. For example, if during the construction of a building on bulk soil a pit is built 150 cm deep, then the lower section of the slope should be one meter from the walls of the pit.
The degree of steepness will depend on the depth of the foundation and the type of soil. The most suitable value of this indicator is the limit from 25 to 60°. The volume of excavation work depends on the increase in the angle of slope arrangement. The higher the slope angle, the more funds will be required for excavation work. It is better to construct pits in summer or autumn. In this case, the soil moisture level will be minimal.
A pit dug in winter has a higher cost, as does the construction of a foundation. In spring or late autumn, the groundwater level is at its highest, so these periods are not suitable for digging work.
Open method for constructing deep pits
The open-pit construction technology consists of constructing a pit to full depth, followed by the construction of structures for the underground part of a building or structure in the usual bottom-up manner (see Fig. 1.).
The open-pit pit construction technology consists of the following main stages:
- Fencing device.
- Tiered excavation of soil in a pit with the installation of fastenings for the pit fencing, if necessary.
- The erection of a building or structure itself.
Fig.1.
Open method of constructing a pit: 1 - fencing the pit; 2 – spacers; 3 – building under construction. The following are used to fasten the vertical walls of the pit:
- spacer fastenings,
- strut fastenings,
- anchors
- cantilever embedding into the ground
- combined options.
Spacer fastening of the pit fencing (see Fig. 2.) consists of installing a horizontal structure in one or several tiers that absorb horizontal loads from the pit fencing. The spacer elements are made mainly of metal, and a metal or reinforced concrete distribution belt is installed at the junction points between the spacers and the fence, so that a concentrated load is not transferred to the fence. Horizontal spacer structures are mainly used as temporary structures for the period of construction with subsequent dismantling, but can also be included in the reinforced concrete floors of underground parts of buildings or structures. The disadvantages of the spacer method include the complexity of soil development (spacers interfere with construction equipment) and the limited width of the pit (high material consumption).
Fig.2. Spacer fastening of the pit fencing: 1 – pit fencing, 2 – spacers
Strut fastening is used to fasten the fencing of the walls of wide pits to reduce material consumption. The struts can be installed in one or several rows. The disadvantages of struts include the difficulty of excavating soil near the struts.
The most convenient fastening of the pit fencing when excavating soil is anchoring into the ground (see Fig. 3.). Ground anchors perceive loads from enclosing structures and transfer them to the soil mass as pulling forces. Ground anchors can be either temporary (for the construction period) or permanent (part of the enclosing structure for the entire period of operation).
Fig.3. Anchor fastening of the pit fencing: 1 – pit fencing, 2 – anchors
Advantages of using ground anchors:
- does not interfere with soil development;
- the ability to develop pits without restrictions on width;
- lower material consumption compared to spacer structures.
However, there are significant disadvantages to using ground anchors in dense urban environments:
- the difficulty of performing geotechnical surveys beyond the boundaries of the construction site, under existing buildings and the prohibition of owners of existing buildings from using anchors under buildings;
- the close location of utilities and foundations of neighboring buildings, which makes it difficult to install high-quality anchors;
Cantilever embedding into the ground is used in shallow pits and when it is impossible to install spacer, strut and anchor fasteners. Embedding into the ground is carried out directly by the enclosing wall of the pit, as well as by installing additional piles that will take part or all of the horizontal load (allows you to reduce the cross-section and immersion depth of the enclosing wall).
It is also possible to use the “jet-grouting” technology , with the help of which a slab is created along the bottom of the pit, which plays the role of a spacer structure and an anti-filtration curtain. The installation of the “jet-grouting” slab is carried out before the start of soil development in the pit by injecting cement mortar under high pressure to the required depth, resulting in the formation of a horizontal slab of secant soil-cement columns (see Fig. 4.).
Fig.4. “Jet-grouting” slab: 1 – pit fencing, 2 – “jet-grouting” slab
Fig.4. “Jet-grouting” slab: 1 – pit fencing, 2 – “jet-grouting” slab
Semi-closed method of constructing deep pits
Combined method for constructing deep pits
Composition of POS according to post. 87
List of used literature:
- Knaupe V. Construction of pits and water reduction
- Tetior A.N., Loginov V.F. Design and construction of underground buildings and structures.
- Guidelines for the integrated development of underground space in large cities, Moskomarkhitektura, 2004..
- Kartozia B.A., Fedunets B.I. , Shuplik M.N. and others. Mine and underground construction.
- Petrukhin V.P., Kolybin I.V., Razvodovsky D.E. Enclosing structures of pits, methods of construction of underground and buried structures
Typical flow chart for working on a pit
The specification specification for the construction of a pit is drawn up at the time of designing the building. If work is carried out in wet soils of the second group, then the depth can be equal to the limit from 2.5 to 9.1 m. It is better to carry out work in the summer. When drawing up a layout drawing, it is necessary to mark the bottom of the pit. The drawing data is transferred to the cover, which contains pillars firmly buried in the ground. Boards are nailed to them, installed on the edge from the outside.
When laying out a pit for large foundations, a contour is determined on the ground and cast-offs are installed at the corners. A wire is stretched between opposite castoffs. The cast-offs indicate the depth of the pit. Before digging a trench or pit with slopes, stakes are installed from the axis and along the edges.
If you use a single-bucket excavator, productivity will decrease as soil density increases. It also depends on the method of soil development. This indicator is also influenced by the capacity of the bucket. The performance of the excavator increases if the boom angle is reduced.
The excavator must be located in a working area called the face. Its shape and geometric dimensions will depend on the equipment and parameters, as well as the types of transport and the size of the excavation. The construction of pits in soils that have high humidity requires the location of vehicles and an excavator in such a way that the average angle of rotation of the equipment from the point of filling the bucket to the place of unloading is minimal. This requirement is due to the fact that approximately 70% of the cycle time is spent turning the boom.
Features of fastening pits
The construction and fastening of pits is mandatory if the depth of the foundation for coarse soil is more than 1 m. For high-density soils, this parameter is 2 m. If the above depth is not exceeded, but the work is carried out in moisture-saturated soil with a high groundwater level, then Strengthening the pit in the area of slopes is mandatory.
Today, there are two known methods for strengthening slopes, the first involves the creation of enclosing sheet piling structures, while the second involves separate strengthening with cementation of the walls. For fastening, not only tongues and pipes are used, but also pipes. The most reliable method is cementation of slopes, but this method has one important drawback, which is expressed in high cost.
The method is used in cases where neighboring buildings are located too close to eliminate vibration effects. For this purpose, you can also use drilling and immersion of sheet piling piles. This method minimizes vibration when the supports are immersed. To strengthen slopes, in some cases, using sheet piles is more practical than cementation. This is because the sheet piles can be removed and reused after the job is completed.
Fastening the pit walls
Fastening of vertical walls is carried out during the construction of pits in loose and water-saturated soils. The fastening not only protects against the collapse of the excavation walls, but also prevents the soil from shifting under the weight of neighboring buildings, and protects their foundations from deformation.
The following wall strengthening technologies are used:
- Sheet piling is a sheet piling fencing of a pit made of rolled metal: from pipes, with or without a pick-up from a board,
- rolled profile, with or without pick-up,
- specialized Larsen tongue and groove.
- drilled tangential and drilled secant piles,
All of the above technologies are applied before digging a pit. The fencing is deepened along the perimeter of the excavation strictly in accordance with the technological map. Under certain conditions, preliminary drilling of wells is carried out: ensuring vertical immersion, reducing vibration effects through the soil on the bases of nearby structures during driving.
Sheet piling fencing made of pipes with a rolled metal band
The most resource-saving method is immersion of sheet piles from pipes. This material is cheap and has high turnover, that is, the possibility of repeated use. Pipe driving is carried out by driving with a pile driver with a diesel hammer or a hydraulic pile driver, as well as using a vibratory loader. An alternative method is immersion using a pile drilling rig using the push-in and screw-in method.
Picking up is carried out in case of critical spillage of rock between the sheet piles, from a board 40-50 mm thick.
Larsen sheet pile fencing
If water reduction measures are necessary, sheet piling made from Larsen sheet piles is used. Each of these tongues has a trough-shaped strong profile and locking grooves for rigid connection with each other. In this way, you can form a strong and airtight wall of any length. Immersion is carried out by driving or vibration immersion. Larsen sheet pile, as well as pipes and rolled profiles, are usually removed after completion of construction, backfilling, and reused at other sites. Sometimes it is not removed, and then the fence is made from a special profile that is left behind.
Fastening the walls of the pit with reinforced concrete structures ensures high mechanical and waterproofing properties of the future foundation of the structures. They can also serve as the foundation and at the same time the walls of the underground part of the building.
Fastening the pit walls with secant piles and ground anchors
Drilled tangential and drilled secant piles are made by drilling, reinforcement and concreting with a diameter of 400 to 1500 mm and a depth of up to 45 m. First, a foreshaft is prepared along the perimeter of the pit - a small reinforced conductor trench. Odd-numbered wells are drilled in it with a step of 0.9 diameters between the lateral edges of the wells. Fill with concrete mixture. By the time they start drilling even-numbered wells, the concrete has already set and the drilling rig’s auger cuts two adjacent odd-numbered piles, making a well for the even-numbered one between them. Then a pre-prepared reinforcing frame, welded from a special reinforcing rod and wire, is immersed in the well and concreted. As a result, after the concrete hardens, a very strong monolithic reinforced concrete wall is obtained. At the next stage, a pit is dug with a ready-made reinforced concrete wall.
Technological diagram of the construction of a wall in the ground, and the subsequent development of a pit
The “Wall in the Ground” technology provides high-strength fencing and fastening of pit walls with a thickness of 300 to 1200 mm, and a depth of up to 60 m. Complex special equipment is used - a grab installation. The grab is a narrow, wall-width, two-bucket earth-moving tool, immersed in the ground on a rigid rod or suspension, with a hydraulic or pulley drive. The trench being developed is protected from collapse with a clay bentonite solution. Upon reaching the design depth, the reinforced frame is immersed in it and concrete is poured, which displaces the clay solution, which in turn is collected in a reserve tank for further use. Development is carried out in sections (occupations) one at a time. In the second phase, the intermediate claws are torn apart and a monolithic wall is obtained. After the concrete gains strength, you can dig a pit.
Features of the foundation structure
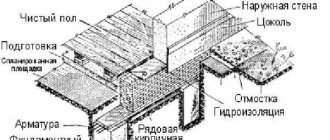
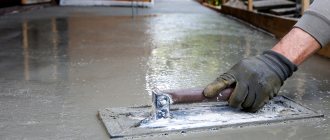
The construction of the pit (SNiP 3.02.01-87 regulates this process) after completion of this stage involves laying the foundation. If we are talking about a strip structure, then a cushion is placed at the bottom of the pit, which will ensure the reliability, durability and strength of the building. It is used as broken brick, crushed stone or sand. You can also use a gravel bed. Its thickness is 200 mm or more.
If we are talking about sand, then cold water is used to compact it. Crushed stone or broken bricks are laid on top. The top layer of the pillow should be as smooth as possible; to check this characteristic, you need to use a level. When laying a cushion, you must provide waterproofing so that when the concrete hardens, moisture is retained for as long as possible.
The construction of the foundation in the pit at the next stage involves installing formwork and pouring concrete. However, first you need to carry out reinforcement. The formwork is made of boards or metal profiles. You can use any available means, the main thing is that the surface from the inside is smooth, because this will affect the appearance of the concrete structure.
At this stage, openings are provided, for example, for water supply, ventilation and sewerage. To do this, pipes of the appropriate diameter are installed in the indicated places before pouring. Pouring concrete acts as the final stage. For this, a solution is prepared from cement, crushed stone and sand. Recommended proportions: 1: 3: 3.